Install the Silicom Bypass Driver on ESXi 5.5 and 6.0
If your ESX/ESXi server has a Silicom network interface card (NIC), you must install the Silicom bypass driver.
- Enable SSH on your ESX system.
- Enable SSH through the CLICommnad line interface
- In the
/etc/ssh/sshd_configmodify the following variable:PermitRootLogin yes - Restart the sshd service:
# service sshd restart
- Enable local or remote TSM from the Direct Console User Interface (DCUI)
- At the DCUI of the ESXi host, press F2 and provide credentials when prompted.
- Scroll to Troubleshooting Options, and press Enter.
- If you want to enable local TSM, select Local Tech Support and press Enter once. This allows users to login on the virtual console of the ESXi host.
- If you want to enable remote TSM, select Remote Tech Support (SSH) and press Enter once. This allows users to login via SSH on the virtual console of the ESXi host.
RECOMMENDATION
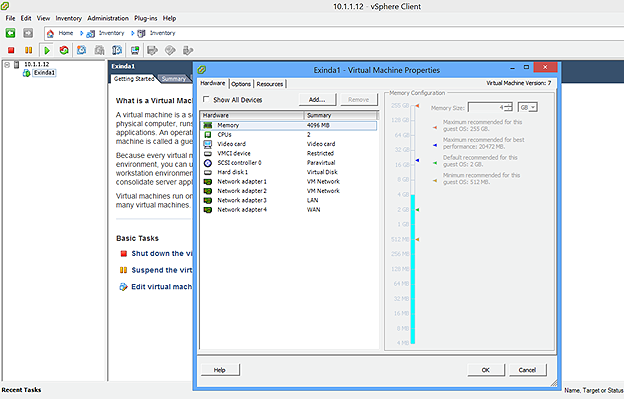
Have your virtual Exinda already installed with the number of interfaces already set, keep it turned off, we will work with it later.
- Query the existing VIBs. Make sure you are in maintenance mode:
# vim-cmd /hostsvc/maintenance_mode_enter
NOTE
If the VIB you are deploying exist, you must first remove the existing VIB.
- Run the following command to determine if any of the existing VIBs match the VIB you are deploying:
# esxcli software vib list | grep bpvm
NOTE
If there are no matches with your VIB, skip the next step.
- If necessary, remove the existing VIB.
# esxcli software vib remove -n net-bpvm
# reboot
- Download the Silicom Driver for ESXi 5.1, 5.5 and 6.0 from: https://updates.exinda.com/exos/virtual/vmware/bypass/5.1-5.5-6.0/net-bpvm-2.0.1.15-1OEM.510.0.0.802205.x86_64.vib
- Copy the driver into the ESX system with SCP or SFTP, drop it on the /tmp directory:
# scp net-bpvm-2.0.1.15-1OEM.510.0.0.802205.x86_64.vib root@<esx-serverip>:/tmp - Deploy the VIB on the ESX system:
# esxcli software vib install -v /tmp/net-bpvm-2.0.1.15-1OEM.510.0.0.802205.x86_64.vib --no-sig-check
NOTE
Ensure that you specify the full path to the .vib file.
- Reboot the appliance:
# reboot - When the ESXI server comes back, verify that a new network adapter named “bpvm0” is listed under Configuration > Network Adapters:

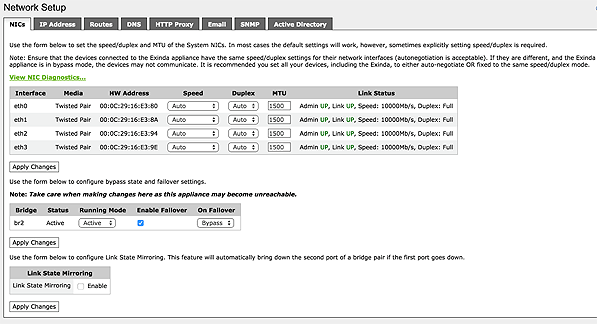
NOTE
ge interfaces of the silicom card will now show up with the following duplex/speed settings if disconnected:

- Create two standalone vSwitches, and assign the LANLocal area network interface of the bridge to one of them and the WANWide Area Network interface of the bridge to the other. (Configure both standalone switches with Promiscous Mode and as accepting all VLANs (4065).
- Look around in the Configuration > Networking configuration to see if the bvpm0 adapter is already attached to a standalone vSwitch that is not one of the ones created in the previous two steps. If that is the case, simply disconnect that bvpm0 adapter from it and assign it to the vSwitch that is currently connected to the LAN interface of the virtual Exinda by using the following command:
# esxcfg-vswitch -L bpvm0 vSwitch <NUMBER>
NOTE
It is possible that the above command could fail saying that the bpvm0 uplink already exists or that the device is busy. If this happens, reboot the ESXi server one more time with the reboot command.
- Connect the physical interfaces of the bridge to its peers (usually to the core switch and to the router/firewall).
- Exit maintenance mode (You can right click the name of the ESXi server for this purpose).
- Turn the Exinda ON
When the Exinda Appliancecomes back, you should see the bypass capability available and the duplex/speed negotiations pointing to the right values. One vSwitch should have both the LAN interface of the bridge and the bpvm0 driver while the other vSwitch will have the WAN interface of the bridge, refer to the below pictures (In the below example, the virtual exinda is configured with 4 interfaces, the first two are standalone interfaces while the last two are for bridging purposes):
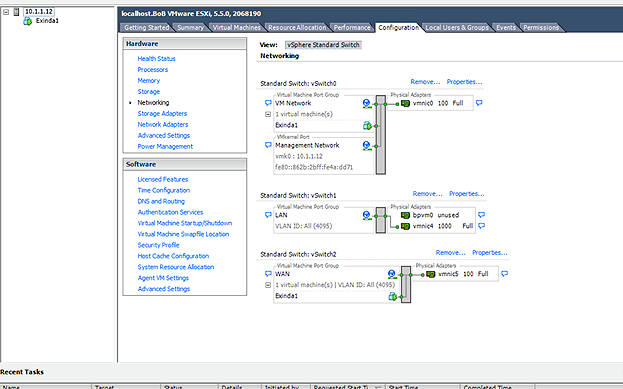
NOTE
From ESXI v6.0, it is possible that after assigning the bpvm0 driver to the “LAN” switch, the driver will not show up as a Physical Adapter (unused) as in the above screenshot. if this is the case, you can continue”