NIC configuration
The NIC settings page is used to set the speed, duplex, and MTUMaximum Transmission Unit of the System NICs, to set the behavior of the bridges in the event of an appliance failure (for example, fail to wire), and to set the behavior of the second port in a bridge pair when the first port goes down (for example, link state mirroring).
Interface Settings
You need the Exinda appliance and devices that are connected to the appliance to have the same speed and duplex settings for their network interfaces. In most cases the default settings will work as the Exinda is setup to auto-negotiate. However, some equipment is not compatible with this.
If the appliance and connected devices are using different speeds and duplex settings, the devices may not communicate and traffic may be dropped. In this case, you may notice collisions, errors, packet loss, and network delays on the Exinda NICs, which will cause the System health status to show as "Warning" and the offending interface(s) will be highlighted.
To resolve this, check if the router or switch is hard-coded to a speed or duplex setting. If hard-coded, then either set all devices to auto-negotiate or set the Exinda device to the same speed and duplex mode.
NOTE
For further troubleshooting, click on the system warning or view the NIC Diagnostics by clicking on the View NIC Diagnostics link.

Set and view the speed, duplex, MTU of NIC interfaces
Fail to Wire (bypass)
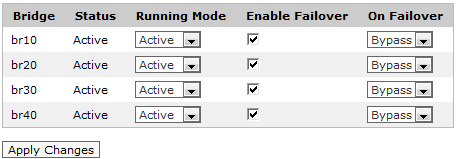
The Fail to Wire (bypass) settings control the behaviour of the Exinda appliance bridges in the event of failure, power outage or reboot. Depending on the hardware appliance and the type of interface cards installed, fail to wire or bypass settings may be configured globally or per bridge.

Independently controllable bypass bridges

Globally controllable bypass bridges
Link State Mirroring
With link state mirroring, the Exinda appliance will bring down the second port of a bridge if the first port goes down. This feature allows the Exinda appliance to sit between a WANWide Area Network router and a switch without blocking detection of switch outages by the router. This is a global setting that is applied to all enabled bridges.

Configure link state mirroring
Go to Configuration > System > Network > NICs.
- In the interface table, you will see:
- Interface - Each interface corresponds to a physical port. (e.g. eth1, eth2)
- Media - Indicates the interface media. The options are Twisted pair or Fibre.
- HW Address - Indicates the MACMedia Access Control address of the interface.
- Specify the Speed and Duplex at which the Exinda will negotiate with neighboring equipment. Use Auto speed to allow the Exinda appliance to auto-negotiate the speed with neighboring equipment. Use Auto duplex to allow the Exinda appliance to auto-negotiate the duplex with neighboring equipment.
- Specify the MTU (maximum transmission unit) size in bytes.
- View the Link Status.The link status shows whether the interface is up/down, the link is up/down, as well as the speed/duplex that has been negotiated with the neighboring equipment.
- Click Apply Changes.
- For each bridge, check the Enable Failover checkbox and set the On Failover status. On failover, the bridge will be automatically moved to the specified mode.
- Bypass - The traffic passes through the Exinda appliance but is not intercepted or manipulated.
- No-link - The bridge interfaces are forced to link state down (as if the cables are not plugged into the interfaces).
- Click Apply Changes.
- For each bridge, you will see:
- Bridge - The name of the bridge. Where available, bridges can be controlled independently; otherwise they will be controlled globally.
- Status - The current status of the bridge.
- Specify the Running Mode of the bridge.
- Active - The bridge is active and traffic is being intercepted by the Exinda appliance.
- Bypass - The traffic passes through the Exinda appliance but is not intercepted or manipulated.
- No-link - The bridge interfaces are forced to link state down (as if the cables are not plugged into the interfaces).
- Click Apply Changes.
In the Link State Mirroring section, check the Enable checkbox.