Creating user accounts in Kerio Connect
In Kerio Connect, user accounts represent physical email boxes.
With user accounts you:
- Authenticate users to their accounts (mail, calendar etc.).
- Set access rights to Kerio Connect administration. For more information refer to Setting access rights in Kerio Connect.
Manage users in the administration interface in Accounts > Users.

Users
Creating user accounts
You can create either local users or map existing users from a directory service.
Accounts must belong to a domain. Each domain may include both local and mapped users. The number of accounts is limited only by your license.
Local accounts can also be imported to Kerio Connect. For more information refer to Importing users in Kerio Connect.
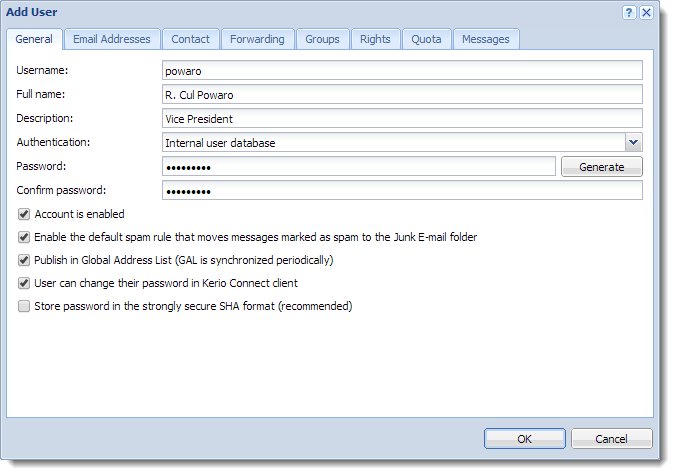
Creating local accounts
You can create and manage local accounts in the Kerio Connect administration interface.
- Go to Accounts > Users and select a domain for the new account.
- Click Add > Add Local User You can also use a template.
- On the General tab, type a new username and password for the user. The domain may require a secure password. (For more information refer to Password policy in Kerio Connect.)
NOTE
Usernames are not case-sensitive and cannot include spaces and special characters.
- Click OK.
Adding users
The users are displayed in section Accounts > Users.
Additional configuration
For each user account, you can:
- Create email address aliases.
- Forward messages to another mailbox within or outside Kerio Connect.
- Add the user to groups.
- Set space quotas.
- Configure access rights to the administration interface.
- Manage account limits (message count, sending outgoing messages, etc.)
- Maintain accounts (for example, message clean-out)
- Restrict access to services
- Add personal and contact information
NOTE
If you store user passwords in the SHA format, use appropriate security policy.
Mapping accounts from a directory service
To add users from a directory service, you must:
- Connect Kerio Connect to a directory service
- Activate users in the administration interface
To activate users:
- Go to section Accounts > Users and select a domain for the account.
- Click Add > Add From a Directory Service.
- Select users you want to map to Kerio Connect. You can add users later.
- Click Next.
- Click Finish.
The users are displayed in section Accounts > Users.
Templates
If you plan to create multiple local accounts with similar settings, create a template:
- In the administration interface, go to Configuration > Definitions > User Templates.
- Type a name for the template and specify all settings common for all users.
- Save the settings.
- In section Accounts > Users, click Add > Use Template and complete the user settings.
Disabling and deleting user accounts
You can temporarily disable user accounts or delete user accounts permanently. Both disabling and deleting free up your license.
You cannot disable/delete the following user accounts:
- Your own account
- User with a higher level of administration rights
Disabling users temporarily
When you disable user accounts temporarily, users cannot login to Kerio Connect. However, all messages and settings of this user remain available in Kerio Connect.
- In the administration interface, go to section Accounts > Users.
- Double-click the user, and on the General tab, disable the Account is enabled option.
- Click OK.
The user now cannot access Kerio Connect Client or the Kerio Connect administration.
To reverse the action, go to user's settings and select the Account is enabled option again.
NOTE
This action is different from blocking when a password guessing attack occurs.
Deleting users permanently
- In the administration interface, go to Accounts > Users.
- Select the user and click Remove.
- In the Remove Users dialog box, you can:
- Delete the user's mailbox
- Keep the user's mailbox. When you create a account with the same username later, Kerio Connect automatically associates the new account with the old mailbox.
- Transfer it to another account in Kerio Connect
- Delete other settings of the user (aliases, roles, and so on)
- Click OK.
NOTE
Instant messaging files are always deleted.
Troubleshooting
All information about users can be found in the Config log.
Information about deleting users is logged in the Warning log