Maintaining user accounts in Kerio Connect
To maintain your user accounts and the mailstore in Kerio Connect, you can:
- Delete old items in users' mailboxes
- Recover deleted items
- Limit the size of outgoing messages
- Set quota for users' mailboxes
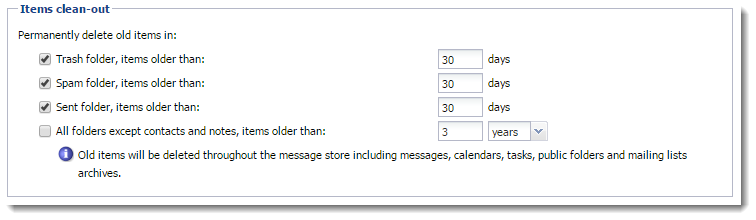
Deleting old items in users' mailboxes automatically
To save some space on your data store disk, you can set a special rule which deletes all messages older than a specified number of days. You can configure the items clean-out for individual users or per domain.
NOTE
If both are configured, settings per user are applied.
Kerio Connect performs the clean-out periodically based on the size of your message store.
You can apply the automatic clean-out to the following folders:
- Trash
- Spam
- Sent
- All folders (except contacts and notes)
Per domain settings
- In the administration interface, go to the Configuration > Domains section.
- Double-click a domain.
- On the Messages tab, select folders for automatic clean-out and set the number of days.
- Click OK.
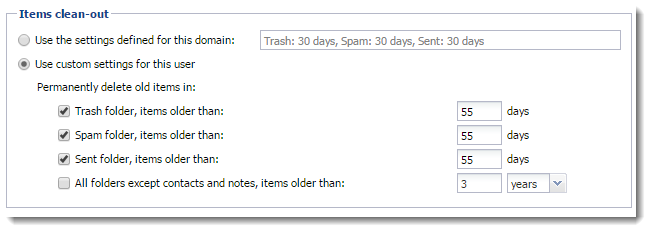
Per user settings
By default, new users inherit settings from their domain.
To change the settings for individual users:
- In the administration interface, go to the Accounts > Users section.
- Double-click a user.
- Switch to the Messages tab
- In the Items clean-out section section, select the Use custom settings for this user option.
- Select folders for automatic clean-out and set the number of days.
- Click OK.
Recovering deleted items
If users accidentally delete a message, you can enable items recovery and recover the deleted items before they are cleared-out.
You can recover:
- Email messages
- Events
- Contacts
- Notes
- Tasks
Enabling deleted items recovery
- In the administration interface, go to the Configuration > Domains section.
- Double-click the domain and go to the Messages tab.
- Select the Keep deleted items for option.
- Specify the number of days for which the items will be available after deletion.
- Click OK.
Recovering deleted items
Once recovery is enabled for the user's domain, follow these steps to recover their items:
- In the administration interface, go to the Accounts > Users section.
- Select the user and click on More Actions > Recover Deleted Items.
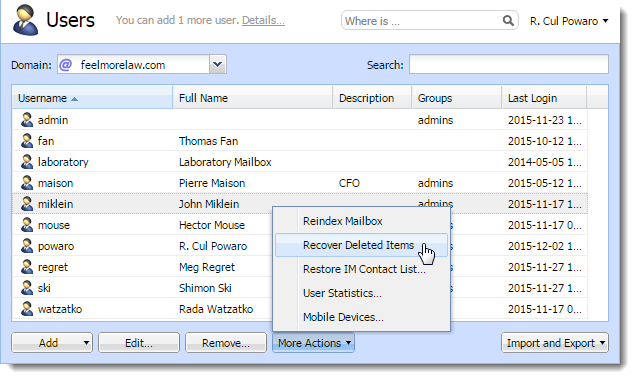
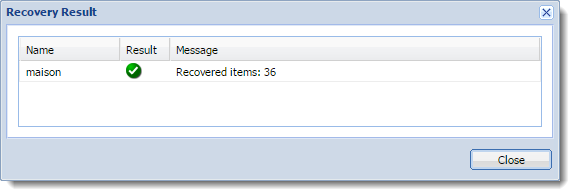
- Click Close to close the result of the process.
- Users find the recovered items in their Trash folder.
NOTE
If you do not enable item recovery for a domain, the Recover deleted items button is not active for users from this domain. If you are using archiving, you can look up the deleted items in the archive
Limiting the size of outgoing messages
To avoid overloading your server with large email attachments, you can limit the size of outgoing messages;
- Particular domain
- Individual users
- From Kerio Connect Client (HTTPHypertext Transfer Protocol - A protocol for exchange of hypertext documents in HTML. POST size)
NOTE
If both are configured, settings per user are applied. You can also use server filters. For more information refer to Filtering messages on the server.
Per domain
- In the administration interface, go to the Configuration > Domains section.
- Double-click the domain and switch to the Messages tab.
- Select the Limit outgoing message size to option.
- Specify the maximum size of the outgoing messages for this domain.
- Click OK.

Per user
By default, new users inherit settings from their domain.
To change the settings for individual users:
- In the administration interface, go to the Accounts > Users section.
- Double-click the user for whom you want to limit the message size.
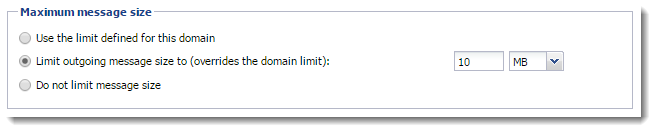
- On the Messages tab in the Maximum message size section, select the Use custom settings for this user option.
- Specify the limit for outgoing messages for the user.
NOTE
Select Do not limit message size to disable any limits.
- Click OK.
From Kerio Connect Client
Each new message composed in Kerio Connect Client is sent to Kerio Connect via HTTP POST requests. Each request contains the message body, all headers and attachments.
You can limit the size of the HTTP POST request (this also limits the message size).
- In the administration interface, go to Configuration > Advanced Options > the Kerio Connect Client tab.
- Specify the maximum size of outgoing messages.
- Click Apply.
- Restart Kerio Connect. For more information refer to Installing Kerio Connect.
Limiting the size of incoming messages delivered via SMTP
- In the administration interface, go to Configuration > SMT server > the Security Options tab.
- Select the Limit maximum incoming SMTPSimple Mail Transport Protocol - An internet standard used for email transmission across IP networks. message size to option.
- Specify the maximum size of incoming messages.
- Click Apply.

NOTE
You can also use server filters. For more information refer to Filtering messages on the server.
Limit the size of user mailboxes
Apart from limiting the size of messages, you can also set a limit to the users' mailbox and the number of items they contain.
- In the administration interface, go to the Accounts > Users section.
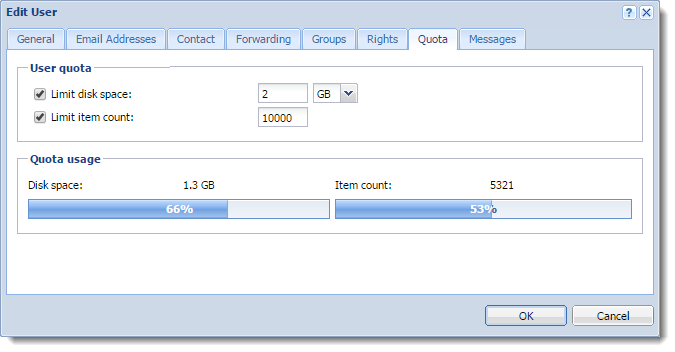
- Double-click the user and switch to the Quota tab.
- To limit the size of the user's mailbox, select Limit disk space and specify the size.
- To limit the number of items in the user's mailbox, select Limit item count and specify the number of items.
- Click OK.
Notifying users about reaching their quotas
Users may be notified if the quota of their message store reaches a certain limit. Thus users may delete messages in their mailboxes.
To set the limit for notifying users:
- In the administration interface, go to Configuration > Advanced Options > the Store Directory tab.
- Int he User quota section, specify:
- The Warning limit
- The frequency in which Kerio Connect sends notifications to the user
- The email address to which Kerio connect sends a message if a user reaches the quota
- Click OK.
