Virtualization
The Virtualization feature allows virtual machines to run on select Exinda appliances, allowing third-party operating systems and products to be installed. Once enabled, you can install any standard 32-bit or 64- bit (Intel-based) operating system onto an Exinda Virtualization Partition (EVP).
Most of the virtualization configuration is performed using the virt CLI command. In the Exinda Network Orchestrator Interface, you can see which virtual machines are configured and you can power on, power off, or power cycle them. You can also view the VGA console for each virtual machine.
NOTES
- Virtualization requires an additional license before this feature can be configured and used. Please contact Exinda TAC or your local Exinda representative if wish to use this feature.
- The Virtualization menu does not appear if the Exida Virtualization license has not been installed.
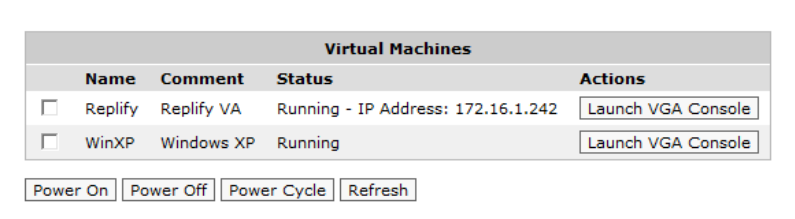
List of Virtual Machines available
The VGA console uses a Java-based applet to launch a secure SSH-based protocol to encrypt the session. You need to have Java installed and enabled as well as direct SSH access to the Exinda appliance in order to use this feature. You also need to authenticate with your username and password.
Where do I find these settings?
- Launch the Exinda Network Orchestrator Console.
- Go to Configuration > System > Virtualization.
The Virtualization menu does not appear if the Virtualization license has not been installed.
What are the hardware requirements?
Only selected Exinda 60 series hardware is supported. Currently, the following hardware is available for Virtualization:
- Exinda 4062, Exinda 4062 v2
- Exinda 6060, Exinda 6062
- Exinda 8060, Exinda 8062, Exinda 8063, Exinda 8064
- Exinda 10060, Exinda 10062, Exinda 10063, Exinda 10064
- Exinda 12063, Exinda 12064
An Exinda Virtualization license must be purchased for each Exinda appliance for which you want to enable virtualization.
NOTE
Virtualization requires 8 GB of RAM or higher. You may need to purchase a RAM kit.
To configure and install virtualization
- Ensure the Virtualization Enable checkbox is checked.
- Configure virtualization through the CLICommnad line interface with the
virtvm command.
These commands can be used to create virtual machines, configure CPU, storage, memory, install an operating system, etc. See CLI: Virtualization.
To manage your virtual machines
- Select the desired virtual machine(s) by selecting the checkbox(es) beside the virtual machine(s) in the Virtual Machines list.
- Click the desired action: Power On, Power Off, or Power Cycle.
To launch the VGA console for a virtual machine
Click the Launch VGA Console button beside the desired virtual machine in the Virtual Machines list. This feature creates a secure SSH connection to the Exinda appliance so that the VGA console can be viewed securely. Therefore, direct SSH access to the Exinda appliance must be available.
Since there is not a trusted certificate as part of the secure SSH connection, a warning is presented that asks you to confirm that you trust the site.
Troubleshooting: If the console does not appear
If the console does not appear, you may need to add the web address for the Exinda appliance to the Java Exception Site List. This is required since the Exinda appliance has a self-signed certificate for https access, which newer versions of Java are blocking.
Troubleshooting: If you are unable to log in
If you are unable to log in, it may be due to an enhancement in JDK 7: "The JDK 7 release supports the Server Name Indication (SNI) extension in the JSSEclient. The SNI, described in RFC 4366, enables TLSclients to connect to virtual servers." (from the Oracle support page). If this is the case, the system pops up a java console window with an exception including:
Javax.net.ssl.SSLProtocolException: handshake alert: unrecognized_name
Options for working around the JDK issue:
- Enable Use SSL 2.0 compatible ClientHello format in the Java console under Advanced OR
- Set your hostname on the Exinda to the Fully Qualified Domain Name (FQDN) that will be used to access the UI and launch the VGA console.