Installing Outlook® Connector via GPO in Windows Server 2008 or later
This section will help you install Outlook Connector via Group Policy:
1. Download one of the following Outlook Connector MSI packages from http://go.gfi.com/?pageid=MAR_DownloadMSI12.0:
MAROC_32bitOutlook.msi(Installer for Microsoft Outlook 32-bit computers only)MAROC_64bitOutlook.msi(Installer for Microsoft Outlook 64-bit computers only)
NOTE
Make sure that when deploying the 32-bit version of the Outlook Connector, the domain policy used contains only computers with Microsoft Outlook® 32-bit version installed.
Also, ensure to use a domain policy that applies only to computers where Microsoft Outlook® 64-bit version is installed when deploying GFI Archiver 64-bit edition.
2. Save the downloaded file to a shared folder accessible by all domains.
3. Open command prompt (CMD)
4. Key in: mmc.exe and click Enter to launch the Microsoft Management Console.
5. Click File > Add/Remove Snap-in… and click Add...
6. Select Group Policy Management Editor snap-in and click Add.
7. Click Browse… and select the domain policy to edit.
8. Select the domain policy and click OK.
9. Click Finish to close ‘Select Group Policy Object’ dialog. Click Close to close ‘Add standalone Snap-in’ dialog and click OK to close ‘Add/Remove Snap-in’ dialog; to return to the Microsoft Management Console.
10. Navigate to Console Root > <domain policy> > User Configuration > Policies, right-click Administrative Templates, and select Add/Remove Templates….
11. Click Add…, browse for the file gfiapps.adm located in: <Program Files\GFI\Archiver\Client Tools> and click Open.
12. Click Close to return to the Microsoft Management Console.
13. Expand Console Root > <domain policy> > User Configuration > Policies > Administrative Templates > Classic Administrative Templates (ADMADM files are template files used by Group Policies to describe where policy settings are stored in the registry. ADM files also describe the user interface that administrators see in the Group Policy Object Editor snap-in.) > GFI Applications.
Setting GFI Archiver server URL in Windows® Server GPOGroup Policy Objects
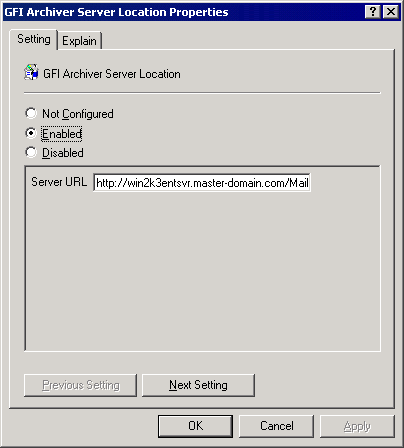
14. From the right pane, double click GFI Archiver Server Location policy and select Enabled. In the Server URL text box enter the URL where user machines can access GFI Archiver in the form http://<hostname>/<GFI Archiver virtual folder name>
For example:
http://win2k3entsvr.master-domain.com/Archiver
15. <Optional> Click Next Setting and configure the following settings. For each option select Not Configured to use the default value or click Enable to specify a custom value.
| Option | Description |
|---|---|
| GFI Archiver Outlook® Connector Data Path Root | Specify a different root location where store configurations and local emails are stored on client machines. For example, type ‘%MyDocuments%’ to store in the My Documents folder of the logged on user. |
| GFI Archiver Outlook® Connector days span | Specify the number of days for which emails are synchronized. Only emails received within this time span are accessible through GFI Archiver Outlook® Connector. |
| GFI Archiver Outlook® Connector download batch size | Specify how many emails can be downloaded during one synchronization session. |
| GFI Archiver Outlook® Connector connection timeout | Specify the timeout period in milliseconds for accessing data from the GFI Archiver server. |
| GFI Archiver Outlook® Connector maximum offline days | Specify the maximum number of days which a user can set for emails offline access. |
| GFI Archiver Outlook® Connector offline support |
Enable or disable offline support. If offline support is enabled, specify the number of days to support offline access. If this setting is enabled:
|
16. Click OK when all settings are configured.
17. Select Console Root > <domain policy> > Computer Configuration > Policies > Software Settings.
18. Right click Software installation and select New > Package…
19. In the Open dialog, locate the share where msi file is saved.
NOTE
When selecting the location of the msi file ensure that this is done through ‘My network locations’ so that the share name in GFI Archiver includes the full network share location rather than the local path.
20. Choose the deployment option - select Assigned and OK.
21. Outlook Connector will be installed the Next time each client machine is started.
To check installation, from Microsoft Outlook®, check that a new folder called GFI Archiver MailboxA directory or folder used for receipt, filing, and storing messages of emails. is created.