Scheduled scans
A scheduled scan is a network audit that is scheduled to run automatically on a specific date/time and at a specific frequency. Scheduled scans can be set to execute once or periodically. Scheduled scan status is monitored using the Activity Monitor tab > Security Scans.
GFI recommends scheduled scans:
- When GFI LanGuard Agents are not deployed on the target computers
- To automatically perform periodical/regular network vulnerability scans using same scanning profiles and parameters
- To automatically trigger scans after office hours and generate alerts and auto–distribution of scan results via email
- To automatically trigger auto–remediation options, (Example: Auto-downloadA GFI LanGuard technology that automatically downloads missing patches and service packs in all 38 languages. and deploy missing updates).
The following sections contain information to guide you in configuring and executing scheduled scans:
- Launch GFI LanGuard.
- Click Configuration tab >Scheduled Scans.
- From Common Tasks, select New scheduled scan.
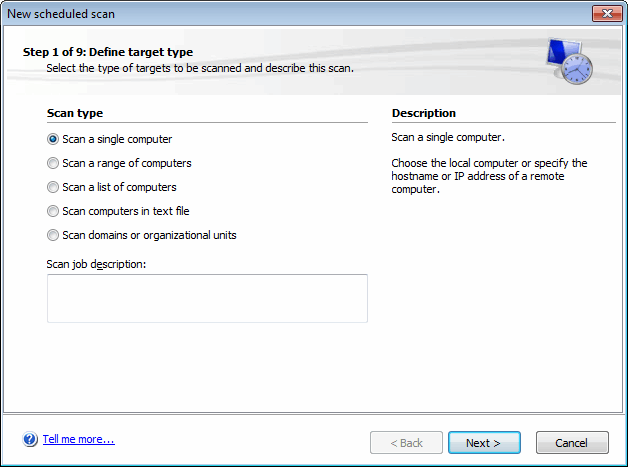
New Scheduled Scan dialog
- Select one of the options described below and click Next.
- Depending on the option selected in the previous step, specify the respective target computer(s) details and click Next.
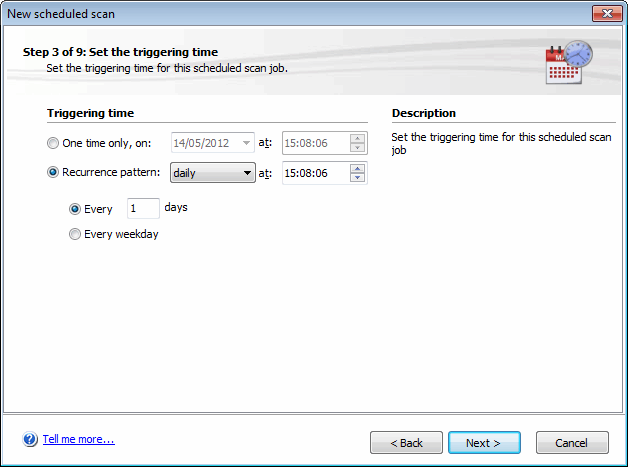
Scheduled scan frequency
- Specify date/time/frequency of the new scheduled scan and click Next.
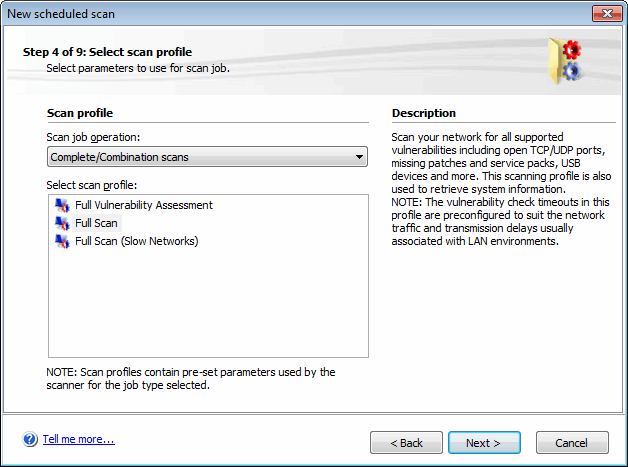
Select scanning profile
- From the Scan job operation drop-down menu, select the scanning profile to be used during the scan and click Next. For more information refer to Available Scanning Profiles.
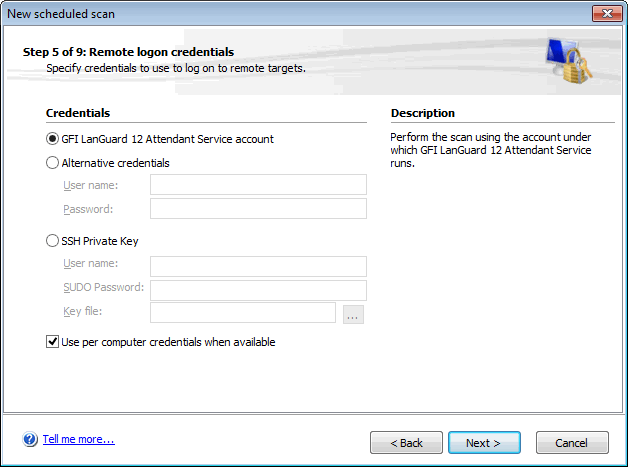
Remote logon credentials
- (Optional) Specify Remote logon credentials and click Next. Remote logon credentials can be either one of the following:
Scheduled scan reporting options
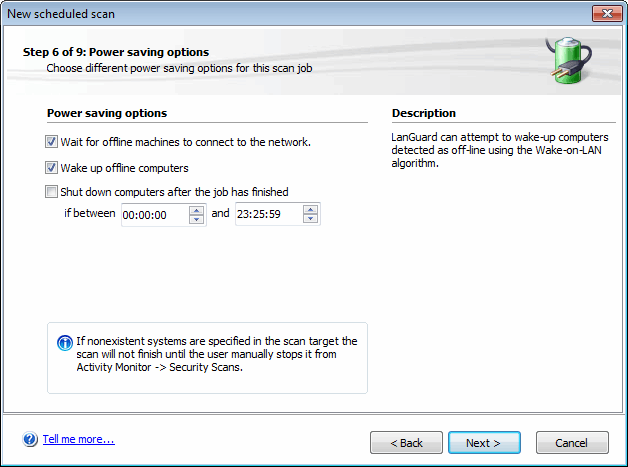
- From the Power saving options, configure the following options:
| Option | Description |
|---|---|
| Wait for offline machines to connect to network | If this option is selected, GFI LanGuard attempts to wait for offline machines to connect to the network. |
| Attempt to wake up offline computers | GFI LanGuard attempts to power on offline machines using Wake-on-LAN. For more information refer to Configuring Wake-on-LAN on scan targets. |
| Shut down computers after the job has finished |
After a computer has been scanned or an auto-remediation job has been done, GFI LanGuard attempts to shut down the computer if the time is in the specified timeframe. NOTE If shut down options are defined in Auto-remediationA GFI LanGuard technology that automatically downloads and deploy missing patches. If an application is blacklisted in GFI LanGuard, auto-remediation will uninstall the application from the target computer during scheduled operations. options, the power saving options are ignored. |
Scheduled scan auto–remediation options
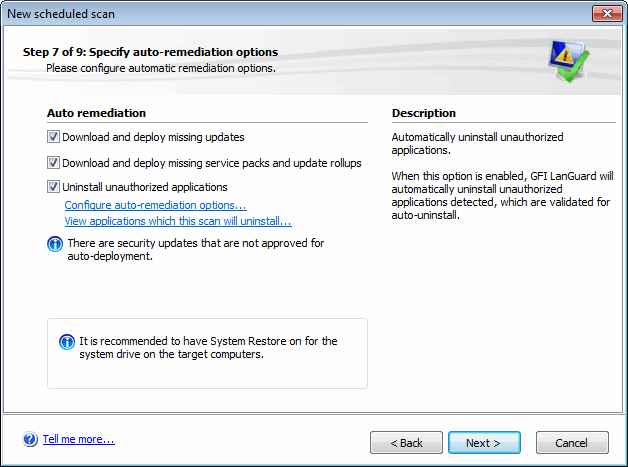
- From the auto–remediation dialog, select the required options and click Next. The table below describes the list of available options:
| Option | Description |
|---|---|
| Download and deploy missing updates | Automatically download and deploy missing patches on target machines. |
| Download and deploy missing service packs and update rollups | Automatically download and deploy missing service packs on target machines. |
| Uninstall unauthorized applications |
If this option is selected all applications validated as unauthorized, will be uninstalled from the scanned computer (unauthorized applications are defined in Application Inventory). For more information refer to Configuring unauthorized applications auto-uninstall. |
| Configure auto–remediation | Automatic-Remediation enables you to automatically download and deploy missing patches as well as uninstall unauthorized applications during scheduled operations, automatically. For more information refer to Automatic Remediation. |
| View applications which this scan will uninstall | Click the link to launch the applications which will be uninstalled dialog. This will list all the applications that will be uninstalled when the scheduled scan is finished. |
Scheduled scan reporting options
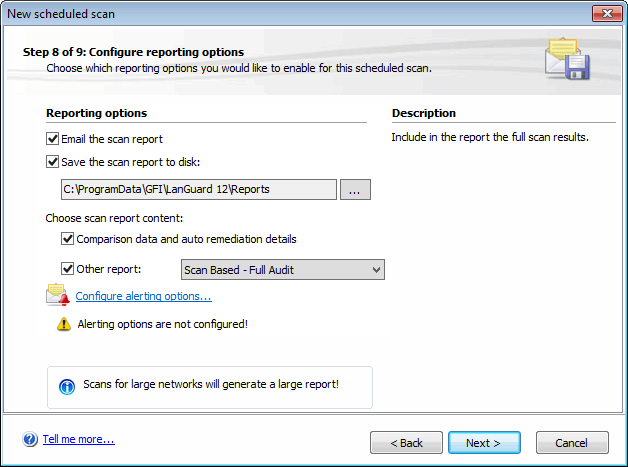
- (Optional) Configure Reporting options as described below:
| Option | Description |
|---|---|
| Email the scan report | Send a report by email at the end of each scheduled scan. |
| Save the scan report to disk | Save a report to disk at the end of each scheduled scan |
| Comparison data and auto remediation details |
Include details of auto remediation actions performed and result comparison with previous security scans. NOTE Comparison is done between scans with same scan target(s) and scanning profile. |
| Full scan results data | Include full scan result details. |
| Configure alerting options | (Optional) Click Configure alerting options… to specify sender/recipient details. For more information refer to Configuring Alerting Options. |
| Override general alerting options, and send email to | (Optional) Send a report by email to specific email address. GFI LanGuard alerting options are overridden. |
Scheduled scan reporting options
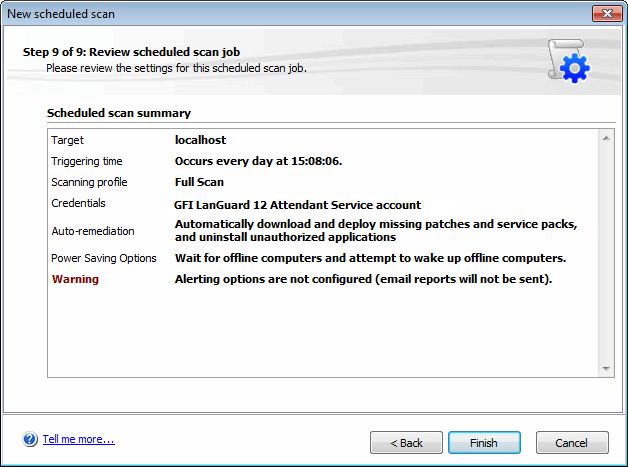
- Review the scan settings summary and click Finish.
NOTE
By default, all new scheduled scans are disabled. To enable, select Configuration tab >Scheduled Scans and click on the  button.
NOTE
Confirm that the new scheduled scans are successfully set by clicking on Activity Monitor tab > Security Scans.
Scan schedules can be reviewed, edited, or deleted from Configuration tab > Scheduled Scans node. All scans are listed in the review page together with the relevant information. Use the scheduled scan toolbar to perform the actions described below:
| Icon | Description |
|---|---|

|
Add new scan
Display the New scheduled scan wizard and create a new scheduled scan. |

|
Delete
Use this button to delete the selected scheduled scan. |

|
Properties
Review and edit the properties of the selected scan. |

|
Enable/Disable
Toggle the status of the selected scan between enabled and disabled. This enables you to activate/suspend a scanning schedule without deleting the scheduled scan. |

|
Scan now
Trigger the selected scheduled scan. This button overrides the scheduled scan date/time settings and executes an immediate scan. |
The scheduled scan properties page enables you to configure all the parameters of the scheduled scans.
To use the scheduled scan properties tab:
1. Go to Configuration tab > Scheduled Scans.
2. Select the scheduled scan and click the Scheduled Scan Properties.
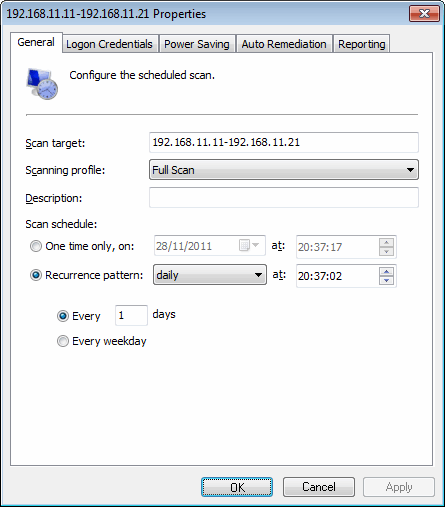
Scheduled Scan properties
3. Click OK.