SDP appliance system settings
The SDP webmin menu allows you to set up the SDP appliance. To access the webmin menu go to default address and login. The default username and password is admin. If the IPInternet protocol address has been changed then use this link format https://<ipaddress>:10000. In order to access SDP webmin on the default IP address, ensure that your network allows the access . Use the settings below to set up the default network configuration of the SDP appliance If required - IP address - 192.168.0.199/Netmask - 255.255.255.0/Default Gateway - 192.168.0.1.
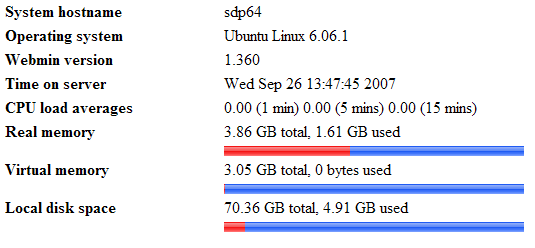
The home page provides a summary of the appliance status.

- Go to Hardware > System.
- Select a time zone from the drop down menu.
- Click Save.
- Ensure that the System time is correct. If the System time is different to the Hardware time, then click Set system time to hardware time or Set hardware time to system time button.
- Go to Servers > Postfix configuration.
- Click Edit Config Files.
- Scroll down and replace exinda.com with the customer's domain name.
- Click Save.
- Go to Servers > Postfix configuration.
- Click General Options.
- Change What domain to use in outbound mail to appropriate value.
- Change Local internet domain name to appropriate value.
- Click Save and Apply.
- Go to Networking > Network Configuration.
- Configure the following settings:
- Click Hostname and DNSDomain Name Server client to change the server's hostname and DNS IP address. Click Save.
- Click Host addresses to add hosts to the server. If you have changed the hostname, make sure you have an entry for the IP address mapped to new hostname. You should delete any IP addresses to hostname values that are not relevant.
- Click Routing and Gateways to alter the default route and change ONLY gateway IP address under Routing configuration activated at boot time.
- Click Network Interfaces to change the IP address and click on the ethernet name which has the IP address 192.168.0.199 under Interfaces Activated at Boot Time. Set Static IP address, Netmask and Broadcast fields to the appropriate values and ensure that the Activate at boot time is set to Yes Note: DO NOT change anything in the Interface active now section. Click Save. DO NOT click Save and Apply button as the system will become unresponsive.
NOTE
The server needs to be rebooted for the configuration changes to be applied.
- Go to System > Change passwords.
- Enter your old password.
- Enter your new password and confirm.
- Click Change.
- Go to System > Bootup and Shutdown.
- Click Reboot System.
NOTE
The server needs to be rebooted for the configuration changes to be applied.
- Download relevant SDP file from the link provided. (An email is sent to customers with the activation key and download link). If it is to update SDP software filename will be SDP.ear and if it is to update Admin portal, file name will be SDP-admin.ear.
- Login to webmin admin console via https://<ip>:10000.
- Go to Others > Upload and Download.
- In Upload and Download window, specify file to upload by clicking on Browse button.
- Leave all other values as default.
- Click upload button to upload the file.
- Then go to Others > Custom commands.
- In the custom commands window, select update-sdp or update-sdp-admin according to uploaded file. (If you uploaded
SDP.ear, you should select update-sdp. If you uploadedSDP-admin.ear, then you should select update-sdp-admin). - Specify activation key provided and click the selected command button.
- Navigate to Others > Custom commands.
- Click Factory Default. This action will restore the server to its factory default settings. Any existing data will be erased.
- Navigate to Others > Custom commands.
- Enter the SDP Activation key and number of licenses. This information can be found in your SDP software certificate.
- Navigate to Others > Custom commands.
- Click Display Host ID . The host id will be displayed in the next window.