Edge Cache Configuration
When web objects are downloaded from the Internet or across WANWide Area Network links, Edge Cache stores them at the edge of the network. When subsequent requests come for the same material, the content is quickly delivered from the Edge Cache without the need to download the data again over the WAN. Edge Cache can cache web objects, videos, software updates, and other content on the WAN. You can control whether to exclude particular sources, or sizes of objects from being cached. The cache objects can also be shared among peer appliances if desired, meaning that if the content cannot be found in the cache of the appliance through which the traffic is passing, then the appliance can request the content from peer appliances. You are also able to clear the cache, if desired.
To learn the details of how edge cache works, see How Edge Cache Works or to learn all the details of how to configure Edge Cache including configuring DNSDomain Name Server and HTTPS certificates and blacklists and whitelists, see the Edge Cache.
You may want to limit the size of objects that can be cached. Since the cache storage size is limited, you may want to decide whether to allow a few large objects or lots of little objects. You should ensure that the size is aligned with the types of objects that you want to be cached. For example, iOS updates tend to be approximately 1 GB and Mac updates tend to be 6 GB and so if you want Edge Cache to help with caching of these updates, you'll want to ensure that the minimum and maximum allowed objects size accommodates these sizes.
You may want to blacklist particular sites if Edge Cache is not working properly and is preventing the network user from getting access to the site. Also, you may want to blacklist secure sites because you do not want to cache sensitive data such as financial or banking sites. Alternatively, if you want to only cache particular secure sites once they've been identified as important to your network, you can whitelist them such that only those sites listed will be cached. Whitelisting is only available for HTTPS caching. You can specify your whitelist and blacklist as source IPInternet protocol, destination IP, source domain, or destination domain. Domains are resolved using the DNS.
To use HTTPS caching, you will need to specify which signing certificate will be used by Edge Cache to generate a certificate to negotiate with the client on behalf of the server.
VERSION INFO
For versions prior to 7.0.2, Edge Cache requires you to restart the Edge Cache process after making any modifications to the Edge Cache configuration. With 7.0.2 and later, the Edge Cache process automatically restarts when needed.
NOTE
Objects in the traffic that are matched with an Edge Cache policy but are excluded from storage in Edge Cache due to these settings, will still pass through Edge Cache unprocessed and will be highlighted on the Real Time conversations screen in blue (indicating that they passed through and were evaluated by Edge Cache).
Go to Configuration > System > Optimization > Edge Cache.
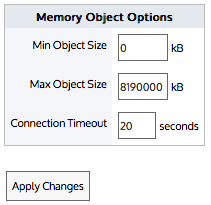
Setting the size of the objects that can be cached
- In the Memory Object Options area, type the minimum and maximum size of the objects to be cached. Only objects that are within this size range will be stored in Edge Cache.
- Click the Apply Changes button.
VERSION INFO
For versions prior to 7.0.2, you will need to restart Edge Cache for the changes to take effect. Go to Configuration > System > Optimization > Services, and click the Edge Cache Restart button.

Setting the connection timeout
- In the Memory Object Options area and in the Connection Timeout field, type the maximum time in seconds that the Edge Cache will wait for a response from the WAN when fetching objects. You may need to increase this if connection timeouts are occurring regularly. Browsers typically return a message similar to the following when this occurs:
(110) Connection timed out - Click the Apply Changes button.
VERSION INFO
For versions prior to 7.0.2, you need to restart Edge Cache for the changes to take effect. Go to Configuration > System > Optimization > Services, and click the Edge Cache Restart button.
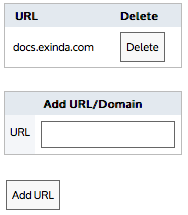
HTTP caching with blacklisted sites
- In the Add URL/Domain area, type the HTTP URL or domain that will be excluded from the Edge Cache.
- Click the Add URL button.
- Repeat until you have your desired blacklist.
- Remove an HTTP URL or domain from the list by clicking the Delete button for the specified URL/domain.
VERSION INFO
For versions prior to 7.0.2, you need to restart Edge Cache for the changes to take effect. Go to Configuration > System > Optimization > Services, and click the Edge Cache Restart button.
All https traffic can be cached according to the policy except those sites listed in the blacklist.
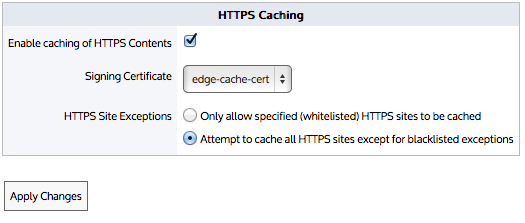
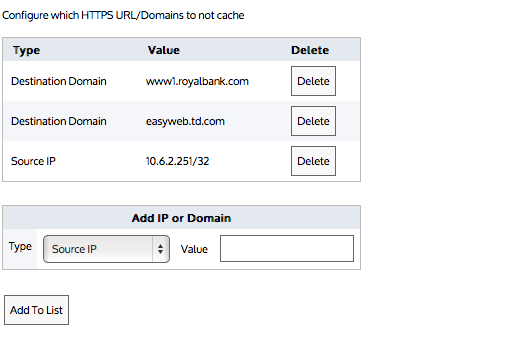
Enabling HTTPS caching with blacklisted sites
- In the HTTPS Caching area, select the Enable caching of HTTPS content checkbox.
NOTE
You cannot enable caching if DNS is not configured.
- Select the signing certificate to use to re-sign the traffic.
- Select Attempt to cache all HTTPS sites except for blacklisted exceptions from the drop-down list.
- Click the Apply Changes button.
- In the Add IP or Domain area, specify the type of traffic you want to blacklist and the Value(IP or domain name) for that type of traffic.
You can specify Source IP, Destination IP, Source Domain, or Destination IP.
Domains are resolved using the DNS. Ensure the domains are in the format that are required by DNS (i.e. without https://).
The specified domain name is resolved to an IP address, then the IP address is reverse mapped to the actual domain name that corresponds to that IP address. Note that the domain name may resolve to multiple IP addresses and multiple other domain names.
- Click the Add URL button.
- Repeat until you have your desired blacklist.
NOTE
The blacklist takes effect immediately as Edge Cache automatically restarts.
- Remove an HTTPS URL or domain from the list by clicking the Delete button for the specified URL/domain.
Only https traffic specified in the policy and in this whitelist will be cached.
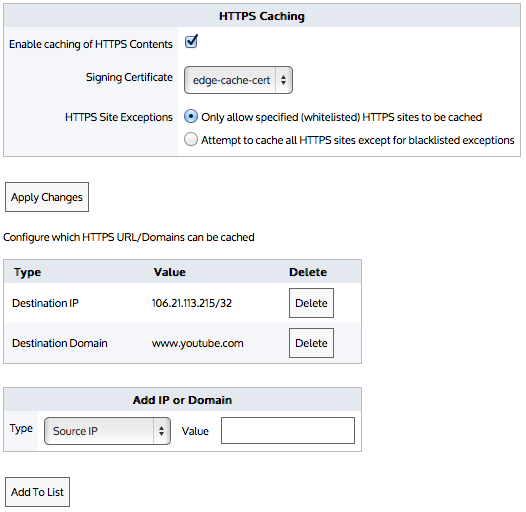
Enabling HTTPS caching with whitelisted sites
- In the HTTPS Caching area, select the Enable caching of HTTPS content checkbox.
NOTE
You will not be able to enable caching if DNS is not configured.
- Select the signing certificate to use to re-sign the traffic.
- Select Only allow specified whitelisted HTTPS sites to be cached from the drop-down list.
- Click the Apply Changes button.
- In the Add IP or Domain area, specify the type of traffic you want on the whitelist and the Value (IP or domain name) for that type of traffic.
You can specify Source IP, Destination IP, Source Domain, or Destination IP.
Domains are resolved using the DSN. Ensure the domains are in the format that are required by DNS (i.e. without https://).
The specified domain name is resolved to an IP address, then the IP address is reverse mapped to the actual domain name that corresponds to that IP address. Note that the domain name may resolve to multiple IP address and multiple other domain names.
- Click the Add URL button.
- Repeat until you have your desired whitelist.
NOTE
The whitelist takes effect immediately as Edge Cache automatically restarts
- Remove an HTTPS URL or domain from the list by clicking the Delete button for the specified URL/domain.
Set the blacklist mode, but do not add any URLs.
This allows all sites to be cached except those listed. Since the list is empty, all sites are allowed.

Click the Clear button. This removes all objects from storage.
When Edge Cache appliance peers are specified, if the requested content is not available in the appliance's cache, Edge Cache can request the content from it's appliance peers.
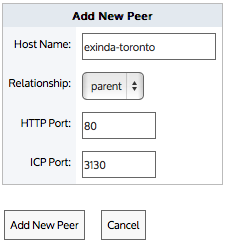
To add a new peer appliance for Edge Cache

Peer appliances for Edge Cache
- Click theAdd New Peer button. An Add New Peer screen appears.
- Type the Host Name of the peer.
- Select the Relationship with the peer.
- Type the HTTP Port of the new peer.
- Type the ICP Port of the new peer.
- Click the Add New Peer button. The peer appears in the list of configured peers.
- Peers can be edited or deleted by clicking the Edit or Delete button for the specified peer.