Configuring automatic phone provisioning
NOTE
Watch the Configuring automatic phone provisioning in Kerio Operator video.
Phone provisioning is used for automatic configurations of selected hardware SIPSession Initiation Protocol - A communication protocol used for voice and video calls in Internet telephony or private IP telephone systems. phones. Phone provisioning means:
- phone automatically connects to the PBXPrivate Branch Exchange - System that connects telephone extensions and switches calls. after booting and is assigned a phone extension,
- extensions are managed in the administration interface,
- if you confirm or plan it, the system will perform an automatic restart of provisioned phones if needed,
- phone firmware is automatically updated,
- displaying a company logo on hardware phones supported by Kerio Operator
- accessing company contacts through LDAP
NOTE
Automatic firmware update is not supported for the Polycom phones and
the original Cisco phones (Cisco SPA is supported). However, there is a
possibility to update the firmware. You can upload all necessary files to
folder /var/tftp in Kerio Operator manually. For more information refer to Uploading configuration files to Kerio Operator TFTP server.
IMPORTANT
Use of phone provisioning is not always suitable. If Kerio Operator is located and runs in the Internet, for security reasons we do not recommend to use automatic phone provisioning.
What you need
- In your local network, you need a DHCPDynamic Host Configuration Protocol - A protocol that automatically gives IP addresses and additional configuration to hosts in a network. server supporting parameter 66 (TFTP server address). Enter the address of Kerio Operator in this parameter.
- Only selected phones support automatic phone provisioning.
- Appropriate settings need to be done in Kerio Operator.
NOTE
If you wish to connect a phone which is not currently supported in Kerio Operator, you cannot use automatic provisioning. The configuration must be done on the hardware phone.
How to add a phone
- In the administration interface, go to Provisioned Phones > Hardware Phones.
- Click Provisioning Settings. The configuration dialog windows is opened.
- Check the Enable provisioning option. The option must be checked.
- Check option Create new extension for newly registered phones in case you create users locally (do not map them from a directory service).
WARNING
The Create new extension for newly registered phones option is checked by default. If you uncheck it, you cannot use automatic remote phone restart — you will have to restart phones manually if needed.
- Each telephone must be authenticated when connecting to the PBX. Extension number and password are used for SIP authentication (Master Password in this case). Option Master password for phones is enabled enables to create one password for all provisioned phones. The password is saved in the configuration file which is sent to the phone upon the first connection to the network and the phone will use this password to authenticate at Kerio Operator. If you disable option Master password for phones is enabled, all phones will have their own passwords (it can be viewed in the configuration dialog of each phone).
Now the general environment for the provisioned phones is configured. Once a phone is connected to your network, it will be listed in section Provisioned Phones.
Adding phones manually
Phones which are not connected to the network can also be provisioned. You may do so manually — you need the phone's hardware address and the type of the phone. The procedure is described below:
Connecting a phone manually
- In section Provisioned Phones, click Add.
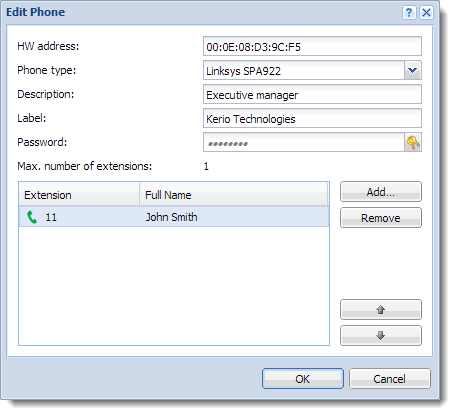
- This opens a dialog which requires the hardware address of the phone (MAC address of the network card in the phone). The address may lack the colons. Once you save it, the colons will be added automatically.
- Select the correct type of the hardware phone (special configuration scripts are created according to the phone type).
- (Optional) Set a label of the phone (for example the name of your company). The upper label on the phone display.
- Assign the phone user or users who will use it.
NOTE
If you do not know to which person the extension will be assigned, check option Generate new extension number and the extension will be assigned automatically. Phones without extensions assigned cannot be provisioned.
Importing from CSV file
Phones can be imported from a CSV file. Data in the file must follow certain rules:
- hwAddress — hardware address of the phone,
- phoneManufacturer — name of the phone's manufacturer,
- phoneType — phone type,
- extension1; extension2; ... — extensions assigned to the phone. The maximum number of extensions depends on the phone type.
Each phone uses one line and all items are separated by a semicolon.
The file may look as follows:
00:1a:a0:be:1e:cd;Cisco;7940;111;112
00:1b:b0:cd:e1:ca;Cisco;7960;115
00:1c:c0:ab:a2:24;Linksys;SPA942;113;114
Import data from a CSV file as described below:
- In the Provisioned Phones section, click on Advanced > Import from a CSV file.
- This opens dialog Import from a CSV file — click on Upload CSV file.
- If the data in the file are correct, a list of all the phones and extensions is displayed. Check those you want to import.
- Click OK.
- The imported phones are displayed in the Provisioned Phones table.
Restarting provisioned phones
When you change configuration which affects provisioned phones, the phones need to be restarted (for example, when you create a new call route). When you do so, a dialog window recommending phone restart is displayed. You can do it immediately or wait for a more convenient time (for example to an off-peak time). To restart phones later:
- Open the Provisioned Phones section.
- Click Advanced > Restart All Phones.
WARNING
Some Cisco telephones from newer series are not able to restart automatically. In case of configuration changes you have to check the result. If anything is wrong, restart the phones manually.
This warning doesn't relate to Cisco SPA phones.
Firmware
Kerio Operator allows easy installation of phone firmware which are managed through the phone provisioning:
- Go to section Provisioned Phones and click on the Advanced > Firmwares button.
- In the Firmwares and Logos dialog, select a firmware and click Edit.
- In the Edit firmware dialog, select Verify the firmware. Kerio Operator vrifies if the firmware includes all important files and information.
- Click Upload File.
- This opens a dialog where you select a firmware file and confirm the selection.
- In the New firmware dialog, select the appropriate phone.
- Click OK.
The new firmware is installed and after the restart will be installed to phones.
Uploading a phone provisioning module
If you want to change or create a provisioning module (archived templates + PHP scripts which can change phones behavior), download Provisioning Developer Documentation and read it carefully.
When the provisioning module is prepared and archived, upload it to Kerio Operator:
- Go to administration interface.
- In section Provisioned Phones, click Advanced > Provisioning Modules..
- Click Upload.
- Restart your phones.
Overriding templates
For more information refer to Editing provisioning templates.
What to do if you want to know the password of your phone
If any of your users needs to know the password of their phone, we do not recommend to provide them with the Master Password. We have a specific solution:
- In the administration interface, go to Provisioned Phones > Hardware Phones.
- Click Provisioning Settings.
- Disable master password.
Once you disable it, each phone will have their own password which can be shared with individual users.
Configuring inter-digit timeout
Inter-digit timeout sets the time between dialing the last digit and automatic dial. If your users complains that it is too long or too short, you can adjust it:
- Go to the administration interface.
- In section Provisioned Phones, go to Provisioning Settings.
- In the Phone Provisioning Settings, set the Inter-digit timeout.
How phone provisioning works
Automatic HW phone provisioning
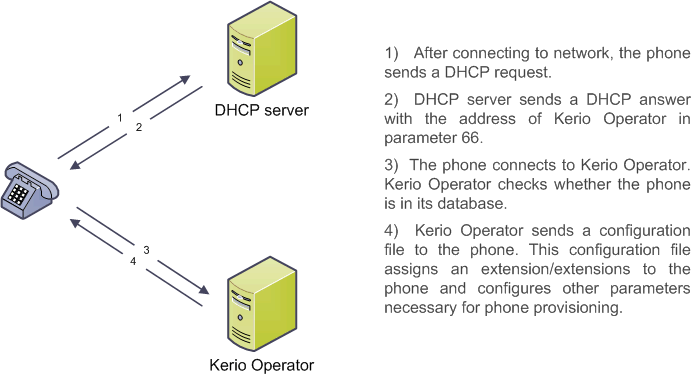
This is how the automatic phone provisioning works:
- The telephone boots in the network and sends a DHCP request for an IP address.
- DHCP server accepts the request, assigns an IP address and sends it back in a DHCP reply. Besides the IP address, the message also contains TFTP (Trivial File Transfer ProtocolA simple protocol for transferring files.) server address — Kerio Operator, in our case.
- SIP phone connects to TFTP server integrated in Kerio Operator.
- Kerio Operator checks whether the phone is new:
- if it is new, Kerio Operator generates a new phone extension for the phone;
- if it is not new, Kerio Operator finds the extension which the phone has used.
- Kerio Operator generates a configuration file suitable for the particular phone type and sends it via the TFTP protocol.
- The phone is configured using the values it has acquired in the configuration file and is ready to be used.
NOTE
Some phones perform an automatic restart during the configuration.