Accessing company contacts through LDAP on provisioned phones
Kerio Operator offers searching in your LDAPLightweight Directory Access Protocol enables users to access centrally managed contacts. directory from your provisioned phones.
WARNING
Cisco79xx phones are not supported.
Polycom phones are not supported with Kerio Connect LDAP.
Connecting to Kerio Connect LDAP/Microsoft Active Directory
- In the administration interface, go to Provisioned Phones.
- Click the Provisioning Settings button.
- In the Phone Provisioning Settings dialog, select option Directory configuration is enabled.
- Click Configure.
- Click Configuration Wizard.
- Select type of a service:
- Kerio Connect LDAP — type Kerio Connect hostname, username and password.
- Active Directory — type domain name and hostname of your Active Directory and credentials of account with at least read-only access to Active Directory,
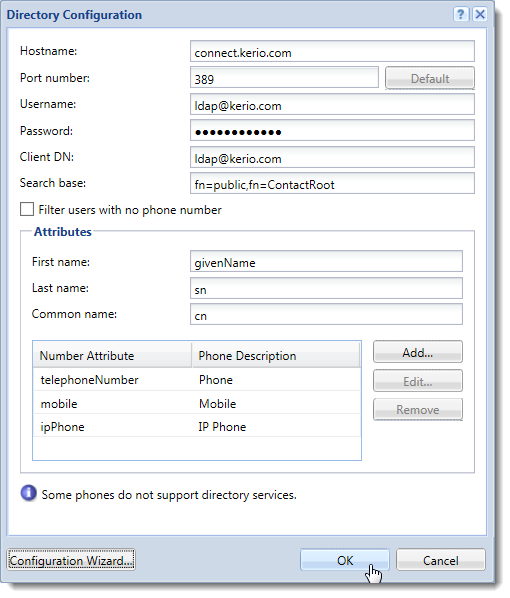
The Directory Configuration dialog after finishing Kerio Connect LDAP configuration
NOTE
We recommend to create a special account with read-only access and use credentials of this account.
- Save the settings.
- In Provisioned Phones, click Advanced and restart all provisioned phones. Phones read the new configuration and start to communicate directly with the LDAP server.
Try this feature on your phone. Find a directory on the phone and check the contact list.
For information on how to use your phone directory, read the manual of your phone.
Connecting to LDAP in general
- In the administration interface, go to Provisioned Phones.
- Click the Provisioning Settings button.
- In the Phone Provisioning Settings dialog, select option Directory configuration is enabled.
- Click Configure.
- Fill the Directory Configuration dialog.
- Save the settings.
- In Provisioned Phones, click Advanced and restart all provisioned phones. Phones read the new configuration and start to communicate directly with LDAP server.
Try this feature on your phone. Find a directory on the phone and check the contact list.
For information on how to use your phone directory, read the manual of your phone.