Create a cluster of Exinda Appliances
Configuring the appliances in the network to behave as a cluster, allowing for high availability and failover, involves two steps:
- Adding Exinda Appliances to the cluster.
- Specifying what data is synchronized between the cluster members.
Once the appliances are configured, the appliances will auto-discover each other and one will be elected as the Cluster Master. All configuration must be done on the Cluster Master, so when accessing the cluster, it is best to use the Cluster Master IPInternet protocol address when managing a cluster.
CAUTION
When upgrading the firmware of appliances that are part of a cluster, Exinda recommends that you break the cluster before starting the upgrade (Either by disconnecting the cluster link or by clearing the “Cluster” option for the appropriate interface). After all appliances in the cluster have been upgraded to the same firmware, the cluster can be put back together.
Configure the appliances with an IP address used within the cluster, as well as the IP address of the cluster master.
- Click Configuration > System > Network > IP Address.
- In eth1, type the management port IP address of the appliance in the Static Addresses field.
- In eth2, select Cluster, and type the internal IP address for this node of the cluster in the Static Addresses field.
NOTE
The Cluster Internal IP for each appliance in the cluster must be in the same subnet and should be an isolated and unused subnet within the network. The cluster subnet is used exclusively for communications between cluster nodes so should be private and not publicly routable.
- In the Cluster Master Settings area, select eth1 and type the external address used to access the appliances.
- Repeat these steps all each Exinda Appliance joining the cluster.
Once these settings are saved, the appliances will auto-discover each other and one will be elected as the Cluster Master. All configuration must be done on the Cluster Master, so when accessing the cluster, it is best to use the Cluster Master IP address when managing a cluster.
Example for a two appliance cluster:

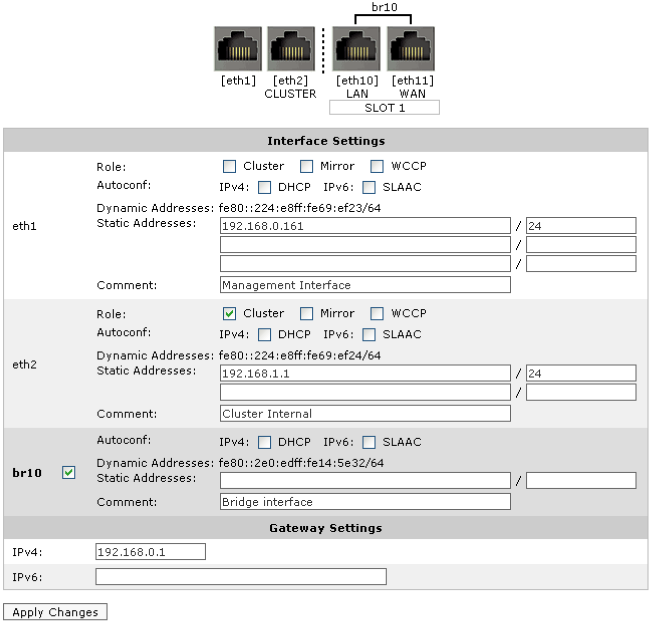
IP address configuration page on Exinda 1.

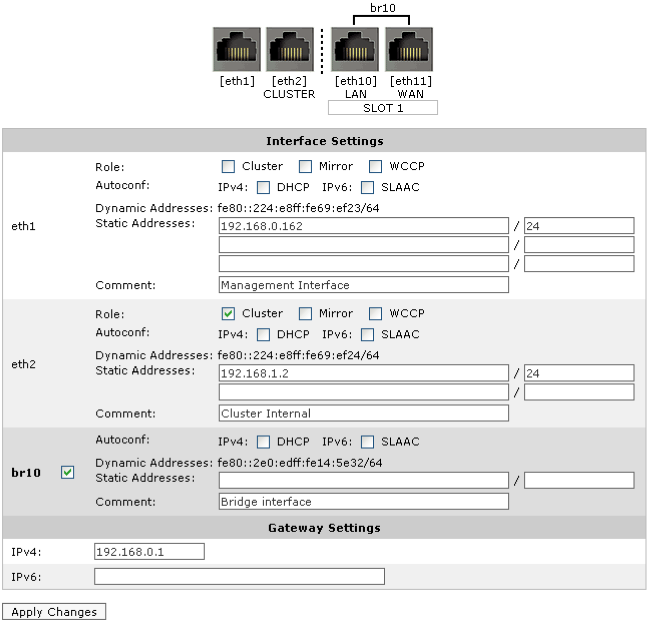
IP address configuration page on Exinda 2.

Cluster Master (External) configuration on both Exinda Appliances.
In the example above, Exinda 1 has a Management IP of 192.168.0.161 and Exinda 2 has a Management IP of 192.168.0.162. The Cluster External IP is configured as 192.168.0.160 on both appliances – regardless of which of these two appliances becomes the Cluster Master, it will be reachable on the 192.168.0.160 IP address. The Cluster Internal IP on Exinda 1 is configured as 192.168.1.1 and on Exinda 2 as 192.168.1.2.
Once these settings are saved, the appliances will auto-discover each other and one will be elected as the Cluster Master. All configuration must be done on the Cluster Master, so in this example, access the cluster via 192.168.0.160. Typically, the first appliance to come online is elected the master.
Even though High Availability protocols are usually handled by the Routers or Multi-Layer switches that act as the “next-hops”, the core switches connected to them also need to detect a link failure in order for the entire network to converge properly. When an Exinda appliance is located in the middle of the connection between a Switch and an HA router, and the link between the HA router and the Exinda goes down, the remaining link (Exinda to Switch) will remain up, avoiding the failure detection by the switch and creating convergence problems. In order to overcome this scenario, you should use the Link State Mirroring feature.
When this option is enabled, the Exinda appliance brings down the second port of a bridge if the first port goes down. This feature allows the Exinda appliance to sit between a WANWide Area Network router and a switch without blocking detection of switch outages by the router. This is a global setting that is applied to all enabled bridges. Exinda recommends to always enable this setting when the appliance is configured in cluster mode, this option is located under Configuration > System > Network > NICs and is disabled by default:

NOTE
An Exinda Appliance goes into “bypass” mode by default if it is shut down. In an HA/Cluster environment, in order to maintain control and visibility on the network, the administrator might want the entire traffic to failover to a backup link if the Exinda appliance on the active one is offline. In order to do this, you need the appliance that went offline to purposefully break the traffic so the HA protocol can hand it over to the backup link. To achieve this functionality, modify the “On Failover” mode for the specific bridge to “NO LINK” mode (This option is located under Configuration > System > Network > NICs):

Exinda recommends that you leave at least one of the cluster nodes in “Bypass” failover mode in case there is a power failure that affects the entire cluster.
The “NO LINK” option is not available on the 3062 model. For the models of the 4062 series, it is necessary to purchase an extra Expansion Card given that the on-board bridges do not come with this feature.
[no] cluster sync {all|acceleration|monitor|optimizer|compression}
all- Acceleration, monitor, optimizer data, and compression are synchronized. This is disabled by default.acceleration- Synchronize acceleration data onlymonitor- Synchronize monitor data onlyoptimizer- Synchronize optimizer data onlycompression- Configure cluster compression settings including compression type and compression level.
- Click Configuration > System > Maintenance > Clustering.
- All appliances in the cluster are displayed.

It is also possible to reboot and shutdown other nodes in the cluster from this page.
- To identify the cluster master, the role is displayed in the list of all appliances.
TIP
When logged into the Web UI of a cluster node, the role of the node is also shown in the header of the user interface.
- Turn clustering off on the appliance that is currently the master.
- Wait for the standby appliance to become the master.
- On the original master appliance, turn clustering back on. This appliance will now be the standby appliance.
Configuration using the CLICommnad line interface is very similar to that of the Web UI.
- Configure a Cluster Internal address. Any interface not bound to a bridge or used in another role (e.g. Mirror or WCCP) may be used. This command will need to be run on each node in the cluster, and each with a unique Cluster Internal address.
cluster interface eth2
interface eth2 ip address 192.168.1.1 /24
- Configure the Cluster External IP. This command should be executed on all cluster nodes using the same Cluster External IP
cluster master interface eth1
cluster master address vip 192.168.0.160 /24
- Enable the cluster.
cluster enable
NOTE
Configuration changes should only be made on the Cluster Master node. The role of the node currently logged into will be displayed in the CLI prompt as shown below.
exinda-091cf4 [exinda-cluster: master] (config) #
Issue the following command:
show cluster global brief
Global cluster state summary
==============================
Cluster ID: exinda-default-cluster-id
Cluster name: exinda-cluster
Management IP: 192.168.0.160/24
Cluster master IF: eth1
Cluster node count: 2
ID Role State Host External Addr Internal Addr
-----------------------------------------------------------------
1* master online exinda-A 192.168.0.161 192.168.1.1
2 standby online exinda-B 192.168.0.162 192.168.1.2