Configure Exinda Appliance Community
A group of Exinda appliances in a network is referred to as a community. Exinda appliances that are part of the same community can accelerate to and from each other. Generally, Exinda appliances automatically discover each other when attempting application acceleration, however, if an appliance is not automatically discovered, you can manually add the Exinda appliance to the community. When the IPInternet protocol address of a manually added Exinda appliance changes, the community node must be updated as well.
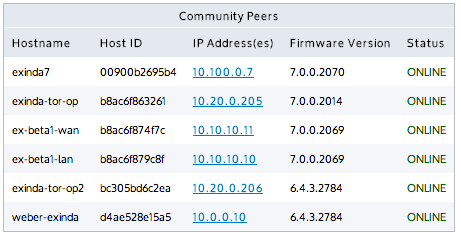
List of automatically discovered Exinda appliances
NOTE
The Community service uses port 8017 to communicate between Exinda Appliances. Please ensure this port is open for proper functionality.
VERSION INFO
- In a pre-6.4 version, by default, the community was larger than it needed to be, which caused some inefficiencies. In this case, user-defined community groups allow you to create multiple separate smaller Exinda Communities in the same network.
- In 6.4 and later versions, appliances automatically join the community of appliances with which they are accelerating. If you want your 6.4 or later appliance to belong to a community of pre-6.4 appliances, you need to configure the community settings to match your pre-6.4 appliances.
Exinda Communities: adding, editing, and removing appliances
Use the following sets of instructions to edit the listing of Exinda community members. For appliances with firmware versions v6.4.0 or later, you do not need to manage communities unless you want such an appliance to join a community created for a pre-6.4.0 appliance group.
NOTE
An Exinda appliance can belong to multiple community groups. By default, all appliances belong to the community group with Group ID 0. As a security measure, the Community Group ID can be used like a PIN to restrict access to any other Exinda appliance from joining your community.
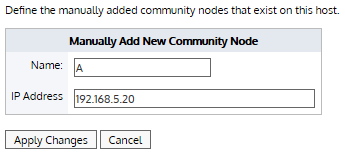
Manually adding an Exinda appliance to the community
- Go to Configuration > System > Optimization > Community.
- In the Manually Add New Community Node area, type a Name and the IP Address for the Exinda appliance.
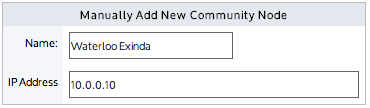
- Click Apply Changes.
The appliance is added to the list of manually added community nodes.
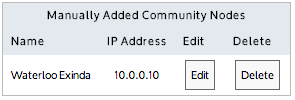
Editing manually added communities
- Go to Configuration > System > Optimization > Community.
- On the Manually Added Community Nodes panel, for the particular appliance, click Edit.
The edit screen opens.
- Modify the name or IP address of the appliance.
- Click Apply Changes.
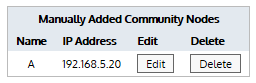
Removing manually added Exinda appliances from the community
- Go to Configuration > System > Optimization > Community.
- To remove individual appliances, on the Manually Added Community Nodes panel, find the appliance and click the Delete button next to its entry.
- To remove all appliances from the community, click Remove all community peers from system.