Configuring Default Import Settings
Configure settings for automatic import of emails and calendar items from user's mailboxes:
1. Go to Configuration > Archive Assistant.
2. Click New Default Import Settings.
NOTE
Once Default Import Options are set the button name changes to Update Default Import Settings.

Configuring default import settings
3. In the Process Emails area, select from the following options:
| Option | Description |
|---|---|
| Once | Select to run the import process one time only. You can schedule the process in the following screen that appears when this import option is selected. |
| Check for new emails every | Select to run the import process periodically. Specify the interval in the provided field. The Schedule screen is skipped if this import option is selected. |
4. In Email Date, select one of the following options:
5. In Archive Types, select one or both of the following:
| Option | Description |
|---|---|
| Emails | Select to import Emails. |
| Calendar Items | Select to import Microsoft Outlook calendar items. |
6. (Optional) In Archive emails in folder (optional), specify the folder name from where you want to import emails, for example, Inbox.
NOTE
Using special characters in folder names
The folder path can be overwritten with the desired folder path using the following conventions:
\ (back slash) is represented by /\
/ (forward slash) is represented by //
For example:
To input a folder path for the following folder structure:
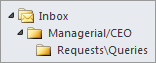
Input the following path: Inbox\Managerial//CEO\Requests/\Queries
7. In Maximum email size, set the maximum size of the emails to import. Default is set to 2 MB.
8. Click Next.
9. If in step 3 above, you have selected to run the import process Once, the Schedule window is displayed. The Schedule screen is skipped if the Check for new emails every import option is selected:
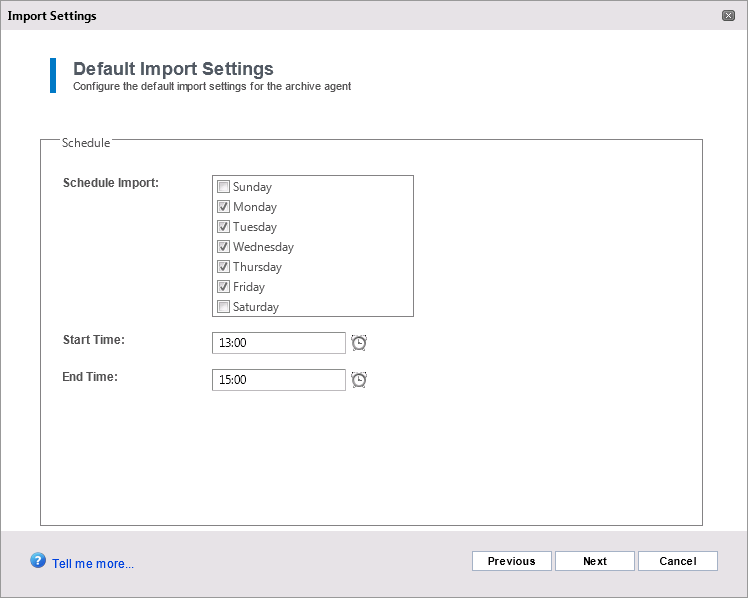
Configure import schedule
10. In the Schedule settings, configure the following:
| Option | Description |
|---|---|
| Schedule Import | Select the import process frequency by checking the desired days. |
| Start time | Define the time of day during which the process will start. |
| End time | Enter the time at which the process will stop. |
11. Click Next.
12. In the Email Deletion Policy area, select one of the following:
| Option | Description |
|---|---|
| Do not delete archived emails | Select this option to keep all emails from being deleted after they are archived. |
| Permanently delete archived emails immediately | When selected, the emails will be deleted as soon as they are archived. |
| Permanently delete archived emails after n days | Specify the number of days to keep local copies of messages after these have been archived (Default 30 days). |
13. In the Calendar Items Deletion Policy area, select one of the following:
| Option | Description |
|---|---|
| Do not delete archived calendar items | Select this option to keep all calendar items from being deleted after they are archived. |
| Permanently delete archived calendar items immediately | When selected, calendar items will be deleted as soon as they are archived. |
| Permanently delete archived calendar items after n days | Specify the number of days to keep local copies of calendar items after these have been archived (Default 30 days). |
14. Click Finish.