Advanced Content Filtering
Advanced Content filtering enables scanning of email header data and content using advanced configurable search conditions and regular expressions (regex).
To configure advanced content rules, go to Content Filtering > Advanced Content Filtering. This page allows you to view, create, enable, disable or delete rules.
 Creating Advanced Content Filtering rules
To create an Advanced Content Filtering rule follow the steps listed below:
Step 1: Configuring basic rule settings and conditions to block
- Go to Content Filtering > Advanced Content Filtering and click Add Rule...
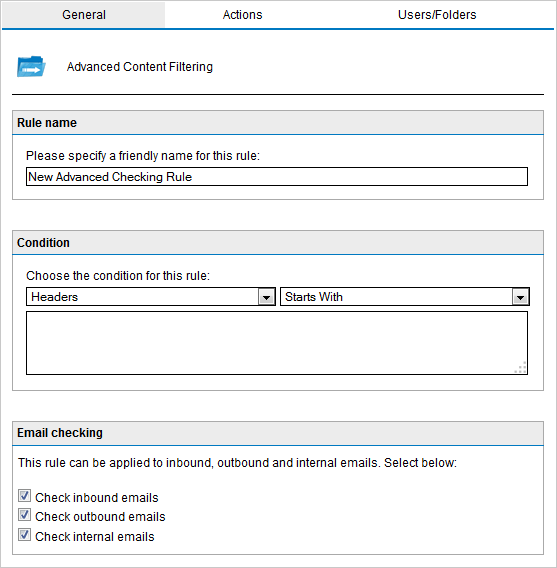
Adding a new Advanced Content Filtering rule
- In Rule Name area, provide a name for the new rule.
- In Condition area, provide the condition that the email has to meet to match this rule. From the drop down select the email part (Headers, Subject, Body, Attachment Name or Attachment Content) and choose a condition (Start with, Ends with, Contains, Matches Exactly, Matches Regex). In the text box, key in the keyword or regular expression that the email should match.
For example: To match emails having swiss in subject - Select Subject and Contains and key in swiss in textbox.
- Select whether to scan inbound, outbound and/or internal emails.
| Option | Description |
|---|---|
| Scan Inbound SMTP Email | Select this option to scan incoming emails |
| Scan Outbound SMTP Email | Select this option to scan outgoing emails |
| Check Internal emails |
Select this option to scan internal emails. NOTE This option is only available when GFI MailEssentials is installed on the Microsoft® Exchange server |
Step 2: Configuring the actions to take on detected emails
- From the Actions tab, configure what happens when this rule is triggered.
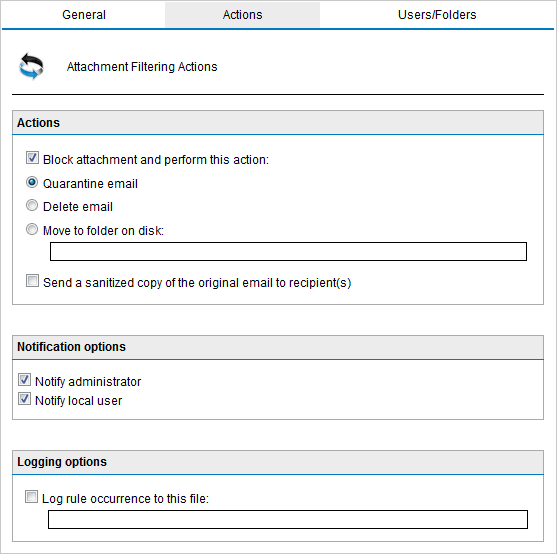
Actions Tab
- To block an email that matches the rule conditions, select Block email and perform this action and select one of the following options:
| Option | Description |
|---|---|
| Quarantine email | Stores blocked emails in the Quarantine Store. You can subsequently review (approve/delete) all the quarantined emails. For more information refer to Quarantine. |
| Delete email | Deletes blocked emails. |
| Move to folder on disk | Moves the email to a folder on disk. Key in the full folder path where to store blocked emails. |
IMPORTANT
Actions always affect the whole email containing the blocked content, even if there is other content (such as attachments) that do not trigger this rule.
- Select Send a sanitized copy of the original email to recipient(s) to choose whether to send a copy of the blocked email to the recipients but with the malicious content removed.
- To send email notifications whenever an email gets blocked, check any of the following options:
| Option | Description |
|---|---|
| Notify administrator |
To notify the administrator whenever this engine blocks an email. For more information refer to Administrator email address. For more information refer to Administrator email address. |
| Notify local user | To notify the email local recipients about the blocked email. |
- To log the activity of this engine to a log file, check Log rule occurrence to this file and specify the path and file name to a custom location on the disk to store the log file. By default, log files are stored in:
<GFI MailEssentials installation path>\GFI\MailEssentials\EmailSecurity\Logs\<EngineName>.log
Step 3: Specifying users to whom this rule applies
- By default, the rule is applied to all email users. GFI MailEssentials, however, allows you to apply this rule to a custom list of email users specified in the Users / Folders tab.
- Specify the users to apply this rule to.
| Option | Description |
|---|---|
| Only this list | Apply this rule to a custom list of email users, groups or public folders. |
| All except this list | Apply this rule to all email users except for the users, groups or public folders specified in the list. |
- To add email users, user groups and/or public folders to the list, click Add.
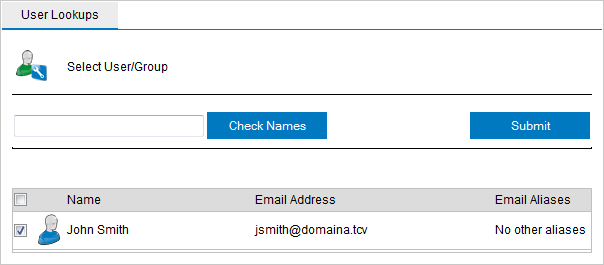
Add users to a Content Filtering rule
- In the User Lookups window, specify the name of the email user/user group or public folder that you wish to add to the list and click Check Names. Matching users, groups or public folders are listed underneath.
NOTE
You do not need to input the full name of the users, groups or public folder. It is enough to enter part of the name. GFI MailEssentials will list all the names that contain the specified characters. For example, if you input sco, GFI MailEssentials will return names such as Scott Adams and Freeman Prescott, if they are available.
- Select the check box next to the name(s) that you want to add to the list and click OK.
NOTE
To remove entries from the list, select the user/user group/public folder you want to remove and click Remove.
- Repeat steps 3 to 5 to add all the required users to the list.
- Click Apply.
Removing Rules
- From Content Filtering> Advanced Content Filtering, select rule to remove.
- Click Remove Selected.
Enabling/Disabling Rules
- From Content Filtering> Advanced Content Filtering, select rule to enable/disable.
- Click Disable Selected to disable rule or Enable Selected to enable.
Sorting Rules
Advanced Content Filtering rules are applied in the same order, from top to bottom as they are listed in the Advanced Content Filtering page (that is, rule with priority value 1 is checked first). To change the sequence/priority of rules:
- Navigate to the Content Filtering > Advanced Content Filtering node.
- Click the
 (up) or
  (down) arrows to respectively increase or decrease the priority of the rule.
 - Repeat step 2 until rules are placed in the desired sequence.