Managing user quotas in Kerio Control
Kerio Control enables you to configure a limit for the volume of data a user can transfer, as well what happens when that quota is exceeded.
Configuring user quotas
- In the administration interface, go to Accounting and Monitoring > Data Gathering.
- Select Gather internet usage statistics. For more information refer to Settings for statistics, reports and quota.
- In the administration interface, go to Users.
- Select a user (or a template) and click Edit. For more information refer to Managing user accounts in Kerio Control.
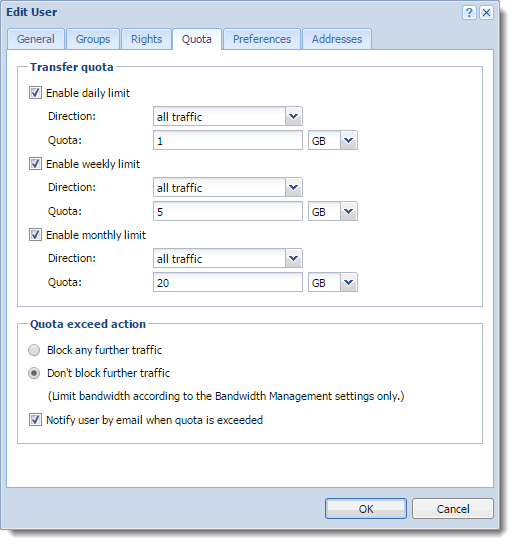
- Select one or more of the Enable ... limit options: daily, weekly and/or monthly.Use the Direction drop-down list to select which transfer direction to control:
- download = incoming data
- upload = outgoing data
- all traffic = both incoming and outgoing data
- Type the quotas and select the units from the drop-down list.
- Choose one of the Exceeded quota action options.
- Block any further traffic allows the user to continue using the open connections. However, no new connections can be established, such as connecting to another server or downloading a file through FTPFile Transfer Protocol - Protocol for transferring computer files from a server.. If users exceed their quotas and Kerio Control blocks the traffic, the restriction is applied until the end of the quota period (day, week, month). To cancel these restrictions, temporarily disable the limit, raise its value, turn off the block, or delete the data volume counter of the user in the Status > User Statistics section.
- Don't block further traffic limits the Internet connection speed for the user. Traffic is not blocked but the user may notice that the connection is slower. For more information refer to Configuring a bandwidth rule for exceeded quotas.
- (Optional) Select Notify user by email when quota is exceeded and specify an email address in the Edit User dialog box. For more information refer to Configuring the SMTP server.
NOTE
The Kerio Control administrator can also be notified when any user quota is exceeded. For more information refer to Using alert messages.
Configuring a bandwidth rule for exceeded quotas
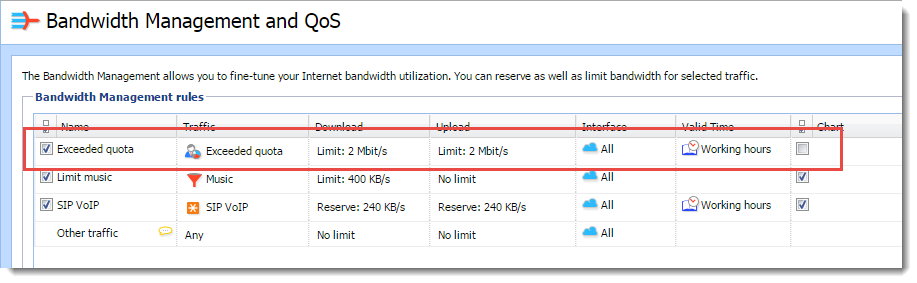
If you don't want to block the traffic when users exceed their quotas, you can limit bandwidth for all users who exceed a certain limit. In the following example, the bandwidth is limited to 2 Mbit/s.
- In the administration interface, go to Bandwidth management and QoSQuality of service - Network's ability to obtain maximum bandwidth and manage other network performance elements like latency, error rate and uptime..
- Click Add.
- Type a name for the rule (for example,
Exceeded quota). - Double-click in the Traffic column.
- In the Traffic dialog box, select Exceeded Quota.
- Click OK.
- Double-click in the Download column.
- In the Download Bandwidth Policy dialog box, select Do not exceed and type the value (for example,
2 Mbit/s). - Double-click in the Upload column.
- In the Upload Bandwidth Policy dialog box, select Do not exceed and type the value (for example,
2 Mbit/s).
From now on, all users who exceed their quotas have their Internet connection slowed down to 2 Mbit/s.
NOTE
If you want to release the limit for a particular user, delete the data volume counter of the user in the Status > User Statistics section. For more information refer to Monitoring user statistics.