Using RADIUS server in Kerio Control
RADIUSRemote Authentication Dial-In User Service - A protocol that offers authentication, authorization, and accounting of users in a network. (Remote Authentication Dial-In User Service) is a protocol used for access to a computer network.
Kerio Control implements a RADIUS server for user authentication with your Wi-Fi access point. This allows users to use their Kerio Control username and password to access your Wi-Fi.
IMPORTANT
There is a known issue with Windows 7 clients: Windows 7 does not accept untrustworthy certificates. If you Windows 7 clients cannot connect through RADIUS, read the Configuring Windows 7 clients section. For more information refer to Configuring Windows 7 clients.
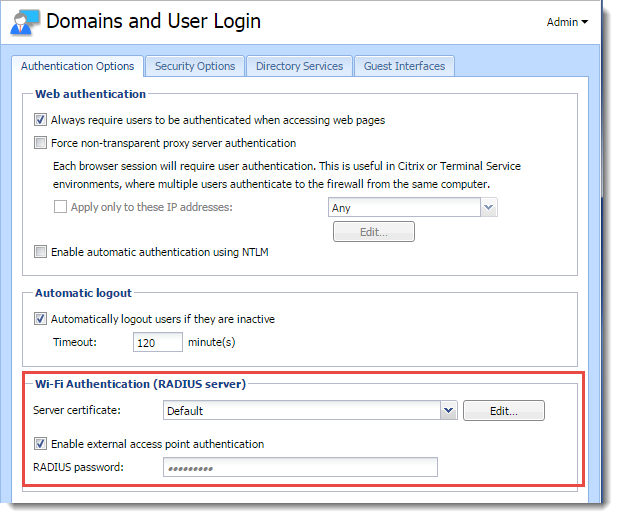
- In the administration interface, go to Domains and User Login.
- Select the Server Certificate. If you have one, use the certificate signed by a certification authority, because devices connecting to Wi-Fi access point may have problems reading self-signed certificates.
- In Wi-Fi Authentication, select Enable external access point authentication.
- Type the RADIUS password - the same password used in the access point configuration. This might be called the shared key or shared secret in the Wi-Fi access point configuration.
- Click the Apply button.
IMPORTANT
Kerio Control does not support MS-CHAPv2 with Apple Open DirectoryA directory service for Apple based networks.. Kerio Control supports only Microsoft Active DirectoryA directory service for Windows domain networks..

Users authentication in Microsoft Active Directory
The Wi-Fi authentication works without any additional settings.
Each type of access point has a different configuration for connecting to a RADIUS server. Find and configure these items (note that terminology may differ slightly):
- Authentication method for the RADIUS server: IEEE 802.1x or WPA/WPA2 Enterprise.
- RADIUS server: IP addressAn identifier assigned to devices connected to a TCP/IP network. where Kerio Control is running.
- Port: 1812. It is the default port for the RADIUS protocol.
- Shared key, shared secret, or RADIUS password: Entered above, in the Configuring Kerio Control section. For more information refer to Configuring Kerio Control.
Windows 7 does not provide an interface for accepting untrusted certificates.
The recommendation is that you use the certificate signed by a certification authority, because devices connecting to Wi-Fi access point may have problems reading self-signed certificates. If that is not possible follow this procedure in case that your users with Windows 7 cannot connect through RADIUS:
Windows 7 clients are connected to your network
Import a Kerio Control local authority as root certificate to Windows 7 clients. You can:
- If you use Active Directory, import certificate of your domain controller into Kerio Control.
- Deploy root certificate via Active Directory.
- Import root certificate to each client individually.
NOTE
Although Windows 7 knows the SSL certificateSSL certificates are used to authenticate an identity on a server., the warning The connection attempt cannot be completed appears to the users during the first connection attempt. Users must click Connect in this window.
Your clients are not connected to your network
Create a profile in the Manage Network Center on each Windows 7 client manually. Windows 7 clients do not validate the Kerio Control SSLSecure Sockets Layer - A protocol that ensures integral and secure communication between networks. certificate:
- In Windows 7, click the Start menu.
- Go to Control Panel > Network and Internet > Network and Sharing Center > Manage wireless networks.

Managing wireless networks
- Click Add. The Manually connect to a wireless network dialog opens.
- Select Manually create a network profile.
- In the next step, type the SSID name in the Network name field.
- In Security type, select WPA2-Enterprise.
- In Encryption type, select AES.
- Select Start this connection automatically.
- Select Connect even if the network is not broadcasting.
- Click Next.
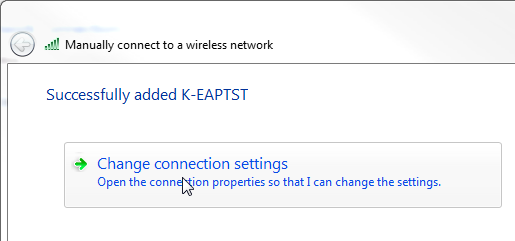
The Successfully added page appears.
- Click Change connection settings.

Changing connection settings
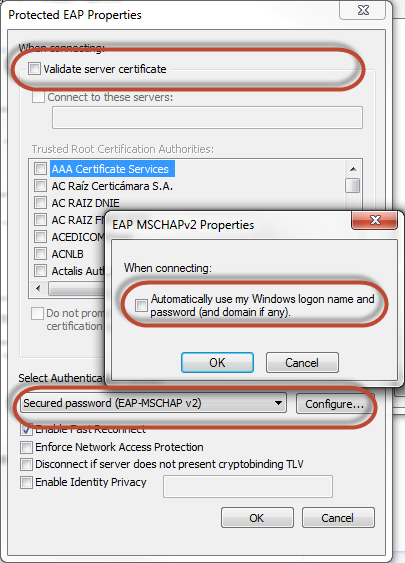
- On the Security tab, click Settings. The Protected EAP Properties opens.
- Unselect Validate server certificate.
- In Authentication Method, select Secured password (EAP-MSCHAP v2).
- Click Configure and the EAP-MSCHAP v2 Properties opens.
- Unselect Automatically use my Windows logon on name and password.

Changing authentication method for wireless connection
- Click OK.
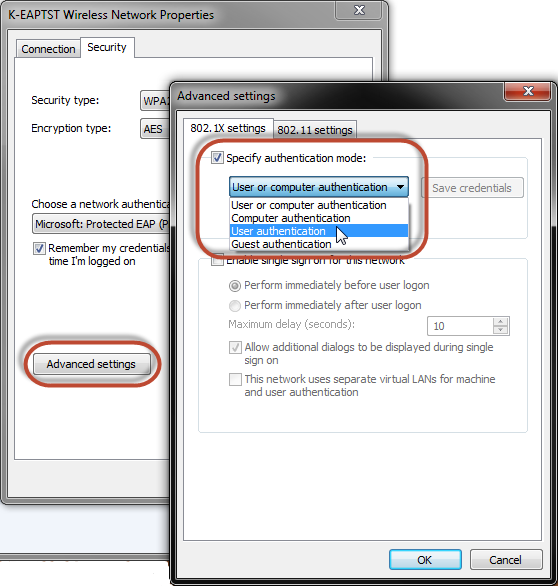
- On the Security tab, click Advanced settings.
- Select the 802.1X settings tab.
- Select Specify authentication mode.
- Select User authentication.

Configuring advanced settings
- Click OK.