Renaming domains in Kerio Connect
In Kerio Connect, you can rename your domain in the administration interface. Once a domain is renamed, the original name becomes an alias. This ensures that email messages sent to addresses with the original name are always delivered.
| Original | Server restart | |
|---|---|---|
| domain name |
|
|
| names_of_aliases |
|
|
The domain configuration does not change after renaming.
IMPORTANT
Any calendar events created before renaming cannot be edited or removed after the domain is renamed.
Prerequisites
Before you start the renaming process:
- Purchase a domain from your provider and make sure the DNSDomain Name System - Enables the translation of hostnames to IP addresses and provides other domain related information. records are updated. Test the new domain.
- Make a full backup of your message store before and after the renaming process
Renaming domains
- In the administration interface, go to Configuration > Domains.
- Double-click the domain you want to rename.
- On the General tab, click Rename.
- Type a new name for the domain. You can cancel the renaming process before you restart the server. Click Cancel Rename in the domain's configuration.

- Restart the server.
Before the restart, all operations are performed using the original name. During the restart, Kerio Connect automatically replaces the original name with the new name in the configuration files.
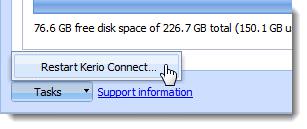
You can restart the server in the administration interface: Go to Status > System Health and click Tasks > Restart Kerio Connect at the bottom.
Renaming distributed domains
Before you start renaming distributed domains:
- Disconnect all servers.
- Rename each domain separately (as described above).
- Reconnect renamed servers to a distributed domain.
Post-renaming issues
If users have email filters with addresses of users from a renamed domain, they must change the rules.
If users use Kerio Outlook Connector (Offline Edition), they must empty the cache after the domain is renamed.