Configuring schedule objects
The Exinda Appliance allows you to automate your network optimization polices for different times of the day and different days of the week. For example, you may wish to lock down your network at night to improve security, while still allowing automated backup services and email to function.
 Configuring schedule objects in the Exinda Web UI
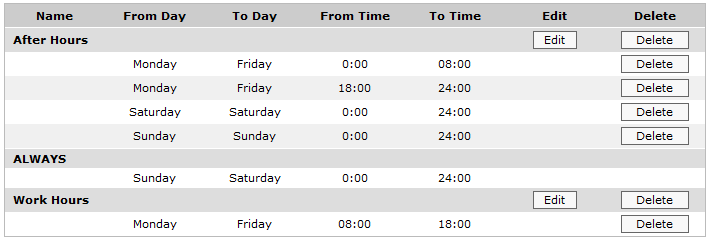
By default, there are three schedule objects defined. Each schedule can be edited or deleted by clicking the appropriate button in the table. The ALWAYS schedule is protected and cannot be edited or deleted.

Predefined schedules
Additional schedules can easily be added.

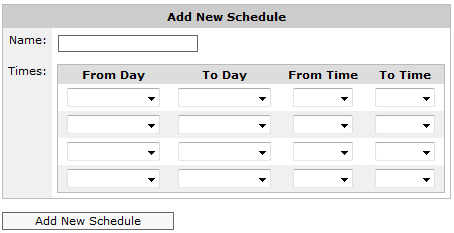
Add a new schedule by specifying one or more date ranges and time ranges.
NOTE
- A single Schedule Object cannot specify different times that overlap. Time must be unique within the same Schedule Object.
- The 'Start Time' and 'End Time' values must fall within the same day. In order to specify a time from one day to the next, use two lines: one from 'Start Time' to 24:00 on the first day, and the other from 00:00 to 'End Time' on the next day.
To add a new schedule:
- Enter a meaningful name for the schedule.
- For each time period, in the From Day field and the From Time field, specify a day of the week and time of day that marks the beginning of the time period.
- In the To Day field and the To Time field, specify a day of the week and time of day that marks the ending of the time period.
- Add multiple time periods if desired.
- Click the Add New Schedule button.
NOTE
By default, there are four time period drop-down sets available to add schedule times. If you need to add more, save the schedule, then select the Edit button next to the newly created schedule. You will be presented with four additional sets of drop-downs to add more schedule times.
 Configuring schedule objects in the EMC
To create a Schedule in the Library
- Go to Library > Schedules.
- Click Create new schedule in the librarythe Exinda repository for network objects and their definitions.
- In the Name section, key-in a name of the schedule item. The name must be unique in the tenant.
- In the Times section, select the days of the week and the Start Time and End Time for this schedule.
- To layer the time ranges, click Add another time range. For example, if you want to apply a schedule for Monday through to Friday from 9:00 to 17:00, but you need a different start and end time for weekends, you can add another range for Saturday and Sunday.
- Click Create.The Schedule item is added to the Schedules Library category and is then available when defining Policies and Virtual Circuits.
NOTE
By default, the Always schedule library item is pre-configured. You cannot change or edit it.