Adding network objects
Network objects represent hosts on a network and can include subnets, single hosts, or groups of both. Once defined, a network objecta logical definition created and stored in the Exinda lilbrary, can represent any network component may be used throughout the Exinda Appliance for monitoring and identifying which traffic should be processed in the policy engineimplements policies specified in the policy tree.
Network objects are in the configurations of other objects, such as applications, adaptive response rules, application performance score objects, and application performance metric objects.
Network objects are also used to determine which traffic is considered inbound to your network and which traffic is outbound.
The location of a network object determines the direction of traffic. If one end of the conversation is defined in an external network object and the other is defined in an internal network object, then traffic from an external network object to an internal network object is considered inbound traffic.
Conversely, traffic from an internal network object to an external network object is considered outbound traffic.
You can indicate whether you want to report on the traffic relative to the network object, that is chart the traffic in and out of a given network object.
 Adding network objects in the Exinda Web UI
By checking the Subnet Report checkbox, the data for the network object will be shown on the subnet monitor page. This setting only affects the display of the data. The data will be collected regardless of this setting.
Some network objects are automatically created by the appliance: ALL, private net and local
- All— Represents all traffic on the network. When used in Optimizer Policies, it matches all traffic. This network object is not editable and cannot be deleted.
- private net— Represents all possible non-routable, private IPInternet protocol addresses.
- local— Created when an IP address is assigned to one or more bridge interfaces. The object contains the IP address and subnet mask of each bridge interface.
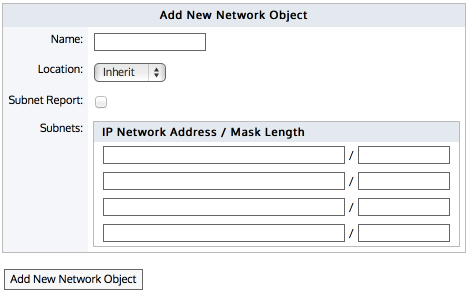
Adding a new network object.
Go to Configuration > Objects > Network Object > Network Objects.
- Specify a name for the network object.
- Select the location of the network object - internal, external, or inherit Packets are matched to a network object, and the closest subnet within that network object determines the location. See examples below.
- Internal— All subnets and hosts defined by the network object will be considered on the LANLocal area network side of the appliance.
- External— All subnets and hosts defined by the network object will be considered to be on the WANWide Area Network side of the appliance.
- Inherit— The locations of the subnets and hosts defined by the network object is determined or inherited by closest match to other network objects.
- If all the subnets in this network object are contained in other network objects that are internal, then the location of this network object will inherit the internal location.
- Similarly, if all the subnets in this network objects are contained in other network objects that are external, then the location of this network object will inherit the external location.
- If some subnets in this network object are contained in other internal network objects and some are contained in other external network objects, then the location of this network object will be mixed.
- If no network objects match, then the location defaults to external.
NOTE
When creating network objects that have location set to "inherit", you can use the CLICommnad line interface command show network-object <name> to show the location.
- Select whether the traffic for this network object should be shown on the Subnet reports. See For more information refer to Monitoring subnets ..
- Specify the network IP address and netmask length of the subnet. IPv4 and IPv6 addresses are accepted. Although only four lines for IP addresses are displayed for a new object, add more IP addresses by saving the network object and click Edit to be presented with an extra 4 lines.
- Click Add new Network Object.
To save the changes to the configuration file, in the status bar click the Unsaved changes menu and select Save configuration changes.

EXAMPLE – Network object defining two internal proxy servers
Create a network object that defines two internal proxy servers, 192.168.1.10 and 192.168.1.11:
Name: Web Proxies
Location: Internal
Subnets: 192.168.1.10 /32
Subnets: 192.168.1.11 /32
EXAMPLE – Head office defining a network object for a remote branch
Create a network object that defines the Head Office location, that has a subnet 10.0.100.0/24, where this Exinda appliance is NOT deployed:
Name: Head Office
Location: External
Subnets: 10.0.100.0 /24
EXAMPLE – Network object defining an internal IPv6 server
Create a network object that defines the internal IPv6 server at 2001:db8::1234:5678
Name: FileServer6
Location: Internal
Subnets: 2001:db8::1234:5678 /128
EXAMPLE - Network object with inherited location
Define three network objects as follows:
Name: HQ Subnets: 10.0.0.0/8 Location: External
Name: Office-A Subnets: 10.0.1.0/24 Location: Internal
Name: Server-1 Subnets: 10.0.1.200/32 Location: Inherit
Subnets are matched by decreasing netmask length. The Server-1 network object 10.0.1.200 will be internal, as it most closely matches the Office-A Network Object which is internal. Since the Server-1 Network Object contains a single subnet that can be matched to Office-A, its location is shown as internal.
When the Ignore Internal-to-Internal option is set on the Monitoring configuration page, all traffic between network objects marked as internal is ignored and passed through the Exinda appliance unaffected. See For more information refer to Monitoring Configuration..
You can use the CLI command to see what location the network object resolved to:
show network-object <name>
It is possible to configure network objects using fully-qualified-domain-names instead of IP addresses. Should it later become necessary to change network settings on application servers, the Exinda appliance can then automatically detect the change through DNSDomain Name Server.
To configure a network object based on a fully qualified domain name, use the following commands:
>en
#conf t
(config) # network-object <NAME> fqdn <fully qualified domain name>
An Exinda appliance must be configured with a DNS server if it is to perform name resolution using FQDN. Each record retrieved has a life cycle equal to the TTL (Time to live) defined for such a record. When the TTL is exceeded, Exinda automatically refreshes the record to verify that the IP address has not changed. When appliance reboots occur, or changes to DNS configuration, interface configurations, or link states on any interface, this causes an automatic refresh of the network object. Should you need to perform a refresh, you can use the following command:
(config) # network-object <NAME> refresh
When the TTL is lower than 5 minutes, Exinda waits the full five minutes before attempting a refresh in order to avoid DNS flooding.
CAUTION
Please be aware that if using a cluster of Exinda Appliances, the resolution for a given FQDN-Network Object, among the different appliances, might be unexpected if any of the following conditions are met:
- If the cluster members are using different DNS servers
- If the name being resolved returns a different set of addresses for each resolve (i.e. 'load balancing')
 Adding network objects in the EMC
A network object can be created in the Library for later use in other components and appliance groups, or it can be created directly in the Optimizer Policy Tree, which also saves it to the Library. You can also import network objects into the Library from an appliance.
 To create and apply a network object
To create and apply a network object:
- Go to Library > Network Objects.
- Click Create new network object in the librarythe Exinda repository for network objects and their definitions.....
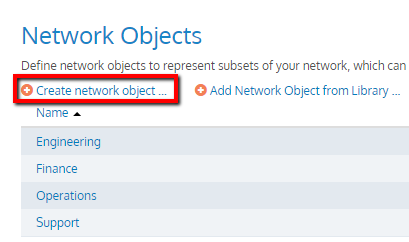
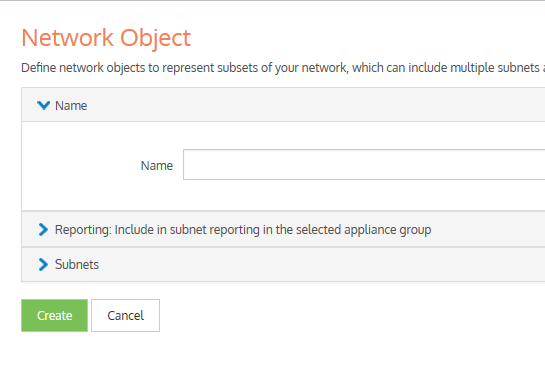
- Key-in a Name for the object.
- In the Subnets section, define subnets to include in this network object by IP Network Address and Mask Length or by Fully Qualified Domain Name (FQDN).
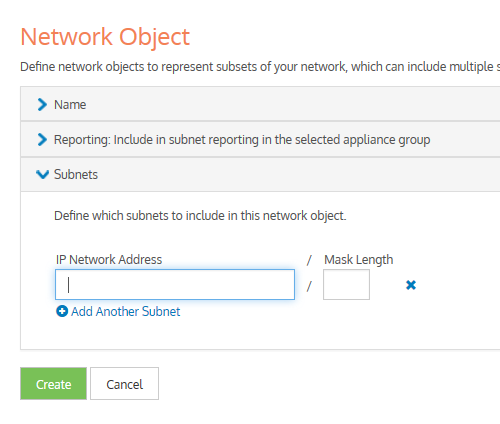
- Click Create. Repeat from step 1, if you want to create another network object.
- Go to Configured Appliances > Network Objects.
- Click Add network object from Library….
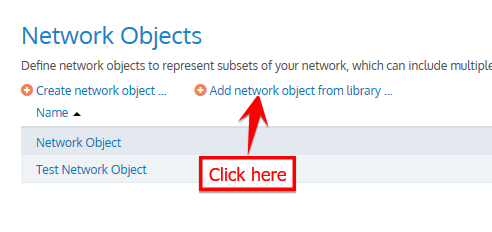
- Select one or more network objects to add and click Add Network Object to 'Configured Appliances'.
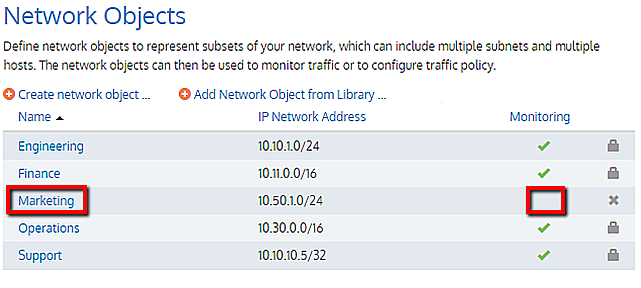
- To define whether to include monitor information of network objects in subnet reporting, edit the required network objects and check Include in subnet reporting option, within the Reporting section.
 To use a network object in a policy rule definition
You can apply a network object filter to a policy to filter by subnet (communicating with other specific hosts or subnets). Use the instructions above to create the Network Object in the library, and then refer to Policy Library for further instructions. The Network Objects saved as Library items appear in the Filter section, under the Source list.
 To use a network object in a virtual circuit definition
When defining virtual circuits to partition a circuit, you can apply Network Object library items to filter the traffic by subnet. Use the instructions above to create the Network Object in the library, and then refer to Virtual Circuits for further instructions.
 To use a network object in an Application
When defining applications to classify traffic, you can apply Network Object library items to classify traffic based on a combination of Network Object, TCPTransmission Control Protocol Port, UDPUser Datagram Protocol Port, DSCPDifferentiated Services Code Point, and Protocols. Use the instructions above to create the Network Object in the library, and then refer to Applications for further instructions.
 Configuring local network objects in the EMC
Local network objects define which part of the network is considered as the local area network relative to an appliance.
Local network objects take their definition from an IP network address and mask length to identify the range of IP addresses that exist in the LAN behind the appliance. You can define a local network object for each appliance, so that each appliance can differentiate between traffic that is external and internal to the LAN on which it operates. The local network objects cannot be deleted.
For reporting purposes, hosts and users are defined as internal or external by comparing the IP address with the network objects.
EXAMPLE
Considering that there are three sites, Chicago, Boston, and Dallas where each site has an appliance, and each appliance has a local network object. Do the following:
- Create network objects to represent the Chicago site, the Boston site, and the Dallas site.
- On the Chicago appliance, when compared to the appliance's local network object, the Chicago network object gets set as internal, and the Boston and Dallas network objects are set as external.
- On the Boston appliance, the Boston network object gets set as internal, and the Chicago and Dallas network objects are set as external.
In the EMCExinda Management Center, SaaS service to centrally monitor and configure multiple Exinda appliances configuration, local network objects are appliance specific, so appliances cannot share these objects.
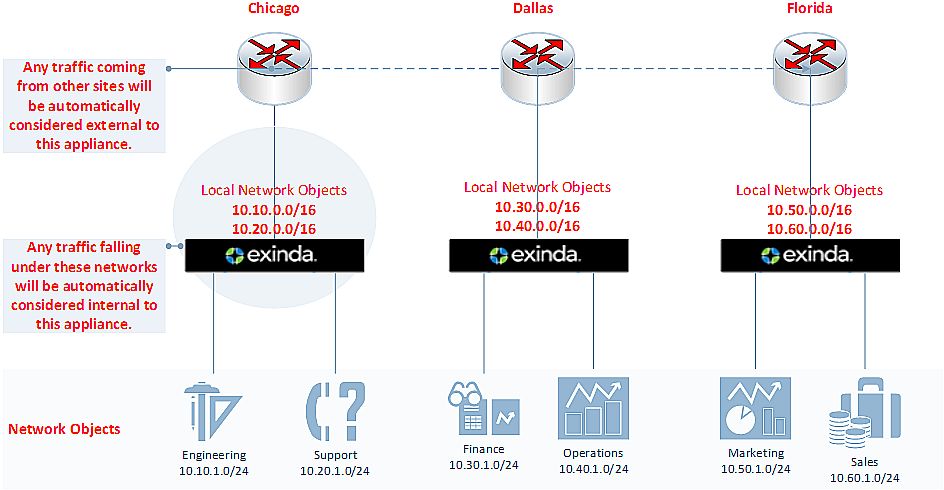
Diagram depicting separated local network objects for each appliance.
To configure the local network object:
- Go to Configured Appliances > Local Network Objects.
- Click Local to Appliance (Host ID) of the appliance to configure the local network object.
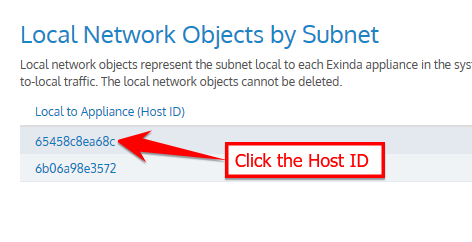
- Key-in the IP Network Address and Mask Length.
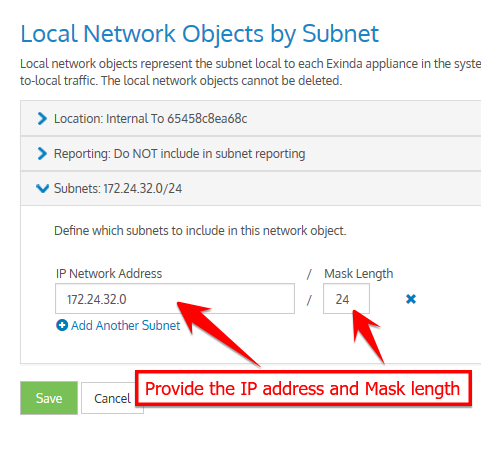
Defining local network object by subnet.
- Click Save.
NOTE
If the IP address and mask length you define are illegal, the EMC returns a warning and provides a suggestion for correcting the issue.
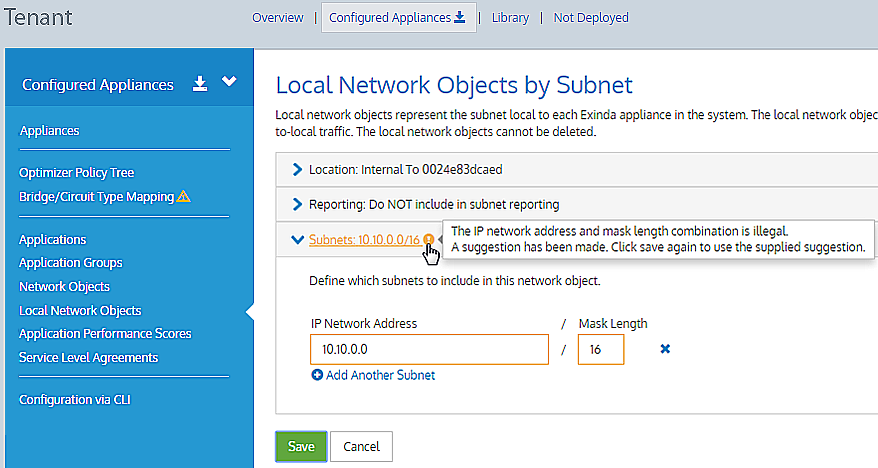
Defining local network object by subnet.
 Importing network objects
If you have existing appliances that are already configured with network objects, in the Exinda Management Center you can import these network objects into the library (one at a time) from the Not Deployed list. When importing network objects, the importer indicates if the network object already exists in the library (or is included in another network object), or if it conflicts with another network object in the library. By importing your network objects, you can more quickly start building a library of objects to use. The system lets you know if the imported network object is already in the library or if the imported network object definition is a subset of a network object in the library. This allows you to quickly ensure consistency across multiple appliances.
To import network objects:
- From the Not Deployed appliance list in your tenant, select the appliance from which you want to import the network objects.
- Click Import Configuration.
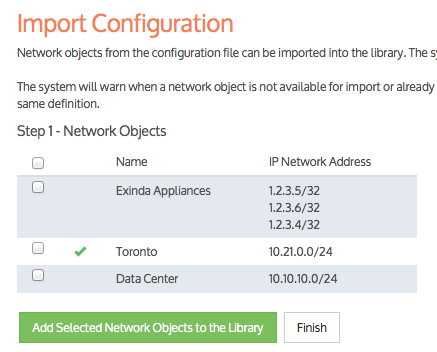
Importing configuration
- Click Import Network Objects. A list of network objects, with their IP addresses, appears. If a network object has the same name as a network object in the library, the following indicate the status:
-
 – if the IP addresses are the same, the name has a green check mark before it.
-
 – if all of the object IP addresses are contained within the one in the library, the name has a green subset symbol before it.
 -
 – if the imported network object has an IP address that is not in the network object with the same name in the library, the name has a warning icon before it. In this case, you have to resolve this conflict manually by modifying the network object in the Library.
- Select the network objects that you would like to import.
- Click Add Selected Network Objects to the Library. The network objects are imported into the library.
NOTE
While importing network objects, neither the location (internal or external) of the network object, nor the reporting flag are imported.