Whitelist
NOTE
Whitelist affects only Anti-Spam filters and not email security and content filtering
The Whitelist contains lists of criteria that identify legitimate email. Emails that match these criteria are not scanned by anti-spam filters and are always delivered to the recipient. Emails can be whitelisted using the following criteria:
- Sender’s email address, email domain or IP address
- Senders to whom an email was previously sent (Auto-whitelist)
- Recipient (exclude local email addresses from having emails filtered)
- Keywords in email body or subject
The whitelist and Auto Whitelist features are enabled by default.
Important notes
Using the Auto Whitelist feature is highly recommended since this eliminates a high percentage of false positives.
In Keyword Whitelist it is recommended to add terms that spammers do not use and terms that relate to your nature of business, for example your product names. Entering too many keywords increases the possibility of emails not filtered by GFI MailEssentials and delivered to users’ mailboxes.
Whitelisting an internal user defeats the purpose of the Anti-Spoofing filter. For more information refer to Anti-Spoofing.
Configuring Whitelist
- Go to Anti-Spam > Whitelist.
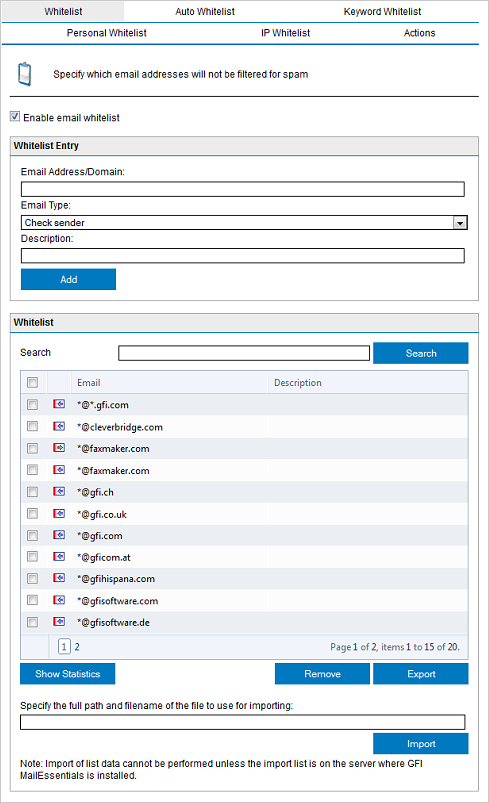
Whitelist tab
- From the Whitelist tab, configure the email addresses and domains to whitelist. Select/Unselect Enable email whitelist to enable/disable whitelist. Perform the following actions:
| Option |
Description |
|---|---|
| Populate Auto Whitelist automatically: | If selected, destination email addresses of outbound emails are automatically added to the auto-whitelist. |
| Enable Email Auto Whitelist |
Select this option to enable auto-whitelist. Senders of incoming emails are matched against the auto-whitelist. If the sender is present in the list, the email is forwarded directly to the recipient’s Inbox. |
| Maximum entries allowed in the Auto Whitelist: |
Specify the number entries allowed in Auto-Whitelist. When the limit specified is exceeded, the oldest and least used entries are automatically replaced by the new entries. |
- From the Keyword Whitelist tab, specify keywords that flag emails as valid emails:
| Option | Description |
|---|---|
| Enable email body keyword whitelist |
Select this option to check for keywords in the email body which qualify an email as valid. Add keywords to the Body Keywords list. You can also import or export lists of keywords from/to an XML file. |
| Enable email subject keyword whitelist |
Select this option to check for keywords in the email subject which qualify an email as valid. Add keywords to the Subject Keywords list. You can also import or export lists of keywords from/to an XML file. |
| Match whole words only (words/phrases in subject/body) | When selecting this option, only whole words from the keyword whitelist are matched that qualify an email as valid. |
- From the IP Whitelist tab, configure:
| Option | Description |
|---|---|
| Enable IP Whitelist | Select to allow emails received from specific IP addresses to be whitelisted. |
| Add IP Whitelist entries |
1. Specify:
2. (Optional) Add a Description. 3 Click Add. |
| Remove IP Whitelist entries | Select the IPs to remove and click Remove. |
- Click Actions tab to enable / disable logging of whitelist occurrences to a file. Provide a path/folder where to store the generated log file.
- Click Apply.