Installation procedure
This section describes how to run the installation of GFI MailEssentials.
Important notes
- If you are currently using a previous version of GFI MailEssentials, you can upgrade your current installation while at the same time retaining all your existing configuration settings. Upgrade is not reversible; you cannot downgrade to the previous version after upgrading.For more information refer to Upgrading GFI MailEssentials.
- GFI MailEssentials 21 and later offers two types of licensing services:
- Using the GFI Account credentials. The username and password are retrieved from GFI Accounts and assigned to the user in the moment of the registration of the account.
- Using a license key. When upgrading to a new major release your also need to upgrade your license key. For more information refer to Obtaining a GFI MailEssentials subscription.
- GFI MailEssentials installation restarts Microsoft® Exchange or Microsoft IIS® SMTP services. This is required to allow GFI MailEssentials components to register correctly. It is recommended to install GFI MailEssentials at a time when restarting these services has the least impact on your network.
- Before running installation wizard, ensure that:
- You are logged on using an account with administrative privileges.
- The machine where GFI MailEssentials is going to be installed, meets the specified system requirements.
- Configure your firewall to allow GFI MailEssentials to connect to GFI servers.
- Disable third-party antivirus and backup software from scanning folders used by GFI MailEssentials.
- If installing GFI MailEssentials on an email gateway or relay/perimeter server, configure that machine to act as a gateway.
- Save any pending work and close all open applications on the machine.
Running the installation wizard
- Right-click the GFI MailEssentials installer and choose Properties. From the General tab, click Unblock and then Apply. This step is required to prevent the operating system from blocking certain actions by the installer.
- Launch the GFI MailEssentials installer.
- Select the language to use with this installation of GFI MailEssentials. Accept the terms and conditions and click Next.
NOTE
Language selection is not reversible. You will need to reinstall GFI MailEssentials to change the language selected at this stage.
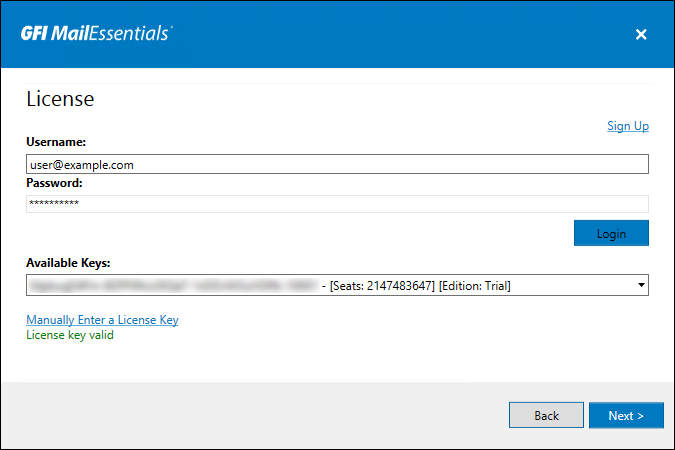
Specifying a GFI account or a license key
- In the Username and Password fields, enter your GFI Accounts area credentials or the account used when signing up to download GFI MailEssentials. Click Login to retrieve the license keys registered to your account. Choose a key from the Available keys drop-down. If you do not have a GFI account , click Sign up and fill in the registration form. You may also manually specify a license key in the Manually Enter a License Key field. Click Next. For more information refer to Obtaining a GFI MailEssentials subscription.
- Select the mode that GFI MailEssentials will use to retrieve the list of email users. The selected user mode cannot be changed after installation. The list of modes available depends on the environment where GFI MailEssentials is installed.
| Option | Description |
|---|---|
|
This option is only available when installing GFI MailEssentials on a machine that is joined to an Active Directory domain. GFI MailEssentials retrieves the list of mail-enabled users from Active Directory. Selecting this option means that GFI MailEssentials is being installed behind your firewall and that it has access to the Active Directory containing ALL your email users. |
|
|
SMTP |
Select this mode if an Active Directory domain is not available or if you would like to manage the list of users manually. In this mode, GFI MailEssentials automatically populates the list of local users using the sender’s email address in outbound emails. The list of users can also be managed from the GFI MailEssentials General Settings node. For more information refer to Managing local users. |
| Remote Active Directory |
Option only available when installing GFI MailEssentials on a machine that is NOT joined to an Active Directory domain. In this mode, GFI MailEssentials retrieves the list of users from a remote Active Directory domain, even though the GFI MailEssentials server is not joined to a domain. This mode can be used for example, when installing GFI MailEssentials in a DMZ, before the firewall that separates your internal and external networks. In this example, the GFI MailEssentials server is typically not joined to the internal domain. In this mode, all other features of GFI MailEssentials function similarly to when GFI MailEssentials is joined to a domain. When choosing this option, in the next screen specify the details of the Remote Domain Controller to use. Ensure that GFI MailEssentials can communicate with this server using LDAP, which by default uses port 389 (or port 636 when using an SSL certificate). |
| GFI Directory |
Option only available when installing GFI MailEssentials on a machine that is not joined to an Active Directory domain. In this mode, GFI MailEssentials connects and fetches users from GFI Directory. This mode is best suited for installations that do not have Active Directory yet want the features and functionalities that a user directory offers. When this option is selected, you need to enter the details to connect with a separate instance of GFI Directory. For more information refer to Installing GFI MailEssentials with GFI Directory. |
| Option | Description |
|---|---|
| Administrator Email Address | Specify the administrator email address to use for notifications about product status. |
| SMTP Server Setup |
Select the SMTP Server that GFI MailEssentials binds to. By default, GFI MailEssentials binds to your Default SMTP Virtual Server. If you have multiple SMTP virtual servers on your domain, you can bind GFI MailEssentials to any available SMTP virtual server. NOTES
|
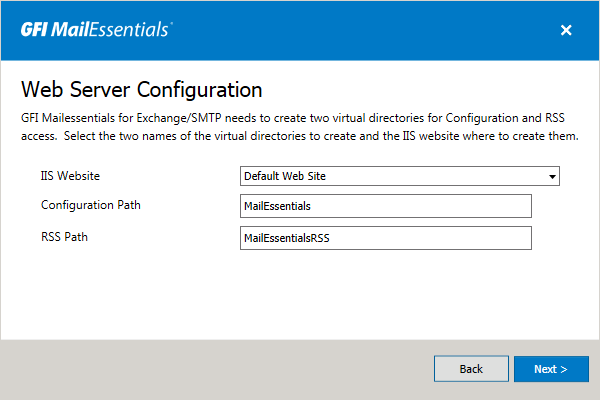
Web server and virtual directory details
- In the Web Server Setup dialog, configure the following options:
NOTE
Default settings are typically correct for most installations.
- Click Next.
- Select a folder to install GFI MailEssentials and click Next. When the installation is an upgrade, GFI MailEssentials installs in the same location as the previous installation.
- Click Install to start the installation process. If you are prompted to restart the SMTP services, click Yes.
- On completion, click Finish.
NOTE
For new installations, setup automatically launches the Post-Installation Wizard. For more information refer to Post-Installation Wizard.