Anti-Spoofing Settings
- Login as DomainAddress or URL of a particular network. Group Administrator.
- Go to Filter Rules > Anti-Spoofing Settings. The Anti-Spoof Domains window is displayed showing a list of your domains:
- Check the box
 to the left of the domain you want to edit and click
  (edit). (Check multiple boxes to edit multiple domains at once). The Anti-Spoof Settings window displays for your selected domain(s).
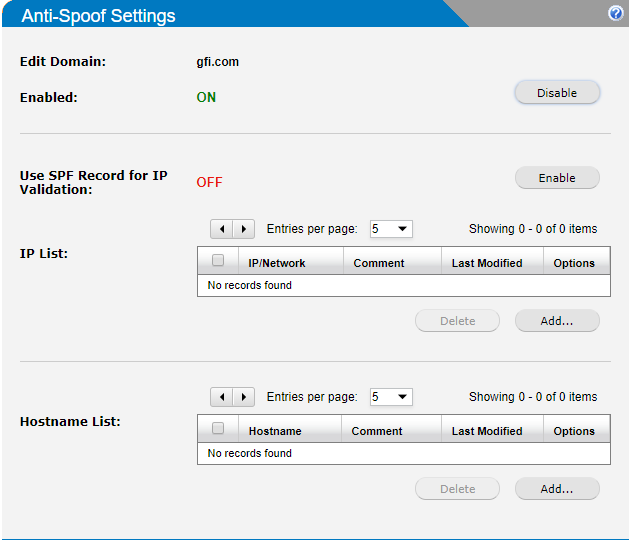
 - Click Enable on the Anti-Spoof Settings panel. The Anti-Spoof Settings panel expands.
- Enable Use SPF Record for IP Validation (disabled, by default) to use your SPF record to determine if a sender is valid. Instead you can add a list of CIDR notation ranges in the IP List that are allowed to send email using your domain.
- Click Add... to add an entry. Click
 (edit) to edit an IP, or
  (delete) to delete an entry from the list.
 - On Hostname List section click Add... to enter hostnames that are allowed to send email using your domain, e.g. "www.example.com".
- If you are editing multiple domains, click Save to save changes to all domains and return to the Anti-Spoof Domains window.
Important
If you do not click Save when editing multiple domains, only changes to the first domain checked is saved.

Check the box and click edit to display anti-spoofing settings window

Click enable to switch ON anti-spoofing
Follow the steps below to enable and modify your anti-spoof settings:

Set the fields on this form as per instructions given below
Using IP List is more secure than using Hostname List. Generally, try to use Hostname List only if you are not using SPF and a service you are using has too many IPs to list.
Note
If using regular expression, the more generic the expression, the easier it is to bypass spoofing.