Relay Settings
You can login as DomainAddress or URL of a particular network. Group Administrator and create as many domains as you want. Each domain can have its own domain administrators created.
Creating a domain is very simple, in GFI EmailSecurity. Follow the below steps:
- Login to GFI MailSecurity as the Domain Group Administrator.
- Go to Settings > Relay Settings.
- On Mail Relay Settings page , click Add .
- Enter the fields on Add Domain pop up. (eg “gfi.com”)
The following table describes the Add Domain fields to be entered:
| Field | Description |
|---|---|
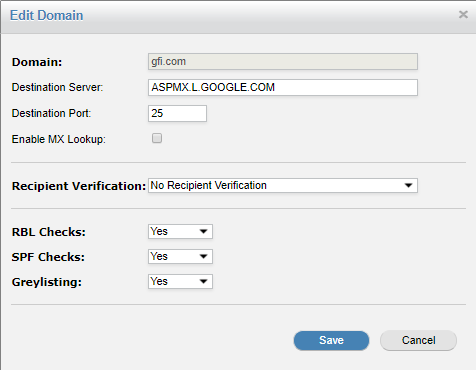
| Domain | The Domain name. |
| Destination Server | The host where the email server resides. |
| Destination Port | The port GFI MailSecurity used to connect to the IMAP server for authentication purposes. This is set to 143 by default. |
| Enable MX Lookup | Check this to enable MX lookup. |
| Recipient Verification |
Set this field to Dynamic Recipient Verification if your mail server supports it. This checks the address of incoming email with the mail server. If the intended recipient is unknown then the email is dropped with a DSN (Delivery Status Notification) message and no further processing is performed. If Dynamic Recipient Verification is not supported then you can select other options and make the required settings accordingly.
|
| RBL Checks | Select whether RBL (Realtime Blackhole Lists) check is required or not. This is used to check if an incoming message has passed through one or more machines which are blacklisted as spam sources or relays. |
| SPF Checks | Select whether SPF (Sender Policy Framework) check is required or not. SPF allows the owner of a domain to use special DNSDomain Name System (DNS) is a database used by TCP/IP networks that enables the translation of hostnames into IP numbers and to provide other domain related information. records to specify which machines are authorized to transmit e-mail for that domain. |
| Greylisting | Select whether Greylisting is required or not. It is an anti-spam technique which initially does not accept an email from an unknown source but after some time it accepts. |
To edit a domain, click  corresponding to the domain you want to edit. On the Edit Domain pop up, make the required changes and click Save.

Use this window to edit domain information
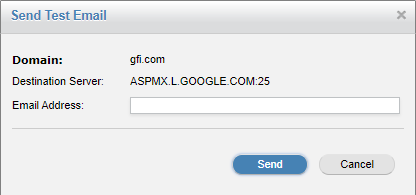
To test a domain, click  corresponding to the domain you want to test. On the Send Test Mail pop up, enter the Email Address and click Send.

Use this window to send test mail