Kerio Operator Box 1000/3000 Series
Learn how to safely install and implement Kerio Operator Box 1000 and 3000 Series PBXPrivate Branch Exchange - System that connects telephone extensions and switches calls. appliances.
General Safety Instructions
During installation follow these security instructions:
- The appliance should be placed on a flat surface or securely mounted horizontally in rack enclosure.
- Do not attempt to open or disassemble the appliance for any reason.
- Strictly follow the installation instructions (see section 4).
- Do not place the appliance near a heat source.
- Place the appliance in a ventilated space, making sure that the appliance fans and vents are unobstructed at all times.
- Do not expose the appliance to liquids of any kind. In the event of liquid intrusion, unplug the appliance immediately.
- Verify that the voltage and frequency of the power socket matches the values printed on the power adapter before plugging in the appliance. Use only the power adapter supplied with the appliance.
- Do not place any items on top of the power cable; keep the power cable away from walkways or other areas where it could pose a tripping hazard.
Device Description
Kerio Operator Box types:
- Kerio Operator 1000 Series — Sub 1U table mountable appliance (see figure 1).
- Kerio Operator 3000 Series — 1U rack mountable appliance (see figure 2).
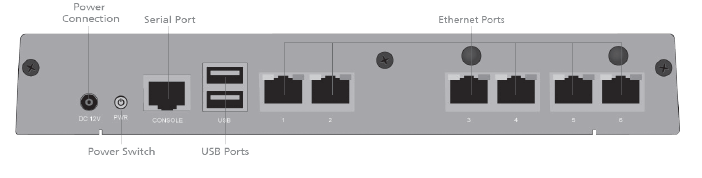
Figure 1 Kerio Operator Box 1220
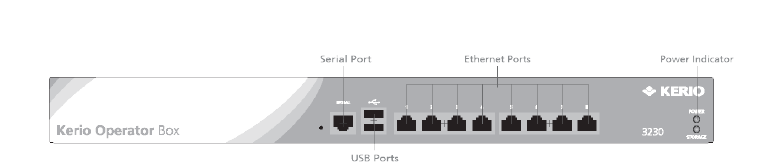
Figure 2 Kerio Operator Box 3230
| Feature | Description |
|---|---|
| Serial port | Used for connecting to a console with a serial cable |
| USB ports | Input for USB devices |
| Ethernet network ports | Used for connecting to the Internet and the LAN with an Ethernet cable |
Kerio Operator Box Installation and Configuration
Once a suitable place has been located for the appliance and it has been plugged into a power outlet according to the safety instructions, it is time to connect it to the network and configure settings.
- Connect Ethernet port number 1 to the network using an Ethernet cable.
NOTE
Alternatively, you can use port number 2 which includes a DHCPDynamic Host Configuration Protocol - A protocol that automatically gives IP addresses and additional configuration to hosts in a network. client.
- Power the device with the power switch. For 3000 series, the power switch is located in the rear of the device.
- On the computer you want to use for the Kerio Operator configuration, set IP address to
10.10.10.2and Subnet mask to255.255.255.0. Setting the default gateway and DNS servers is not necessary for the Kerio Operator configuration. - The Kerio Operator PBX is configured through the Kerio Web Administration interface. Open a web browser and connect to the Kerio Control Administration web interface using the https://10.10.10.1/admin URLThe Uniform Resource Locator is the address of a web page on the world wide web..
- Ignore the SSLSecure Sockets Layer - A protocol that ensures integral and secure communication between networks. certificate warning.
- Follow the instructions provided by the wizard and configure the appliance.
NOTE
Alternatively, you can use the serial port to connect the console to the device. After the server starts, you can get information about the actual network configuration or you can use the console to restart or turn off the appliance. Set your terminal application in the following mode: 9600, 8, N, 1.
Additional Information
For further assistance with configuration please refer to additional documentation at:
For online and community based support resources please visit: