Kerio Control Virtual Appliance for Hyper-V
This topic provides detailed description on installation and basic configuration of the Kerio Control Virtual AppliancePre-configured Kerio Control virtual machine image for VMware or Hyper-V. for Hyper-V. All additional modifications and updates reserved.
Kerio Control Virtual Appliance for Hyper-V is a firewall, VPNVirtual private network - A network that enables users connect securely to a private network over the Internet. and unified threat management solution distributed as a virtual appliance for Hyper-V. The software provides a complex set of features for security of local networks, control of user access to the Internet and monitoring of user activity. It also includes tools for secure interconnection of company's offices and connection of remote clients to the LANLocal area network - A network that connects computers and other devices in a small area. via the Internet (VPN).
To keep this document simple and easy to read, Kerio Control Virtual Appliance for Hyper-V is referred to as firewall.
System requirements and licensing
System requirements
For up-to-date system requirements, please refer to: https://www.gfi.com/products-and-solutions/network-security-solutions/kerio-control/specifications/system-requirements
Licensing Policy
As a response to the need for security and VPNs, Kerio Control Virtual Appliance for Hyper-V can be used for free for three months from installation (special trial version).
Upon the special trial version expiration, you will need to purchase a corresponding license for further use of the product. Then, simply register the trial version with a valid license key. This process makes the trial version a full version automatically.
The license is defined by:
- The base product license,
- Kerio Control Web Filter license (optional component used for classification of web content),
- License for the integrated Kerio AntivirusAn integrated antivirus engine powered by Bitdefender. (optional component).
The special, extended trial version removes the filtering and AV components during the first 30 days. These features are not required for VPNs. Customers who would like these components can contact a reseller for purchasing the full product, and then enabling the optional components.
For detailed information about license options, pricing and license purchase, refer to http://www.kerio.com/control.
Installation and basic configuration of the firewall
Importing the virtual appliance into Hyper-V
Kerio Control Virtual Appliance for Hyper-V is distributed in the form of virtual harddisk.
- Unpack the distribution Zip package into the desired target location (e.g. C:\KerioControl). After importing the appliance into Hyper-V, the location cannot be changed anymore!
- The server needs to have the Hyper-V role set. You can add the role in the Server Manager control panel (Roles > Add Roles).
- Open the Hyper-V Manager control panel and choose the local Hyper-V server.
- Run the New virtual machine wizard (New > Virtual machine).
- As a virtual machine location, choose the directory with the unpacked virtual harddisk (see above). Assign at least 1,5 GB RAM and virtual network adapters.
- In the next step, choose the existing virtual harddisk option. Select the virtual harddisk unpacked from the distribution package.
- After finishing the wizard, connect to the virtual appliance and start it.
Installation and basic configuration
Kerio Control checks all interfaces for a DHCPDynamic Host Configuration Protocol - A protocol that automatically gives IP addresses and additional configuration to hosts in a network. server in the network and the DHCP server provides a default route after the installation:
- Internet interfaces — All interfaces where Kerio Control detects the DHCP server and the default route in the network. If there is more than one Internet interface with a default route, Kerio Control arranges the Internet interfaces in the load balancing mode.
- LAN interfaces — All interfaces without any detected DHCP server. Kerio Control runs its own DHCP server through all LAN interfaces configured to 10.10.X.Y where X is the index of the LAN interface (starting with 10). Y is 1 for the Control interface and 11-254 for DHCP assigned hosts.
To change the automatic pre-configuration, go to Kerio Control Administration to section Interfaces. For more information refer to Configuring network interfaces.
Login to the Kerio Control Administration web interface and configure the product as necessary.
Setting a static MAC address for the Kerio Control appliance
Hyper-V assigns dynamic MAC addresses by default. Kerio Control needs a static MAC addressMedia Access Control Address - A unique identifier that specifies a device in a network.:
- In Virtual Machine Manager, go to properties of the Kerio Control appliance.
- In Properties, go to Hardware Configuration.
- In Hardware Configuration, select Static in the MAC address section.
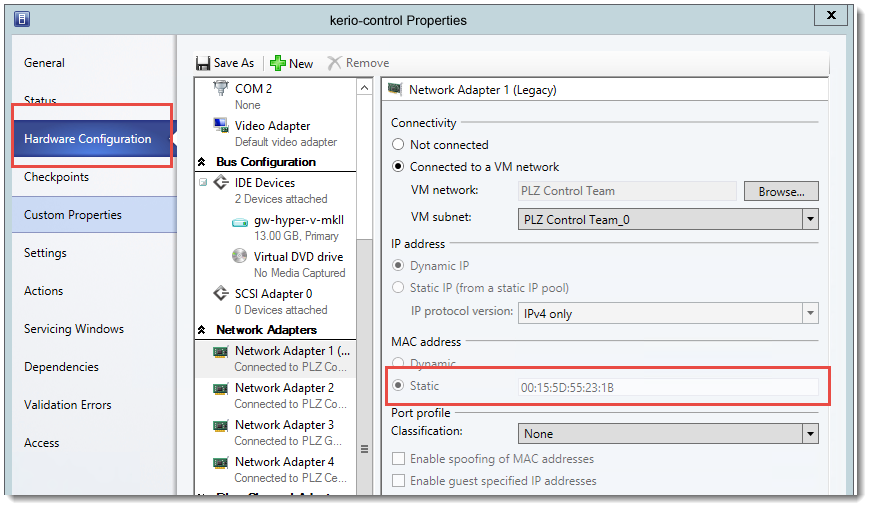
Hardware configuration in the properties of Kerio Control
Hyper-V assigns the static MAC address to your Kerio Control appliance.
Firewall administration
The Kerio Control Administration web interface allows full remote administration of the firewall and viewing of status information and logs.
To perform the initial setup, open the following address in your web browser: https://kerio_control_ip_address:4081/admin
for example, https://10.10.10.1:4081/admin, which is the IP addressAn identifier assigned to devices connected to a TCP/IP network. where Kerio Control is accessible from your LAN.
Authenticate with username Admin and the password set within the product activation.
NOTE
Remote administration via the Internet must be enabled explicitly by the firewall's traffic rules.
The firewall's console
On the console of the virtual computer where Kerio Control Virtual Appliance for Hyper-V is installed, information about the firewall remote administration options is displayed. Upon authenticating by the administration password (see above), this console allows to change some basic settings of the firewall, restore default settings after installation and shut down or restart the computer.
The firewall's console allows:
- to change configuration of network interfaces (e.g. if network configuration changes or if an incorrect interface was chosen for the local network during the firewall installation).
- to change traffic policy of the firewall so that remote administration is not blocked (if connection to the administration fails).
- to shut down or restart the firewall.
- to recover default configuration.
This option restores the firewall settings as applied upon the first start-up on Hyper-V. All configuration parameters any other data will be removed and the initial configuration wizard is started again. Restoration of default configuration is useful especially if the firewall does not work correctly and you cannot easily fix the configuration.
Creating your VPN
Here is a summary of what is required in terms of configuration:
Network manager sets up Kerio Control and gets the IP address or name(s) of the Kerio Control Server.
Network manager sets up VPN user accounts based on the need of remote workers. Refer to: Managing user accounts in Kerio Control
The network manager sends information to remote workers, with a link to the Download VPN Client, or as an executable file that has the client plus organization’s VPN information.
Remote workers must install the Kerio VPN Client on their machines that connects to the network. For more information refer to Installing and configuring Kerio Control VPN Client for users.
In the Users and Groups > Users section, enable the user right/access: Users can connect using VPN for your users. If you are using a template for all users, this right must be configured at the template level. For more information, see:
Connection to the VPN Server from the Internet as well as communication between VPN Clients must be allowed by traffic rules. There is a default traffic policy rule which should be enabled. Otherwise, there is a defined service for Kerio VPN (TCPTransmission Control Protocol - ensures packet transmission./UDPUser Datagram Protocol - ensures packet transmission. 4090), in case you do not have this rule.
Network manager must connect with their ISP to ensure:
- Inbound connections from the Internet to Kerio Control must be allowed via TCP and UDP port 4090
- Configure a DNSDomain Name System - A database enables the translation of hostnames to IP addresses and provides other domain related information. FQDN name for the VPN serverKerio Control includes a VPN server which provides users to connect to the Kerio Control network from the Internet securely. name that resolves to the correct public IP address assigned to the service
- If using commercial SSLSecure Sockets Layer - A protocol that ensures integral and secure communication between networks. certificates make sure the server certificate is imported into Kerio Control server and assigned to the VPN service
- Test VPN connections using an external computer with the Kerio VPN Client installed
- Document the configuration steps necessary in order to install and configure the VPN client and share the final document with remote users
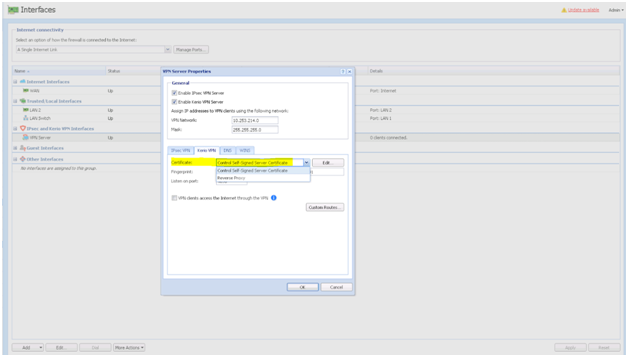
VPN Server Properties
Find additional information here: Configuring network interfaces