Date and Time Configuration
It is important to accurately set the date and time of your Exinda appliance so that all time-based functions use the appropriate time. It is highly recommended to set the date and time using an NTPNetwork Time Protocol server. This is particularly important if you have multiple Exinda appliances where you need to correlate or aggregate the monitoring data or if you need the exported NetFlow records to be synchronized with NetFlow records from other network appliances.
It is recommended to set the date and time using one or more NTP servers. The more NTP servers that are configured, the more accurate the time will be. It is generally accepted that four NTP servers is the optimal number of servers for extremely accurate time. To explain why four NTP servers is considered an optimal number of servers, see http://www.ntp.org/ntpfaq/NTP-s-algo-real.htm
A great source for NTP servers is the NTP Pool Project at http://www.pool.ntp.org/en/use.html
The date and time setting has implications for the following functions:
- Monitoring data have time stamps and the monitor charts will be reported relative to these time stamps
- Exported NetFlow records have time stamps
- Schedule-based policies need to take effect at the appropriate times
- Scheduled events, such as scheduled reports or scheduled jobs, need to occur at appropriate times.
Note that when the current time on the appliance is out of sync with the date-time provided by the NTP servers, the NTP servers will slowly adjust the clock time. If the appliance's time is significantly out of sync with the NTP servers (say, 1000 seconds or approximately 15 minutes), then it is recommended that you force the appliance to jump to the correct time using the ntpd command from the command line.
Go to Configuration >System > Setup > Date and Time.

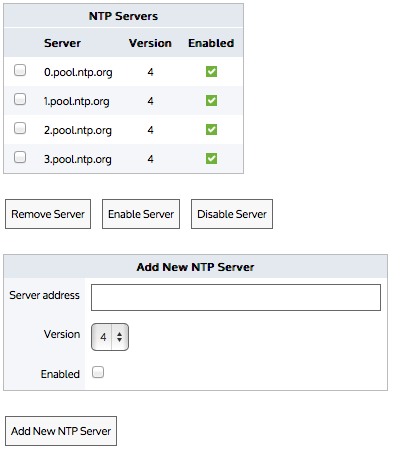
- Add one or more NTP servers by entering the IPInternet protocol address or hostname of the NTP server, the version of NTP supported by the server, and enabling it by checking the enable checkbox in the Add New NTP Server area, Only hostnames and IPv4 addresses are supported.
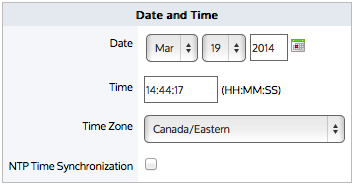
- In the Date and Time area, select the NTP Time Synchronization checkbox and Apply Changes.

The change is applied only if you accept the Restart Message to restart the UI.
Any of the NTP servers can be disabled, re-enabled, or removed by clicking the appropriate button - Disable Server, Enable Server, Remove Server.

- In the Date and Time area, ensure that the NTP Time Synchronization checkbox is not checked.
- Set the desired date, time, and timezone and click Apply Changes.
WARNING
If you change the time manually, you will be prompted to restart the UI. If you do not accept the Restart, the configuration change is not applied.
If the NTP Time Synchronization checkbox is checked, then the manual date-time setting will not be applied.
On the command line, type: ntpd <ntp-server-address>
<ntp-server-address>- The location of an NTP server specified as hostname or IPv4/IPv6 address.
This command is similar to the deprecated ntpdate command.