Configuring the EMC
To configure the Exinda Management Center to communicate with the Exinda Network Orchestrator appliances, follow the workflow below. After you complete the steps, you are ready to create policy and send it to your appliance groups.
 Step 1: Identify the SDP Location on the Exinda Management Center (if forwarding data to an SDP server).
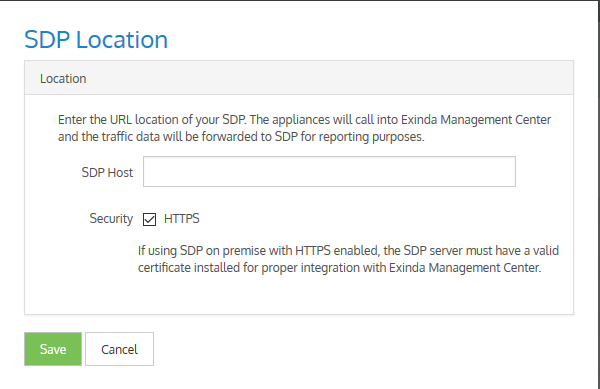
Configure the location of your SDP so that data from the appliances is forwarded to this SDP.

At the top right of the interface, click Admin > SDP Location and specify the location of your SDP. The "SDP Location" configuration pop-up opens.

All tenants will be associated with the same SDP.
 Step 2: Configure Administrator Email Settings
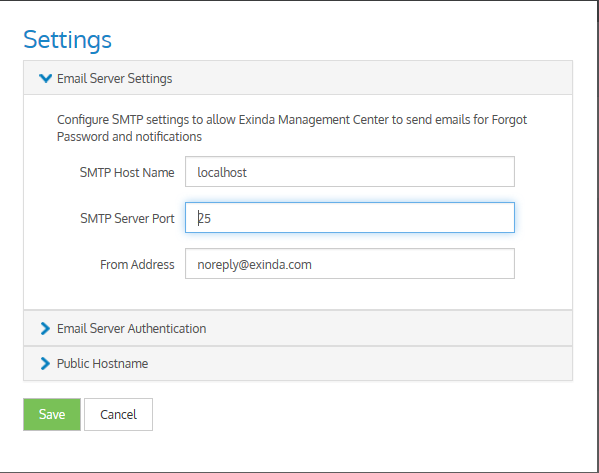
The mail server is used to send emails when a user needs to use the Forgot Password functionality.
At the top right of the interface, click Admin > SMTPSimple Mail Transfer Protocol Server Settings and specify the location of your Mail Server settings.

 Step 3: Configure your appliances to communicate with Exinda Management Center
Exinda Network Orchestrator appliances need to know the location of the Exinda Management Center before they can communicate with it.
To allow an Exinda Appliance to communicate with the EMCExinda Management Center, SaaS service to centrally monitor and configure multiple Exinda appliances, in the Exinda Web UI use the SDP Options to enable and set the location of the EMC system. The data collected by the Exinda Appliance is then forwarded to SDP for report generation. If you have an account in SDP, you can view and create reports there.
IMPORTANT
- Only Exinda Appliances running firmware version 7.0.2 Update 1 or later support proper communication with the Exinda Management Center.
- After the appliances have been configured to communicate with the EMC, sending configuration or performing firmware updates will not work from SDP. To restore this functionality in SDP, you need to reconfigure your appliances to communicate with SDP.
This step requires configuration on the Network Orchestrator appliances.

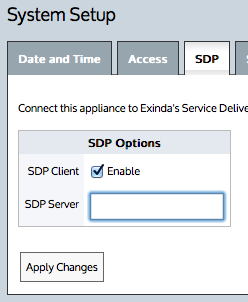
SDP settings
To configure the appliances to communicate with Exinda Management Center:
- In the Exinda Web UI, go to Configuration > System > Setup > SDP.
- Set the SDP Server to the location of your EMC.
- If using the Exinda-hosted EMC, type
oc.exinda.com. - If using your on-premises EMC, type the location of your EMC instance.
- Select the SDP Client Enable checkbox.
- Click Apply Changes.
 Step 4: Add Tenants
NOTE
This screen appears only if using an on-premises instance of EMC.
In the EMC web UI, click Create new tenant at the top of the tenant tree and specify the name of your tenant.

After you have created the tenant, click the tenant in the list to start managing the appliances in the tenancy.
 Step 5: Add Appliances to Tenants
Wait for your appliance(s) to call in. If using the Exinda-hosted service or an on-premises instance with a single tenant, the appliance appears in the Not Deployed group.

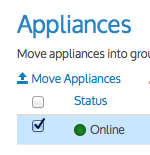
If you are using a multi-tenant on-premises instance, the appliance will appear in the Appliance Pool. Move the appliance from the Appliance Pool to Unallocated under the appropriate tenancy.

 Step 6: Create Appliance Groups within a Tenant (optional)
Create an appliance group hierarchy under Configured Appliances. Appliances can be added to these groups. All appliances under the same group will receive the same configuration. Groups can be created hierarchically. Go to the Configured Appliances area. Click the drop down caret on the blue menu heading. Click the drop down caret on the desired appliance group and select Add Group. For more information refer to Managing Exinda Appliances with EMC.

Move the appliances from the Not Deployed group to the Configured Appliances group (or one of the appliance groups that you created). Only appliances in a configured appliances group can be configured by Exinda Management Center. Select an appliance in the Not Deployed list and click Move Appliances. For more information refer to Managing Exinda Appliances with EMC.
