Configuring the Content Filter
NOTE
Watch the Configuring the content filter video.
In the content filter, Kerio Control defines the types of web activities that are allowed by users on your network. The content filter blocks:
This filtering on different network layers is easily configured by a single set of rules.
Here are the main purposes of content filtering:
- Access limitations according to URL (substrings contained in URL addresses)
- Filtering based on classification by the Kerio Control Web Filter module (worldwide website classification database)
- Filtering based on classification by the Application awareness
- Limitations based on occurrence of Forbidden words
- Enforcing SafeSearch in supported search engines
- Access to certain FTPFile Transfer Protocol - Protocol for transferring computer files from a server. servers
- Limitations based on filenames
- Elimination of P2P networks
Prerequisites
- Traffic must be controlled by the HTTPHypertext Transfer Protocol - protocol for exchange of hypertext documents in HTML. / FTP / POP3Post Office Protocol 3 - A protocol used by local email clients to retrieve emails from mailboxes over a TCP/IP connection. protocol inspector. The HTTP, FTP and POP3 protocol inspectors are activated automatically unless their use is denied by traffic rules.
- Kerio Control performs URL based filtering for encrypted traffic (HTTPSHypertext Transfer Protocol - version of HTTP secured by SSL. protocol). Learn more in a special article HTTPS filtering specifics.
- Secured FTP traffic (FTPS, SFTP) cannot be filtered.
- Content rules are also applied when the Kerio Control's proxy server is used. However, FTP protocol cannot be filtered if the parent proxy server is used. In such case, content rules are not applied.
NOTE
Kerio Control does not apply content rules to the reverse proxy traffic.
Configuring content rules
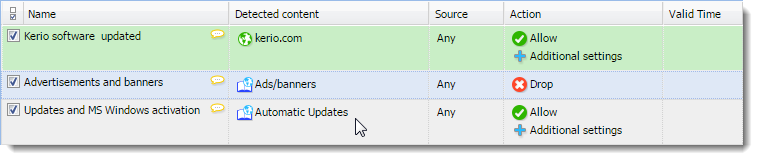
The Content Rules table includes several predefined rules.
Each rule is compound from several parts. Each part is represented with a column in the Content Rules table. Here there are the most important parts of each rule:
- Detected content defines what types of content to filter.
- Source is a person or IP addressAn identifier assigned to devices connected to a TCP/IP network. to which the rule applies.
- Action describes what to do with the selected content.
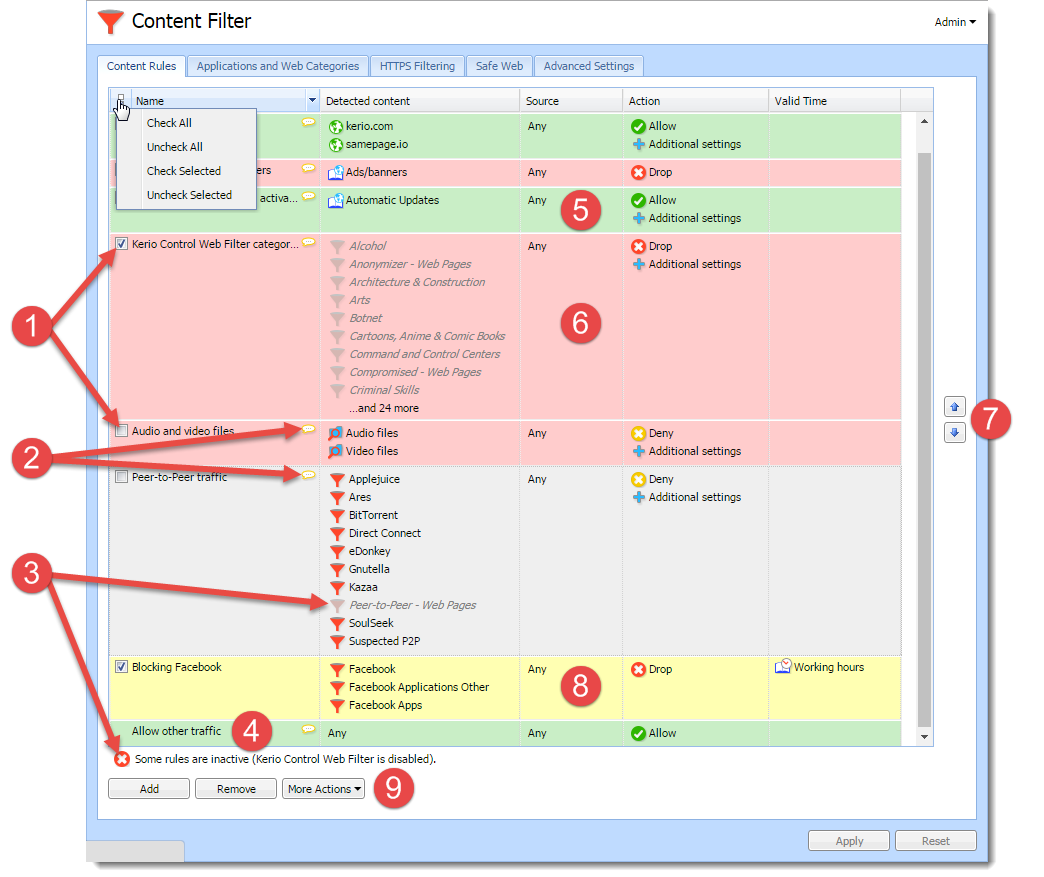
In the Content Filter table, you can see:
- Checkboxes which enable/disable rules (1)
- Short descriptions of each rule (2)
- Rules are greyed out when they are inactive(3). Kerio Control Web Filter or the application awareness feature is inactive on the Content Filter > Applications and Web Categories tab.
- The default rule allows all content (4)
- Green color highlights allowing rules (5)
- Red color highlights denying and dropping rules (6)
- The rule order is important. Use the arrows to adjust the order of rules. For details, see Ordering rules (7)
- Color your own rules for clear arrangement (8)
- More Actions (9) allows you to:
- Duplicate the highlighted rule
- Change color of the highlighted rule
- Change the description the highlighted rule
- Edit the time range of the highlighted rule
Duplicating content rules
If you want to create a new content rule, try to find a similar one and duplicate it first. Duplicating a rule and adjusting some parameters is quicker than creating the new rule.
Adding new rules
- In the administration interface, go to Content Filter.
- On tab Content Rules, click Add.
- In table, type a name of the rule in the newly created line.

- Double-click the Detected content column and select what type of the content should be filtered (see details in Detecting content).
- Double-click the Source column and select users and/or IP addresses.
- Double-click the Action column and fill in the dialog box (see details in Setting actions)
- (Optional) Set the valid time — you can set a time interval for applying the rule. Create time intervals in Definitions > Time Ranges (see article Creating time ranges in Kerio Control) then you can select the time interval in the Content Rules table.
- Click Apply.
Detecting content
In the Content Rule - Detected Content dialog box, click:
- Applications and Web Categories — for pages sorted in the selected categories by the Kerio Control Web Filter and the application awareness for pages sorted in the selected categories by the application detection.
- File Name — to allow/disable the transfer of the defined file types.
- URL and Hostname — to type any URL starting with
the specified string. It is possible to use wildcards
*(asterisk) and?(question mark). - URL Groups — to allow/disable access to a group of web pages. For more details, read article Configuring URL groups.
Setting actions
NOTE
To log all traffic matched with the rule, check Log the traffic. Each log will be written to the Filter log.
The Content Rule - Action dialog varies depending on selected action:
| Action | Description |
|---|---|
| Allow |
Traffic allowed. With the allow rule you can create the following types of rules:
|
| Deny |
User will be redirected to the firewall page with information that access is denied. You can:
WARNING It works only for HTTP sites. Blocked HTTPS sites cannot be redirected to another URL, or to the custom denial page. The page will time out for the user.
|
Drop |
Access is denied and the user will see the page as unavailable. |
Rule order
Kerio Control goes through rules from top to down and stop with the first match. Therefore, order the rules from specific to general. The most general rule, Allow other traffic, is created by default and it is placed at the bottom.
You can change the order with:
- Arrows placed on the right side of the window
- Drag&Drop and move rule or more rules with mouse
Unlocking rules
Privileged users can continue to filtered websites if you enable this right for them. Read Setting access rights in Kerio Control for detailed information.
Examples
Adding new URLs for automatic updates
If you start to use a new software with the automatic updates option, you must add a new URL to the content filter:
- Go to Content Filter and enable rule Allow automatic updates and MS Windows activation. The rule is based on the Automatic Updates URL group.
- Go to Definitions > URL Groups.
- Click Add.
- In the Add URL dialog, select Select existing > Automatic Updates.
- Type the URL for automatic update. You can use *, ? or select Use regular expression and type the URL as regular expression.
Blocking Facebook
NOTE
If you have a Kerio Control Web Filter license, block Facebook or other social media with the Application awareness.
To deny Facebook, add the following rule:
- On the Content Rules tab, click Add.
- Type a name of the new rule.
- Double-click Detected Content.
- In the Content Rule - Detected Content dialog, click Add > URL and Hostname.
- Type
facebook.cominto the Site field. - Check option Also apply to secured connections (HTTPS). This option has exceptions written in the HTTPS filtering specifics article.

- Click OK.
- In the Content Rule - Detected Content dialog, click Add > URL and Hostname again.
- Type
www.facebook.cominto the Site field.
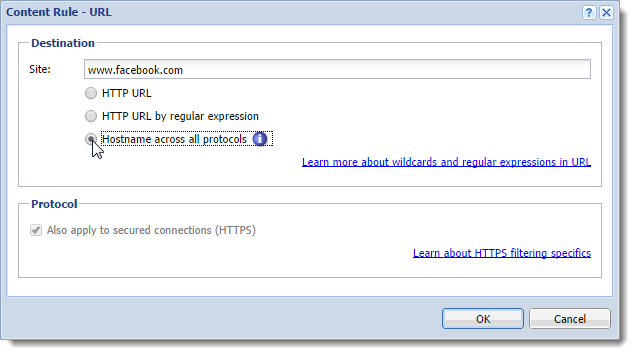
- Select option Hostname across all protocols. Kerio Control sends DNSDomain Name System - A database enables the translation of hostnames to IP addresses and provides other domain related information. query and ensures that all IP addresses used by Facebook will be identified.
- Click OK.
- Double-click Action.
- In the Content Rule - Action dialog, select Deny in the Action drop-down menu.
- Save the settings.
- Click OK.
- Double-click Action.
- In the Content Rule - Action dialog, select Allow in the Action drop-down menu.
- Select Skip Antivirus scanning.
- Select Skip Forbidden words filtering.
- Select Do not require authentication.
- Save the settings.