Configuring the reverse proxy
Why use the reverse proxy server in Kerio Control
With the reverse proxy, you can provision more than one web server placed behind Kerio Control. A single public IP addressAn identifier assigned to devices connected to a TCP/IP network. is used on a default port (80 for HTTPHypertext Transfer Protocol - protocol for exchange of hypertext documents in HTML. and 443 for HTTPSHypertext Transfer Protocol - version of HTTP secured by SSL.).
Kerio Control forwards traffic to different servers based on the hostname. Kerio Control does not support directories.
NOTE
Content filter rules are not applied to the reverse proxy traffic in Kerio Control.
Configuring the reverse proxy
IMPORTANT
First, you must configure a traffic rule to allow HTTP/HTTPS to the firewall.
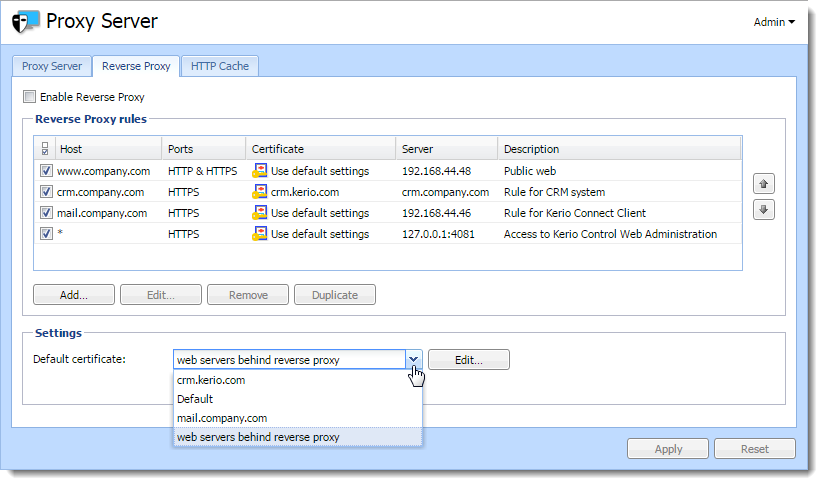
To configure the reverse proxy, enable it in Kerio Control and add rules for particular web servers:
- In the administration interface, go to Proxy Server > Reverse Proxy.
- Select Enable Reverse Proxy.

- Click Add and create new rules for your servers, as described below.
- Arrange your rules using the arrows on the right side of the main window. Kerio Control examines rules from the top down. The last asterisk rule directs other traffic to the 4081 port (Kerio Control Web Administration).
- In Settings, select a valid SSL certificateSSL certificates are used to authenticate an identity on a server.. You need the certificate for proper authentication of Kerio Control when using HTTPS protocol in rules. To avoid problems with browsers, use one SSL certificate with alternative DNS names as a default certificate, as described below.
IMPORTANT
The SSLSecure Sockets Layer - A protocol that ensures integral and secure communication between networks. certificate must be created with a proper Kerio Control DNSDomain Name System - A database enables the translation of hostnames to IP addresses and provides other domain related information. name as a hostname.
Adding new rules
Each rule represents one web server behind Kerio Control.
- In the administration interface, go to Proxy Server > Reverse Proxy.
- Click Add.
- In the Reverse Proxy Rule dialog box, type the DNS name of the web server in the Host field.
NOTE
Asterisk notation is allowed.
- Select the protocol of the server. You can select HTTP, HTTPS, or both. If you are using the HTTPS protocol, select a valid SSL certificate. You need the certificate for proper authentication of Kerio Control when using HTTPS protocol.
IMPORTANT
The SSL certificate must be created with a proper web server DNS name as a hostname.
- In the Server field, type the server's private IP address. To secure the connection from Kerio Control to the web server (in the local network), select Use secured connection.
- (Optional) To route HTTP traffic over to HTTPS protocol, select Force HTTPS Redirection.
- (Optional) To use antivirus scanning on files uploaded to the web server, select Perform antivirus scanning.
- Click OK.
- In the main window, click Apply.
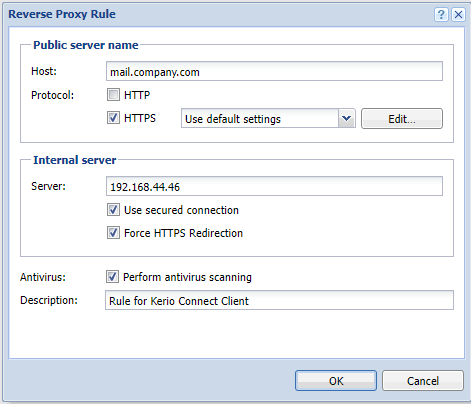
Kerio Control can now use the new rule for your web server.
Configuring a traffic rule
To allow HTTP or HTTPS to the firewall, you must configure traffic rules:
- In the administration interface, go to Traffic Rules.
- Select the Web Services rule. If the rule is not available, create the rule to allow HTTP or HTTPS to the firewall, as shown in the figure below.
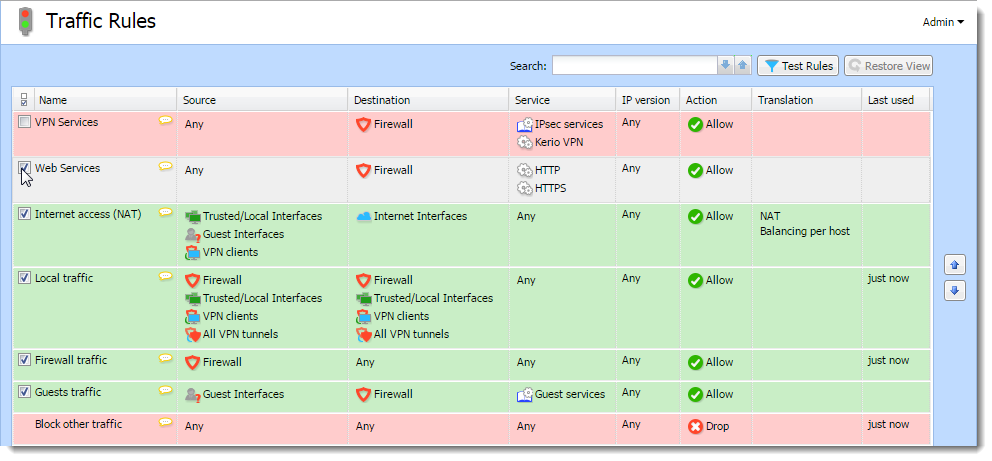
- Click Apply.
HTTP/HTTPS traffic is allowed.
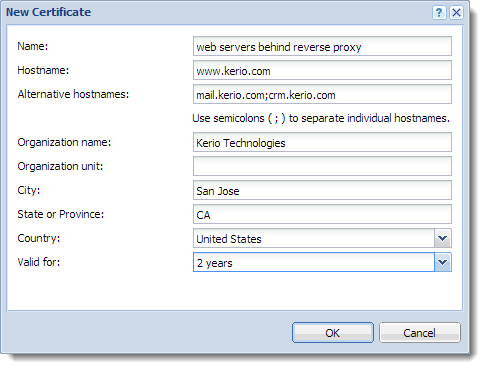
Creating SSL certificates with alternative DNS names
If you configure the reverse proxy for your web servers, you can use just one certificate for all the web servers placed behind the reverse proxy.
NOTE
You can use this for self-signed certificates and certificates signed by a certification authority.
To create an SSL certificate with alternative DNS names:
- In the administration interface, go to Definitions > SSL Certificates.
- Click Add > New Certificate or Add > New Certificate Request.
- In the New Certificate or New Certificate Request dialog box, type the name for the certificate.
- In the Hostname field, type the hostname of any of your web servers placed behind the reverse proxy.
- In the Alternative hostnames field, type the
other web server hostnames.Use semicolon (
;) to separate the hostnames. - You may type the City, State or Province, and select Country and Validity of the certificate.
- Click OK.
- In the main window, click Apply.
NOTE
If you want to use a certificate signed by a certification authority, you must export the certificate request from Kerio Control and send it to the certification authority.
Once you've created the SSL certificate with alternative DNS names, you can use it as a default certificate:
- In the administration interface, go to Proxy Server > Reverse Proxy.
- Change Default certificate to the certificate with alternative DNS names.
Your result should be similar to what is shown below.
Configuring HTTP cache for the reverse proxy
- In the administration interface, go to Proxy Server > HTTP Cache.
- Check Enable cache for Kerio Control reverse proxy.
- Click Apply.