Kerio Control NG100W and NG300W installation guide
Purpose
This document is a quick guide for safely installing and implementing Kerio Control NG100W and NG300W UTM appliances.
General Safety Instructions
During installation follow these security instructions:
- The appliance should be placed on a flat surface or securely mounted horizontally in rack enclosure.
- Do not attempt to open or disassemble the appliance for any reason.
- Strictly follow the installation instructions (see section 4).
- Do not place the appliance near a heat source.
- Place the appliance in a ventilated space, making sure that the appliance fans and vents are unobstructed at all times.
- Do not expose the appliance to liquids of any kind. In the event of liquid intrusion, unplug the appliance immediately.
- Verify that the voltage and frequency of the power socket matches the values printed on the power adapter before plugging in the appliance. Use only the power adapter supplied with the appliance.
- Do not place any items on top of the power cable; keep the power cable away from walkways or other areas where it could pose a tripping hazard.
Appliance description
Kerio Control hardware applianceKerio Control installed and delivered with standardized and tested hardware box. types:
- Kerio Control Box NG100W — Desktop appliance
- Kerio Control Box NG300W — Sub-1U table mountable appliance
| Feature | Desription |
|---|---|
| Serial port | Used for connecting to a console with a serial cable |
| USB ports | Input for USB devices |
| Ethernet network ports | Used for connecting to the Internet and the LANLocal area network - A network that connects computers and other devices in a small area. with an Ethernet cable |
| Antenna(s) | Dual band antenna used for Wi-Fi |

Kerio Control Box NG100W (front + back)
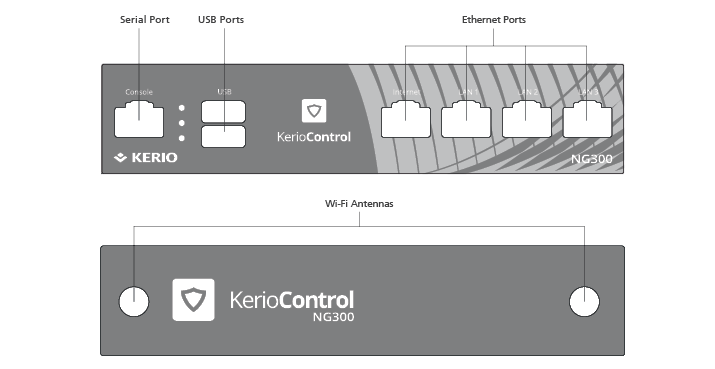
Kerio Control Box NG300W (front + back)
Kerio Control Box Installation and Configuration
Once a suitable place has been located for the appliance and it has been plugged into a power outlet according to the safety instructions, it is time to connect it to the network and configure settings.

Connecting Kerio Control Box NG100W to the network
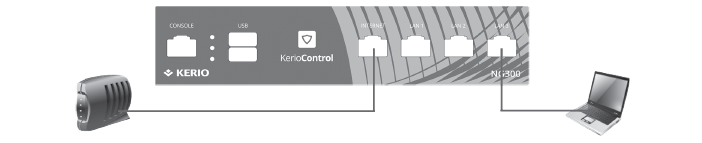
Connecting Kerio Control Box NG300W to the network
To configure the appliance:
- Connect the antenna(s) to the hardware appliance.
- Connect the Internet port to the Internet (e.g. DSLDigital Subscriber Line - A high-speed Internet service over ordinary phone lines using broadband modem technology. or Cable modem) using an Ethernet cable.
- Connect the LAN port to the computer that will be used to configure the appliance (see the figures below).
- Turn on the appliance.
Now you have two options:
- Add and manage the appliance through MyKerio (see Installing Kerio Control Box through MyKerio)
- Access the Kerio Control Administration through a browser (see below):
- Set the networking preferences for Ethernet on the connected computer to Automatic DHCPDynamic Host Configuration Protocol - A protocol that automatically gives IP addresses and additional configuration to hosts in a network. configuration. (You can change it later after the configuration is complete).
- Renew the DHCP lease on the computer and confirm it has an IP addressAn identifier assigned to devices connected to a TCP/IP network. of 10.10.10.11.
- Open a web browser and connect to the Kerio Control Administration web interface using the following URL: https://10.10.10.1/admin
- Ignore the SSL certificateSSL certificates are used to authenticate an identity on a server. warnings and proceed to the configuration wizard.
- Follow the instructions provided by the wizard and configure the appliance.
NOTE
For troubleshooting purposes, you can use the serial port to connect the console to the device. See Connecting to Kerio hardware appliances with a serial console.