Routing all traffic through Kerio VPN Tunnel
This article describes how to route all traffic from one Kerio Control through the Kerio VPN tunnelKerio Control includes a VPN tunnel which allows to distributed offices to interconnect their offices securely. to another Kerio Control.
This scenario is useful if you want to gather user statistics for all users in a single Kerio Control.
The steps below use the scenario illustrated in the following diagram:

Connecting Kerio installations using VPNVirtual private network - A network that enables users connect securely to a private network over the Internet. tunnel
Licensing
You need a license for each user going through the Kerio Server. On the example illustrated in the screenshot above, the Control 1 server needs licenses for all Control 1 and Control 2 users, while the Control 2, you need a license for each Control 2 user.
Configuring the Kerio VPN tunnel
Follow these steps to configure the Kerio VPN tunnel:
 Step 1: Add a Kerio VPN tunnel
See Configuring Kerio VPN tunnel if you do not already have one set up.
 Step 2: Configure remote endpoint routing
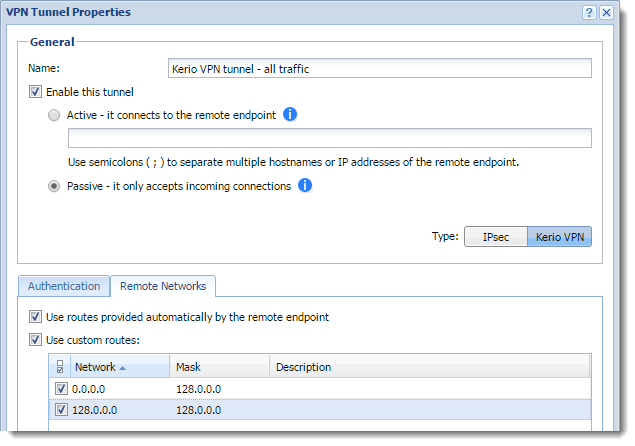
After establishing a Kerio VPN tunnel, you need to set up routes in the Control 2 server:
- In the Control 2 administration interface, go to Interfaces.
- Double-click the tunnel.
- In VPN Tunnel Properties, click the Remote Networks tab.
- Add two routes —
128.0.0.0/1and0.0.0.0/1— for routing all traffic through the tunnel.

VPN tunnel properties
- Click OK.
- Click Apply.
 Step 3: Create traffic rules
In the Control 1 VPN endpoint, add a traffic rule to allow users from the VPN tunnel to access the Internet:
- In the Control 1 administration interface, go to Traffic Rules.
- In the Internet access (NATNetwork address translation - A method that remaps IP addresses by changing network address information.) rule, double-click the Source column.
- In the Traffic Rule - Source dialog box, click VPN.
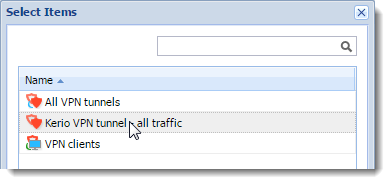
- In the Select Item dialog box, double-click the Kerio VPN tunnel you want to use to route all traffic to another Kerio Control.

Selecting Kerio VPN tunnel all traffic
- Click OK.
- Click Apply.

Kerio VPN tunnel showing in the dashboard
From now on, users from the Control 2 server can access the Internet.
 Step 4: Configure DNS forwarding
If users from the Control 2 server cannot reach the Internet, verify that Control 2 uses the same server as Control 1:
- In the Control 2 administration interface, go to the DNSDomain Name System - A database enables the translation of hostnames to IP addresses and provides other domain related information. section.
- Select Enable custom DNS forwarding.
- Click Edit.
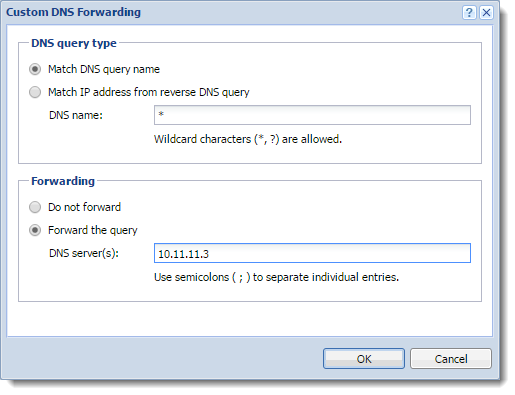
- In the Custom DNS Forwarding dialog box, click Add.
- In the Custom DNS Forwarding dialog box, select Match DNS query name and type
*(asterisk). - Select Forward the query and type the IP addressAn identifier assigned to devices connected to a TCP/IP network. of the Control 1 DNS server.

Configuring custom DNS forwarding
- Click OK twice.
- Click Apply.
For more information refer to DNS forwarding service in Kerio Control.