Creating a new ticket view
Views are created from the Staff Control Panel. Once view is saved it is available for you and your teammates from the Views dropdown, , depending on the visibility option you select.
To create or edit views, you need a Staff Account with the 'Ticket views' permission.
To create a new ticket view:
- Sign in to the Staff Control Panel.
- Click on Tickets > Views.

View navigation
- On the next page, you can see any views that you have already created. To create a new one, click New on the top right.
- First up, you want to add a descriptive Ticket view title so your staff knows what they are getting when they select a view.
- From the Display tickets assigned to section, select the types of tickets the view should include.
- Next, choose the Visibility level for the view to share it with other staff members or keep it to yourself.
- To use this view as the default for one or more departments, check the box next to them in the Link this view with departments section. NOTE:
If there are two views linked to the same department, the view that was most recently linked is the default.
- Switch to the Options tab to set some default behaviors associated with the view.
- From the Tickets to display per page option, set a number of tickets to display before breaking onto a new page. NOTE:
The number you set here cannot exceed the global page limit specified in the admin control panel.
- Choose how often, if at all, you want to Automatically refresh the ticket listing.
- To automatically reassign any ticket in this view to whoever replies to or forwards it, set Automatically set ticket owner to active staff user to Yes.
- From Default ticket status when replying to a ticket select which status tickets should have when a ticket is forwarded or replied to.
- Select a default action you want GFI HelpDesk to take After a ticket has been replied to. You can opt to be directed to a few different views or tickets.
- Next, switch to the Columns tab, where you can choose the columns that define your view.
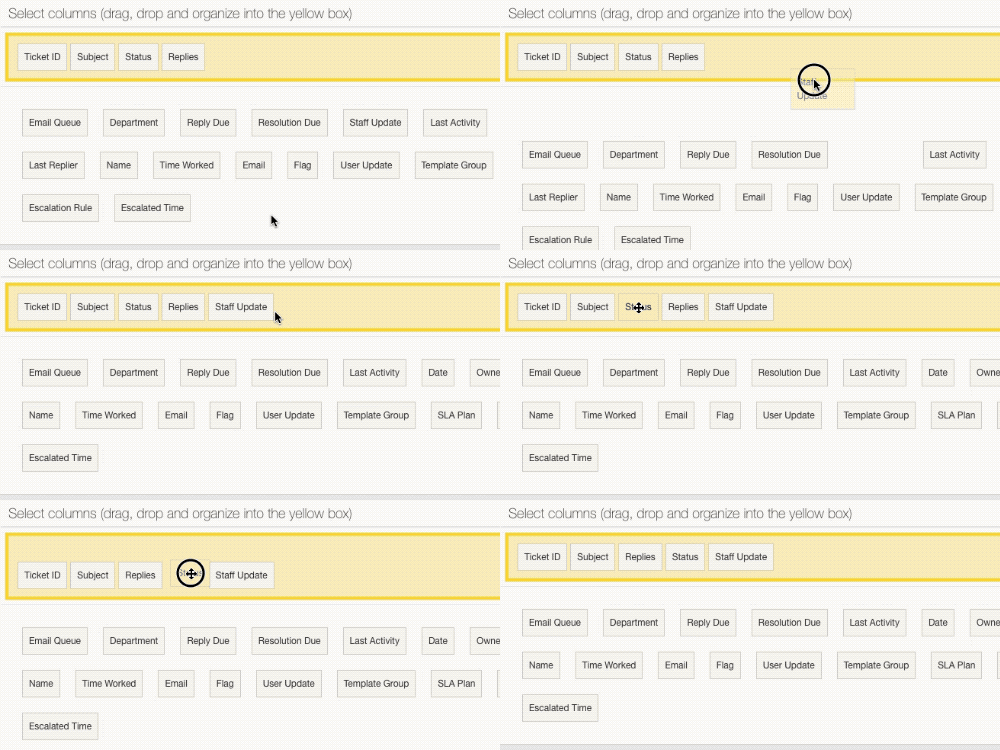
- First, skip down to the bottom of the page, and drag and drop the columns you want to see into the yellow box.

Drag, drop and organize into yellow box
- Add as many columns as you like, and rearrange into whatever order suits the purpose of your view. NOTE:
If you have created any custom fields, you'll be able to add them as view columns.
- When you have your columns selected, select a default Sort by column, and whether the Sort order should be 'Ascending' or 'Descending'. NOTE:
You can sort your view on the fly as well, by clicking the column headers.
- When the view is configured, click Insert on the toolbar.
At this point, your team can start using this view whenever they want, by selecting it from the Views dropdown.

Use newly created view