Configuring the guest network
NOTE
Watch the Configuring the guest network video.
The guest network in Kerio Control offers your company's guests Internet access secured by Kerio Control.
- Guests can connect to your network without a Kerio Control username and password. Guests are not counted as licensed users.
- Kerio Control gathers statistics for the guest network under the built-in Guest users account.
- Users connect to the guest network from a welcome page. For more information refer to Customizing the welcome page.
- You can set a shared password for accessing the Internet via a guest network. Guest users must type the shared password on the welcome page.For more information refer to Setting shared password for guest users.
- Kerio Control redirects guest network users to the welcome page after 2 hours of inactivity.
IMPORTANT
Users connected through the guest network are fully secured by Kerio Control, except that Kerio Control Web Filter is disabled in the guest network.
Assigning guest interfaces
To create a guest network move an existing interface to the Guest Interfaces group. For more information refer to Configuring network interfaces.
To add one or more interfaces to the Guest Interfaces group:
- In the administration interface, go to Interfaces.
- Find the interface created for guests.
- Drag that interfaces to the Guest Interfaces group.

- Click Apply.
Kerio Control creates the guest network and your guests can now connect to your company's Internet connection.
Setting DHCP scope
Interfaces from the Guest Interfaces group behave just like any interface from the Trusted/Local Interfaces or Other Interfaces group.
If the DHCPDynamic Host Configuration Protocol - A protocol that automatically gives IP addresses and additional configuration to hosts in a network. server in Kerio Control is enabled and you use automatic mode, the scope will be generated automatically. If you configure DHCP scopes manually, you must create a new one for each guest network.
For more information refer to DHCP server in Kerio Control.
Customizing the welcome page
When your guests access the Internet via the guest network, they see a welcome page. You can customize the page in Kerio Control, but you cannot disable it.
- In the administration interface, go to Domains and User Login.
- On the Guest Interfaces tab, type your own welcome text.
NOTE
You can format the message in HTML. For more information refer to Creating HTML content in your Welcome page.
You can also add a custom logo in the Advanced Options > Web Interface section.
- Click Apply.
Your guests now see this text on the welcome page.
Creating HTML content in your Welcome page
You can format the page in HTML.
You can also add links to external websites accessible via HTTPHypertext Transfer Protocol - protocol for exchange of hypertext documents in HTML. (for
example: <a href='http://www.example.com'>HTTP
link</a>). These web pages are accessible even without clicking
on the Continue button. However, ensure that the linked
pages do not require any external content (scripts, fonts, etc.), because this
content will not be available.
Setting shared password for guest users
To set up a password guests can use to access the Internet via the guest network, customize it in Kerio Control:
- In the Kerio Control administration, go to Domains and User Login.
- On the Guest Interfaces tab, check the Require users to enter password option.
- In the Password field, type the password. All guests must use this password to access the Internet via guest network.
- Click Apply.
Your guests must login with the password to access the Internet via guest network by typing the password on the welcome page. For more information refer to Customizing the welcome page.
Traffic rules for the guest network
Traffic rules in Kerio Control include two rules that concern guest interfaces.
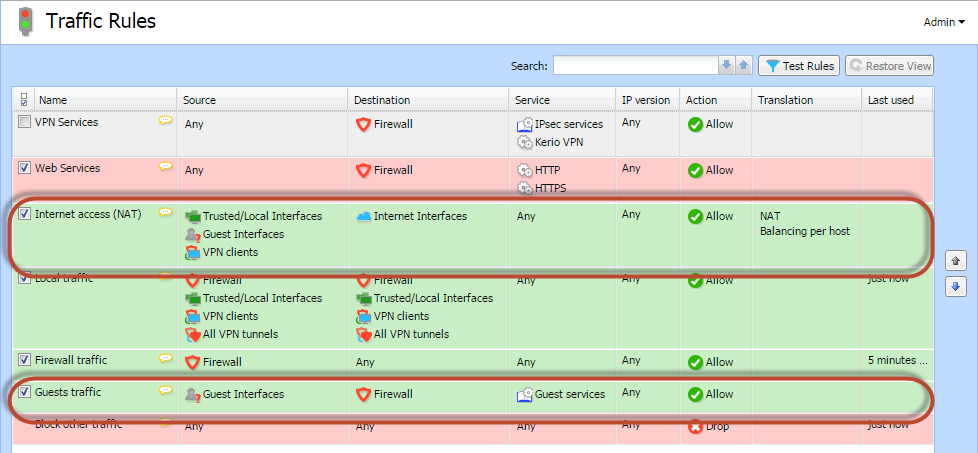
In the Internet access (NATNetwork address translation - A method that remaps IP addresses by changing network address information.) outgoing rule, all guest interfaces are included.
The Guests traffic rule allows the traffic from all guest interfaces access to the firewall with a guest services group. For more information refer to Services in Kerio Control.
IMPORTANT
Guests can access the firewall and Internet only. This is a hard-coded behavior. Traffic rules cannot override it.