Configuring traffic rules
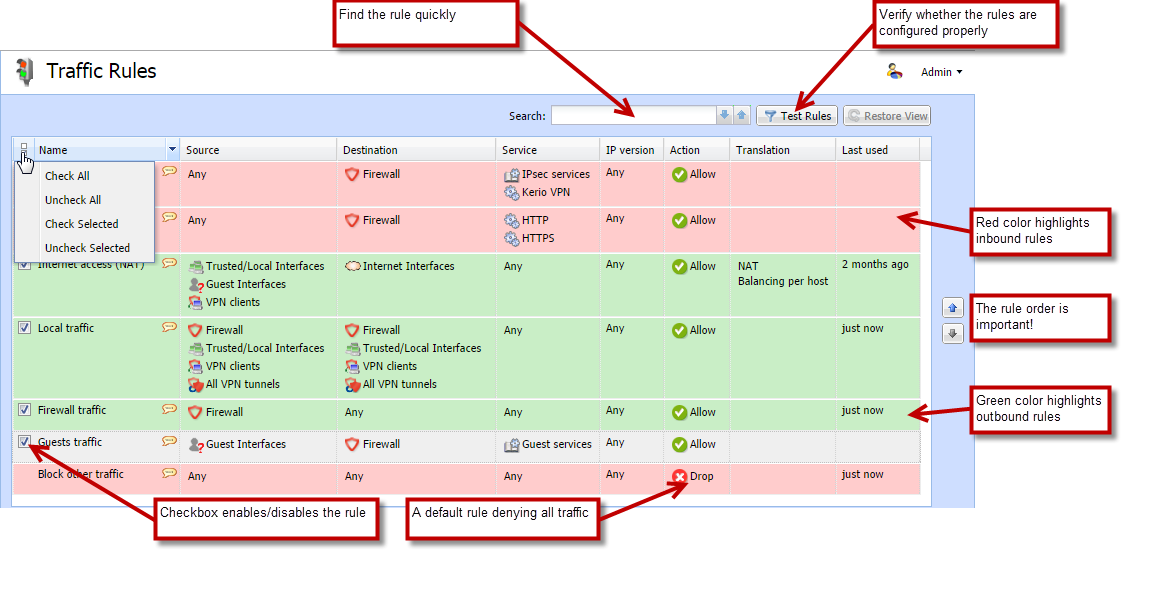
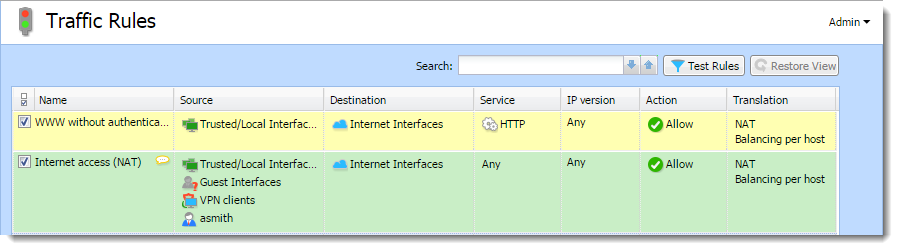
The traffic policy consists of rules ordered by their priority. The rules are processed from the top downwards and the first matched rule is applied. The order of the rules can be changed with the two arrow buttons on the right side of the window, or by dragging the rules within the list.
An implicit rule denying all traffic is shown at the end of the list. This rule cannot be removed. If there is no rule to allow particular network traffic, then the implicit rule will discard the packet.
NOTE
To control user connections to WWW or FTPFile Transfer Protocol - Protocol for transferring computer files from a server. servers and filter contents, use the content filter available in Kerio Control for these purposes rather than traffic rules. Read more in the Configuring the Content Filter article.
Configuring traffic rules
If you do not have any traffic rules created in Kerio Control, use the configuration wizard (go to Traffic Rules and click More Actions > Configure in Wizard).
To create your own rules, look at the following examples:
Generic rule
In the default state, Kerio Control denies communication for all services. To create an allowing rule for a service, for example, to allow a user group to use SSHSecure Shell - A cryptographic network protocol that enables you to connect securely over an unsecured network. for access to servers in the Internet:
- Go to Traffic Rules in the administration interface.
- Click Add.
- In the Add New Rule dialog box, type a name for the rule (for example, Allow SSH to a group).
- As a rule type, select Generic.
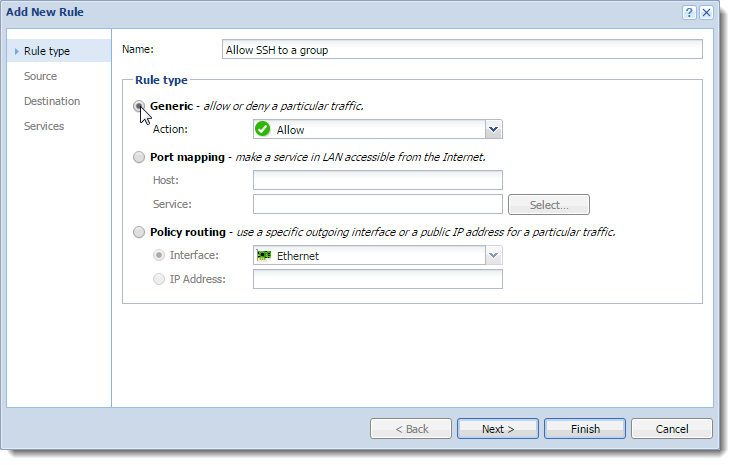
- Click Next.
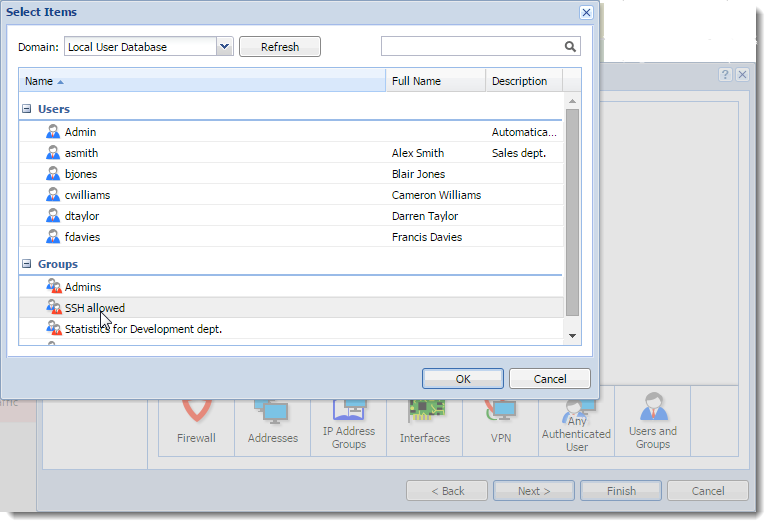
- Click Users and Groups.
- In the Select Items dialog box, double-click a group (SSH allowed in our case).
- Click Next.
- Select Interfaces.
- In the Select Items dialog box, select Internet Interfaces.
- Click Next.
- Click Services.
- In the Select Items dialog box, double-click SSH.
The rule allows your users to use SSH to access servers in the Internet.

Port mapping
To enable all services for Kerio Connect placed in your local network protected by Kerio Control, follow these step:
- In the administration interface, go to Traffic Rules.
- Click Add.
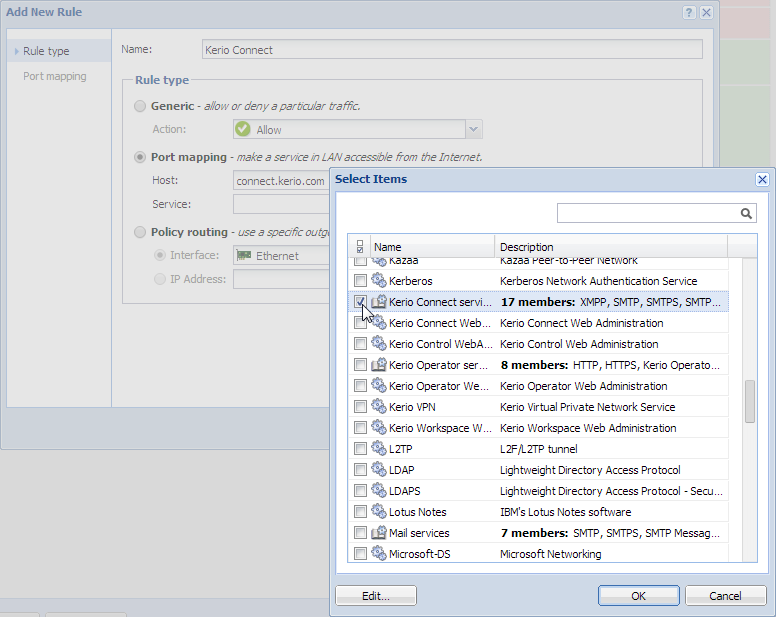
- In the Add New Rule wizard, type a name of the rule.
- Select Port mapping.
- In the Host field, type the hostname or IP address of the SMTP server placed in your local network.
- Next to the Service field, click Select.
- In the Select Items dialog, check the Kerio Connect services group.
- Click Finish.
- Move the rule to the top of the table of traffic rules.
Other examples
User accounts and groups in traffic rules
In traffic rules, source/destination can be specified also by user accounts and/or user groups. In the traffic policy, each user account represents the IP addressAn identifier assigned to devices connected to a TCP/IP network. of the host from which a user is connected. This means that the rule is applied to users authenticated at the firewall only (when the user logs out, the rule is not effective any longer):
Enabling certain users to access the Internet
In a private network and with the Internet connection performed through NATNetwork address translation - A method that remaps IP addresses by changing network address information., you can specify which users can access the Internet in the Source item in the NAT rule.

Such rules enable the specified users to connect to the Internet if they authenticate. They need to open the Kerio Control interface's login page manually and authenticate.
IMPORTANT
With the rule defined, all methods of automatic authentication are ineffective (i.e. redirecting to the login page, NTLMNT LAN Manager - Security protocols that provide authentication for Windows networks. authentication and automatic authentication from defined hosts).
Automatic authentication (redirection to the login page) is performed when the connection to the Internet is established. This NAT rule blocks any connection unless the user is authenticated.
Enabling automatic authentication
The automatic user authentication issue can be solved as follows:
- Add a rule allowing an unlimited access to the HTTPHypertext Transfer Protocol - protocol for exchange of hypertext documents in HTML. service and place it before the NAT rule.
- In Content Rules, allow specific users to access any web site and deny any access to other users.

Users who are not yet authenticated and attempt to open a web site are automatically redirected to the authentication page (or authenticated by NTLM, or logged in from the corresponding host). After a successful authentication, users specified in the NAT rule will be allowed to access other Internet services. Users not specified in the rules will be disallowed to access any web site or/and other Internet services.
NOTE
In this example, it is assumed that client hosts use the Kerio Control DNS Forwarder or local DNSDomain Name System - A database enables the translation of hostnames to IP addresses and provides other domain related information. server (traffic must be allowed for the DNS server). If the client stations use a DNS server in the Internet, you must include the DNS service in the rule which allows unlimited Internet access.
Demilitarized zone (DMZ)
For more information refer to Configuring Demilitarized Zone (DMZ).
Policy routing
For more information refer to Configuring policy routing.
Enabling protocol inspection on traffic rules
Kerio Control includes protocol inspectors that monitor all traffic on application protocols, such as HTTP, FTP. The inspectors filter the communication or adapt the firewall's behavior according to the protocol type. For more information refer to Protocol inspection in Kerio Control.
- In the administration interface, go to Traffic Rules.
- Right-click a table header and select Columns > Inspector.
- In a particular rule, double-click the Inspector column and select the appropriate protocol inspector.
IMPORTANT
Each inspector should be used for the appropriate service only. Functionality of the service might be affected by using an inappropriate inspector.
- Click Apply.