Configuring IPv6 networking in Kerio Control
To run the IPv6Version 6 of the Internet Protocol. network in Kerio Control:
- Enable IPv6 on WANWide area network - A network that connects computers and other devices in a large area. interfaces (IPv6 prefixIPv6 prefix is a part of IPv6 address dedicated for routing in IPv6 networks. delegation)
- Enable IPv6 on local interfaces
- Enable router advertisements
To see all the Kerio Control IPv6 features, see Support for IPv6 protocol.
WARNING
Kerio Control does not support DNSDomain Name System - A database enables the translation of hostnames to IP addresses and provides other domain related information. on IPv6, so you also need the IPv4Version 4 of the Internet Protocol. network.Obtaining an IPv6 prefix from your ISP
Kerio Control supports the IPv6 prefix delegation. Your ISPInternet Service Provider - the organization which can provide Internet service. assigns you an IPv6 prefix and you must enable it on a network interface in Kerio Control. Kerio Control then becomes a DHCPv6 client and obtains the prefix from your ISP.
If you get the IPv6 prefix from your ISP and your ISP uses a DHCPv6 server:
- In the administration interface, go to Interfaces.
- Double-click the Internet interface where you want to run IPv6.
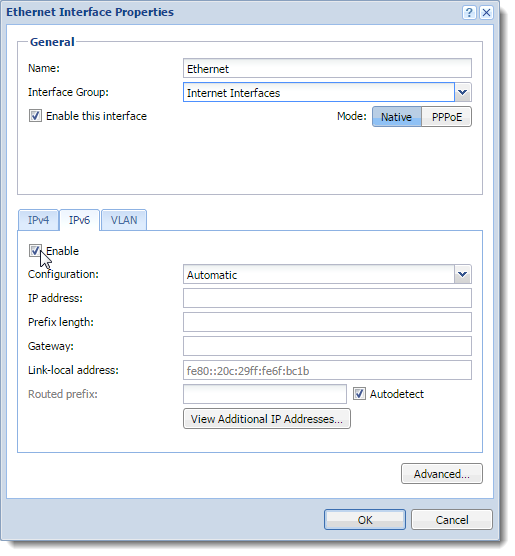
- In the Interface Properties dialog box, go to the IPv6 tab.
- Select Enable. Autodetection of the routed prefix is selected by default.
- Save your settings.
From now on, Kerio Control behaves as a DHCPv6 client and automatically obtains the routed prefix from your ISP. Kerio Control automatically records the routed prefix in the IPv6 router advertisements table and the IPv6 routing table.
Running IPv6 in the Kerio Control network
To run IPv6 in your local network, you must enable IPv6 on your local interfaces:
- In the administration interface, go to Interfaces.
- Double-click an interface in Trusted/Local Interfaces, Guest Interfaces, or Other Interfaces.
- Go to the IPv6 tab.
- Select Enable.
- Click Apply.
IPv6 now runs on the selected interface in the Kerio Control network.
Enabling the IPv6 router advertisements
Kerio Control uses the IPv6 router advertisements for stateless auto-configuration of IPv6 devices in the LANLocal area network - A network that connects computers and other devices in a small area. (SLAAC). Kerio Control adds a record for every network in which it advertises as a default router.
- In the administration interface, go to IPv6 Router Advertisements.
- Enable the Enable IPv6 Router Advertisements option.
- Click Apply.
All IPv6 devices now get the IPv6 address.
Manual configuration
Kerio Control generates advertisements automatically. However, if you need to make some changes, you can do it manually:
- In the administration interface, go to IPv6 Router Advertisements
- Click the link Click to configure manually.
- Click Add.
- Select an interface connected to the network where the router should advertise.
- Double-click in the Prefix column and type the IPv6 prefix (subnet address).
- Double-click in the Prefix length column and type the number of bits of IPv6 address that defines the prefix.
- Click Apply.