Configuring group antivirus protection
The AntivirusA software countermeasure that detects malware installed on a computer without the user's knowledge. service offered by GFI OneGuard can be configured per device or on a group of managed devices. This topic describes how to configure Antivirus protection on a group.
DevicesMachines connected to a network that have been discovered by GFI OneGuard. joined to a group inherit the antivirus protection settings configured on that group.
To access group antivirus settings:
- Login to GFI OneGuard and go to Manage > Devices.
- In the left pane, under Managed Groups, hover your mouse over the group you want to configure.
- Click the pulldown menu arrow
 and select Configure group.
 - Go to the Antivirus Protection tab to start customizing settings in this group.
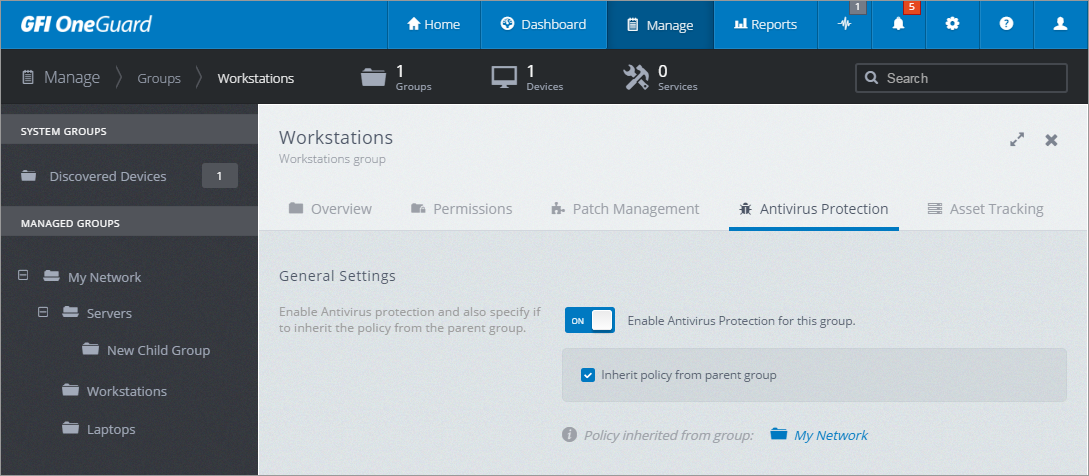
Configuring Antivirus Protection policy
 Enabling/Disabling Antivirus Protection
To enable or disable antivirus protection, use the switch Enable Antivirus Protection for this group.
If enabling antivirus protection, you may proceed to configure the other settings.
If disabling antivirus protection, no other settings are need to be configured and you can click Save Settings to apply the change. If the antivirus service was previously installed and the antivirus service is then disabled, then the antivirus agentA GFI OneGuard component that runs as a background service on target devices and handles the deployment of patches, service packs and software updates. gets uninstalled from the affected devices.
NOTE
When installing or uninstalling the Antivirus, a reboot of the target computer may be required to complete the action.
IMPORTANT
When another third-party antivirus software is found on a device managed by GFI OneGuard that has antivirus protection enabled, the third-party antivirus software is automatically uninstalled by the GFI OneGuard agent. Note that this may require a reboot of the device.
 Inherit policy from parent group
Use the Inherit policy from parent group option to automatically inherit settings from the parent group, according to the hierarchy shown in the Managed Groups section in the left pane. If this option is selected, the options below this setting are hidden.
 Import or Export a Policy
You can use these options to export a policy from an existing GFI OneGuard deployment and import them into another. This is useful for example when moving your GFI OneGuard installation from one server to another.
Select from the following options:
| Option | Description |
|---|---|
| Import Policy | Click to select a policy settings file from a saved location. |
| Export Policy | Use this option to save the currently configured settings to a desired location. |
 Scan Settings
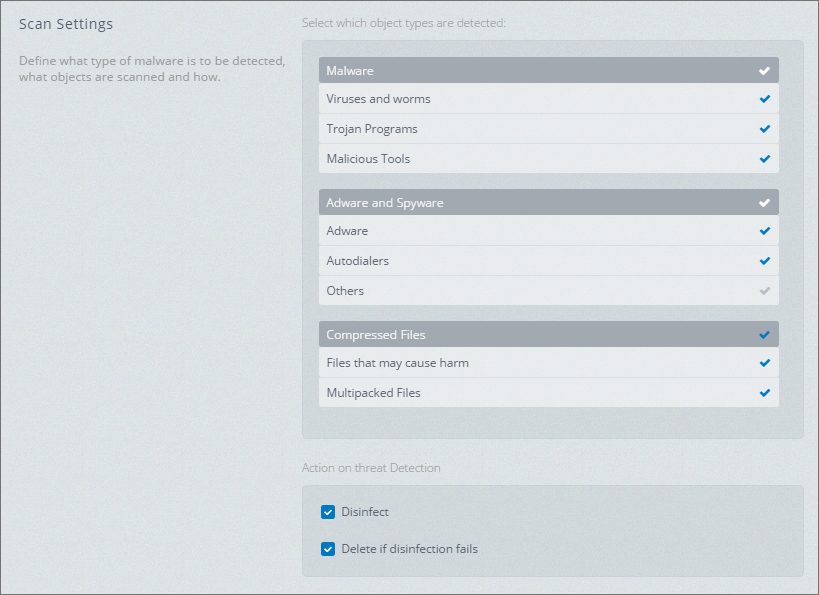
Antivirus scan settings
In the Scan Settings area, configure how this policy scans for antiviruses:
| Option | Description |
|---|---|
| Select which object types are detected | Use this area to select which security scans to perform on devices within this group and the types of malicious or potentially risky files that are detected by GFI OneGuard. Select the check mark |
| Action on threat detection |
Specify the actions taken by the antivirus service when a potentially infected file is detected. Select from the following options:
|
| Security Level |
Move the slider to select your preferred level of protection from security threats. When switching between levels, options in the collapsed Advanced Settings area change accordingly. Available options are:
|
|
File types to scan (shown when viewing Advanced Settings) |
Use this setting to specify the types of files to include in a scan. Select from:
|
|
Heuristic Analysis (shown when viewing Advanced Settings) |
If you want GFI OneGuard Antivirus to use heuristic analysis, select the Heuristic Analysis checkbox and use the slider to set the intensity of a scanning process:
|
|
Scan Compound Files (shown when viewing Advanced Settings) |
Select which types of compressed files to scan:
|
NOTE
It is recommended to use the default setting in most scenarios since that gives the best level of security while not heavily impacting systems performance.
 Scan Profiles
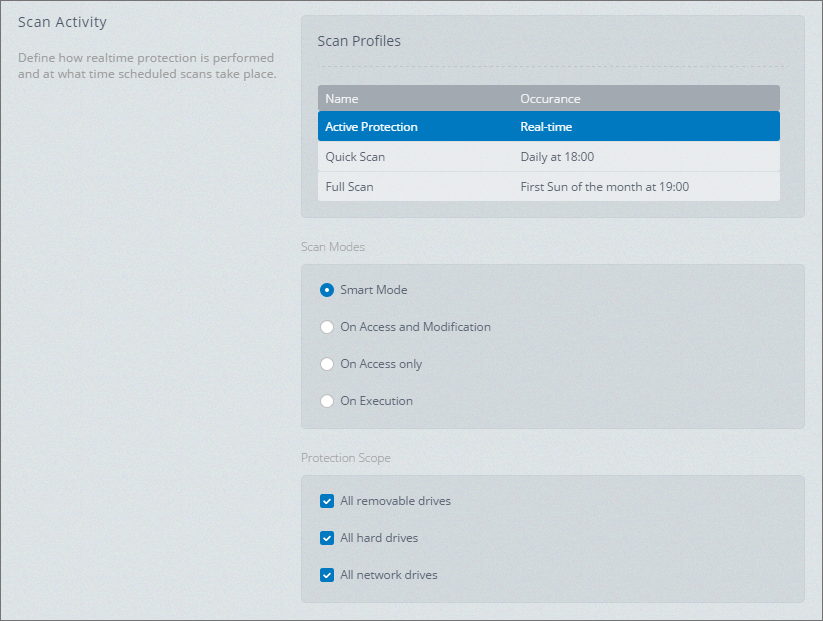
Antivirus scan activity
Select one of the available 3 profiles that provide real time antivirus protection. Modify settings for the selected profile as described below:
| Profile | Description |
|---|---|
| Active Protection (Default profile) |
Active protection is ongoing protection where a threat is blocked not only when a scan is run but also if a user downloads, opens or executes an infected file. In the Scan Modes area, select a scan mode from the following options:
In the Protection Scope area, select any of the following options:
|
| Quick ScanA Quick Antivirus Scan checks the objects loaded at the operating system startup, the system memory and boot sectors. |
Select this option to have GFI OneGuard Antivirus periodically check objects loaded on system startup, the system memory and boot sectors. Quick scan may not detect some malware, but it can still inform you about a virus if your computer is infected. Configure the frequency of quick antivirus scans. The default schedule is set to run daily at 18:00. Modify the schedule using the Occurrence, Day and Time controls as required. |
| Full ScanA Full Antivirus Scan performs a check of the whole system, scanning the system memory; programs loaded at startup; system backup; email databases; hard drives, removable storage media and network drives. |
If this option is selected, GFI OneGuard Antivirus scans the operating system, including RAMRandom Access Memory. A hardware device that allows information to be stored and retrieved on a computer, objects that are loaded at startup, backup storage of the operating system, and all hard drives and removable drives. Configure the frequency of full antivirus scans. By default, full scans are set to run on the first Sunday of every month at 18:00. Modify the schedule using the available controls as required. |
 Additional Antivirus Settings
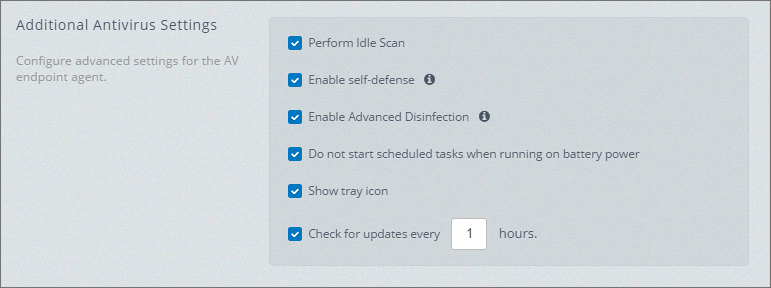
Antivirus additional settings
Configure advanced settings for the AV endpoint agent.
| Options | Description |
|---|---|
| Perform Idle Scan | GFI OneGuard Antivirus scans machines only when a computer is idle and not busy. |
| Enable self-defense | Self-defense is a feature that protects the antivirus agent itself from malicious attacks, such as applications that block the antivirus agent from scanning the system. |
| Enable Advanced Disinfection | Advanced disinfection is a feature that allows a special disinfection process to be performed on active malware. |
| Do not start scheduled tasks when running on battery power |
Enables energy conservation mode. When enabled, the following tasks are not run, even if scheduled:
|
| Show tray icon | When enabled, a GFI OneGuard Antivirus icon is displayed in the Windows system tray. |
| Check for updates every 1 hours | GFI OneGuard Antivirus agent checks for definition updates at an interval which is set to 1 hour by default. |
 Group Exclusion list
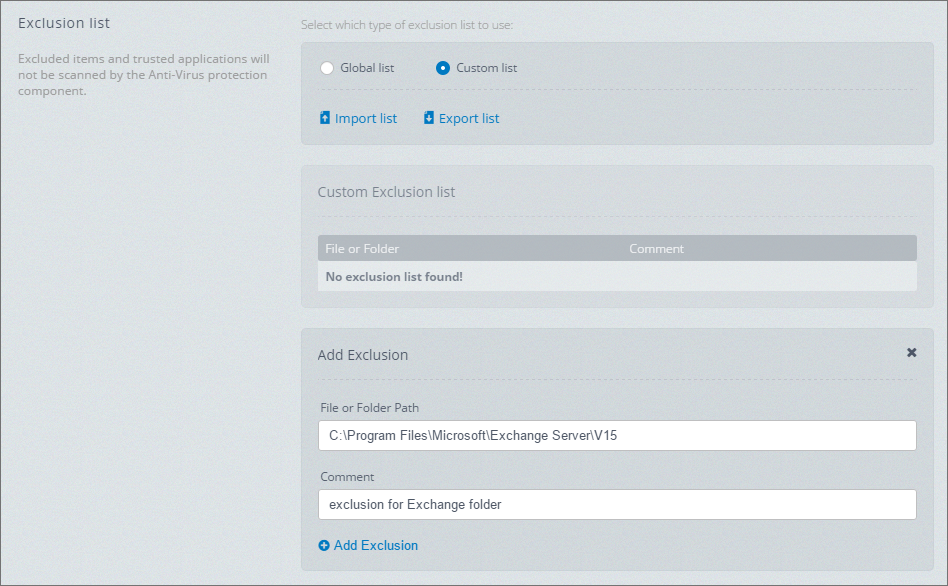
Antivirus custom exclusion list
You can configure a list of items and trusted applications that will be excluded from Antivirus scanning and protection. GFI OneGuard provides the following exclusion options:
| Options | Description |
|---|---|
| Global list | Select this option to instruct GFI OneGuard to use the global list set in Manage > Services > Antivirus Protection. For more information refer to Antivirus global exclusion list. |
| Custom list |
GFI OneGuard gives you the option to import a custom list of exclusions or specify custom file or folder exclusions. To create a custom exclusion manually, click Add file/folder. Key in a file name or the path of a folder to exclude from scanning, for example invoice.xls or |
 Quarantine
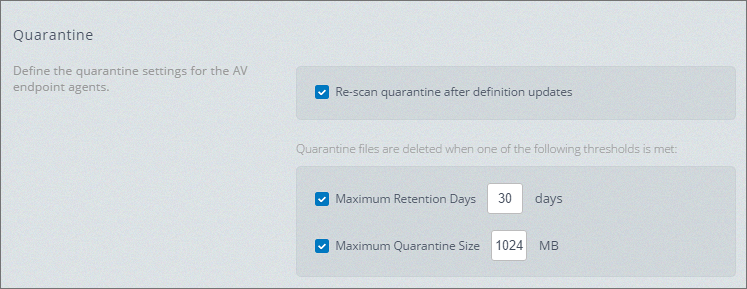
Antivirus quarantine settings
Use this area to define quarantine settings enforced by the antivirus service endpoint agentsA GFI OneGuard component that runs as a background service on target devices and handles the deployment of patches, service packs and software updates..
| Option | Description |
|---|---|
| Re-scan quarantine after definition updates | Select to run an antivirus scan on quarantined items each time antivirus definitions are updated. |
| Maximum Retention Days | Set a retention value in days to specify for how long a period to keep infected files quarantined before deleting them. |
| Maximum Quarantine Size | Set a retention value to specify the threshold f in hard disk space to keep infected files quarantined before deleting them. |
 Notifications
Configure system alerts and email notifications based on antivirus related tasks carried out by GFI OneGuard.
| Notification type | Description |
|---|---|
| Alerts | Choose to enable or disable email notifications when the below situations are encountered by the antivirus agent. |
| Send an email when a Quarantined file is added | Instructs GFI OneGuard to send an email notification when a file is added to the quarantine list. |
| Send an email when an Unprocessed file is found | Instructs GFI OneGuard to send an email notification when the antivirus agent cannot process an infected file. This situation is typically encountered when the infected file is unavailable (for example, file located on a removable drive without write privileges). |
| Send an email when a Blocked file is found | Use this option to instruct GFI OneGuard to send an email notification when a file is moved to the antivirus backup. The antivirus agent performs this action when a file is found to contain malware. |
| Users who have access |
When checked, notifications are sent to the users that have access to the group. To specify custom recipients who receive the group's notifications, uncheck this option and specify custom email addresses.
|