Kerio Exchange Migration Tool
The Kerio Exchange Migration Tool (KEMT) is a free application for migrating public folders, accounts, and user data (Email, Contacts, Calendars, Tasks, Notes) from your Microsoft Exchange Server to Kerio Connect.

The migration process
Preparing for the migration
See the Kerio Connect product page for supported versions of Microsoft Exchange server and Microsoft Outlook.
The duration of the migration depends on many factors, and may take some time. If possible, perform the migration during light usage hours.
The migration tool does not overwrite or remove the existing data in the destination Kerio Connect mailboxes. You can therefore run the migration tool on active Kerio Connect mailboxes, and the data will be merged.
Ensure that data on Microsoft Exchange does not change during or after the migration process. To prevent this from happening, ensure that users and new email are directed to Kerio Connect server before starting the migration.
Before you start
- Install Kerio Connect and run it.
- Verify that the IMAP service in Kerio Connect runs on port
143. - On a machine which can access both Kerio Connect and the source Exchange server, install Microsoft Outlook and the Kerio Exchange Migration Tool
NOTE
Do not install the KEMT tool on a computer that has both Exchange server and the Kerio Connect server. This results in migration failure.
- Disable receiving new emails on the source Exchange server temporarily (otherwise migrated data will be inconsistent).
- Verify that MAPI is enabled on the Exchange server. See Enable or disable MAPI for a mailbox for details.
- If connection between the Exchange server and Kerio Connect goes through a firewall, open the following firewall ports:
- TCPTransmission Control Protocol - ensures packet transmission. protocol on port
143 - TCP/UDP protocol on port
44337
Migrating the data
- Verify that both the source Exchange server and Kerio Connect are running.
- Run the Kerio Exchange Migration Tool (KEMT) and follow the wizard.
- Key-in the hostname of the source Exchange server and its administrator.
- Key-in the hostname and admin credentials of Kerio Connect.
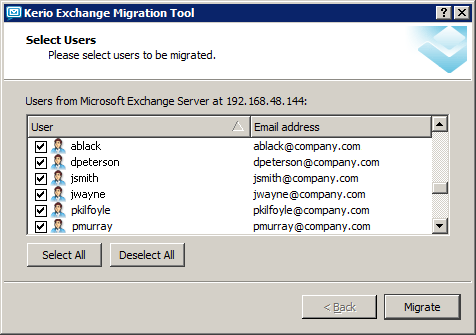
- Select the accounts for migration. The migration process may be time-consuming. We recommend to migrate data in parts (groups of users).
- Click Migrate.
NOTE
If you interrupt the migration process, the tool only saves the completely migrated data of the user currently being migrated. Before you resume, delete the partially migrated user in Kerio Connect to prevent data duplication. See the Report log section for details.
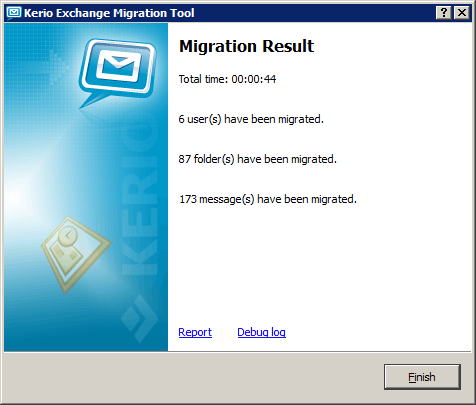
- When the migration is finished, click the Report or Debug log links to see the migration result.
Users should create new accounts/profiles in users' email clients to avoid data inconsistency.
Migration process logs
The Kerio Exchange Migration Tool (KEMT) generates various logs during the migration process. They are stored within the KEMT installation folder in \logs\MMDDYYYY_HHMMSS.
Every time you start the migration tool, it generates a new log.
| Log file | Description |
|---|---|
| Report log |
After completion of each migration, it is recommended to go through this file to make sure that no errors occurred and that all user accounts have been migrated correctly. If users had not been mapped to Kerio Connect before the migration, the Report log includes new user passwords generated by the migration tool. |
| Debug Log | Information in this log is useful especially for the developers. If you have any issues during the migration process, this log can help the Kerio technical support to find the solution. |