Configuring call queues
Call queues are used to distribute incoming calls between agents.
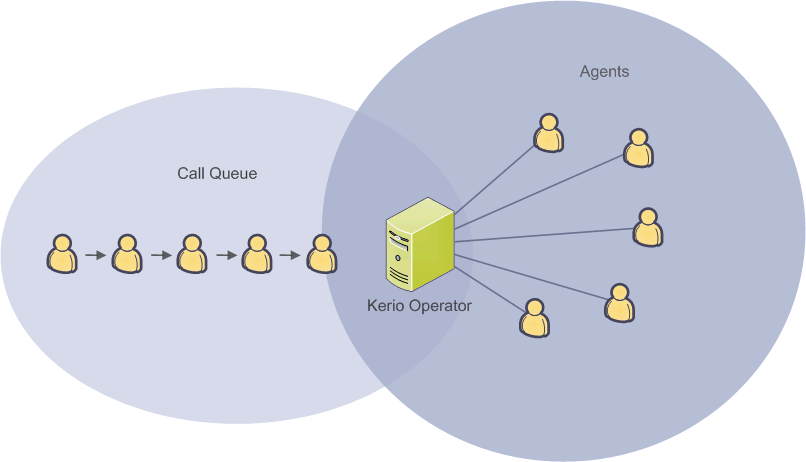
Call queue
Configuring call queues
- In the administration interface, go to Configuration > Call Queues.
- Click Add to open the Add Call Queue dialog. On the General tab, type the new queue extension number.
- Select the queue strategy.
- Click the Agents tab.
- If you want your agents to log in dynamically, type login and logout code. For example, 12345 to login, and 54321 to logout. The calls will only go to agents logged into the queue. If you want to assign specific agents permanently to the queue, click Add to select their extensions.
NOTE
Both methods can be combined. One queue may have agents who are assigned permanently and agents who log in dynamically.
- Click the Announcements tab. An announcement is a pre-recorded message that callers hear while waiting in a call queue. You can import pre-recorded announcements into Kerio Operator (see topic Language settings in Kerio Operator) or record them by going to Configuration > PBXPrivate Branch Exchange - System that connects telephone extensions and switches calls. Services > Record audio (see topic Using PBX services).
How to select a queue strategy
- Round robin with memory mode uses circular call distribution. It remembers the last agent who answered the phone, and new calls are directed to the next agent in the round queue.
- Ring all agents — calls always ring at all agents until one of them answers the particular call.
- Ring least recently called agent — the system selects the agents who have not answered the phone for the longest period.
- Ring agent with fewest calls — the system assigns the call to the agent with the lowest number of calls answered so far.
- Ring random agent — if you select this option, the system will choose an agent randomly.
- Ring in order — only for permanently assigned agents. You specify a fixed order in which they are always selected. This strategy is for companies where all calls are answered by a receptionist. In case the receptionist is not answering, the call is directed to the next agent in order (for example, an administration assistant).
What is the difference between permanently assigned and dynamic agents
- Permanent assignment — agent's extension is assigned permanently to the queue.
- Dynamic login — agents use special code for logging in and out of the queue.
Recording calls from call queues
Kerio Operator allows recording calls from call queues. No other module or equipment is necessary. Setting can be done as follows:
- Open the Configuration > Call Queues section and select the queue in which you wish to record the calls.
- On the General tab, select Record calls.
To play back recorded calls
WARNING
Please note that call recording is subject to special laws in many countries. It may not be legal in your jurisdiction, or may require notice to the other party on the call. Accordingly, you assume all liability for using the call recording functions and are responsible for notifying all users of this system of this potential restriction, if applicable.
Section Status > Recorded Calls displays all calls recorded from call queues. Select a call to listen to it, download it to your computer or remove it.
Deleting Recorded Calls
Recorded calls can be periodically deleted once their total size reaches a certain limit. The limit can be set in section Status > Recorded Calls.
- Click Advanced > Periodically Remove Old Recorded Calls.
- In Remove Old Recorded Calls dialog box, enter the maximum size of recorded calls on a disk (in MB).
Configuring a call queue timeout
The call queue timeout period determines the maximum amount of time a caller can be placed in a call queue. Configuring the limit prevents from waiting in a queue infinitely.
The timeout limit is unlimited by default. For setting the limit, perform these steps:
- In administration, go to Configuration > Call Queues.
- Click Add/Edit.
- On tab General, set Queue timeout.
- (Optional) Go to tab Announcements and select Timeout announcement. Such announcement will play when the limit is reached and should include information about what happens next (tab Exceptions).
- Go to tab Exceptions.
- Choose an action for exceeded limit:
- Callers receive a busy signal — if announcement was set, recording plays before call termination.
- Forward to — type an extension. Kerio Operator forwards callers to the extension. If announcement was set, recording plays.
- Save the settings.
Timeout is configured. If you want to check your settings, lower the limit to several seconds and dial the queue from several phones.
Configuring a music on hold and a while waiting period
A while waiting period is the period when users are waiting in a call queue for an agent. You can set what is playing during the period:
- In administration, go to Configuration > Call Queues.
- Click Add/Edit.
- On tab General, select While waiting:
- Music on hold — a music sounds during the while waiting period.
- Ringtone — a ringtone sounds during the while waiting period.
- If you selected the Music on hold option, select the particular recording in the Music on hold menu. If you want to add a new recording to Kerio Operator, go to the Definitions > Music on Hold section.
- Save the settings.
Configuring a queue length
A queue length determines max. number of callers in the queue at the same time. Configuring the limit prevents from waiting too long in the queue.
The queue length is unlimited by default. For setting the limit, perform these steps:
- In administration, go to Configuration > Call Queues.
- Click Add/Edit.
- On tab General, set Queue length.
- (Optional) Go to tab Announcements, select Full queue announcement. Such announcement will play when the limit is reached and should include information about what happens next (tab Exceptions).
- Click the Exceptions tab.
- Select an action for exceeded limit:
- Callers receive a busy signal — if an announcement was set, recording plays before a call is terminated.
- Forward to — type an extension. Kerio Operator forwards callers to the extension. If an announcement is set, Kerio Operator plays the recording.
- Save the settings.
The queue length is configured. If you want to check your settings, lower the limit to 1 and dial the queue from two phones.
Configuring exit keys
You can set exit keys for each call queue. Callers can use an exit key for transfer to an extension.
- In administration, go to Configuration > Call Queues.
- Click Add/Edit.
- On tab General, click Edit next to Exit keys.
- Edit Exit Keys, click Add.
- In the Add Exit Key dialog, type an exit key (for example 1).
- Type an existing extension to transfer calls.
- Type a description.
- Save the settings.
When users standing in the queue use the exit key, they are transferred to pre-configured extension.
Configuring call queues without agents
Follow these steps if no agents are logged into the queue:
- In administration, go to Configuration > Call Queues.
- Click Add/Edit.
- (Optional) Go to the Announcements tab, select No agents announcement. Kerio Operator plays the announcement when there are no agents in the queue.
- Go to tab Exceptions.
- Select an action if the queue has no agents:
- Callers cannot join the queue. Callers already waiting are removed — Kerio Operator disconnects all callers. If No agents announcement is selected, Kerio Operator plays the recording.
- Callers can join the queue — new callers can connect to the queue. Current callers stay in the queue. If No agents announcement is selected, Kerio Operator plays the recording.
- Callers cannot join the queue — new callers cannot connect to the queue. Current callers stay in the queue. If No agents announcement is selected, Kerio Operator plays the recording.
- If you selected Callers cannot join the queue or Callers cannot join the queue. Callers already waiting are removed, select one of these actions:
- Callers receive a busy signal
- Forward to — type an extension or external phone number. Kerio Operator forwards callers to the number.
- Save the settings.
Settings are complete now. If you want to check your configuration, test these cases:
- No agent serves the queue. Try to join the queue as a caller.
- One agent serves the queue. Join the queue as a caller. Agent logs out.
Prioritizing call queues
Agents can operate several call queues. In the following example, an agent is assigned to three queues.
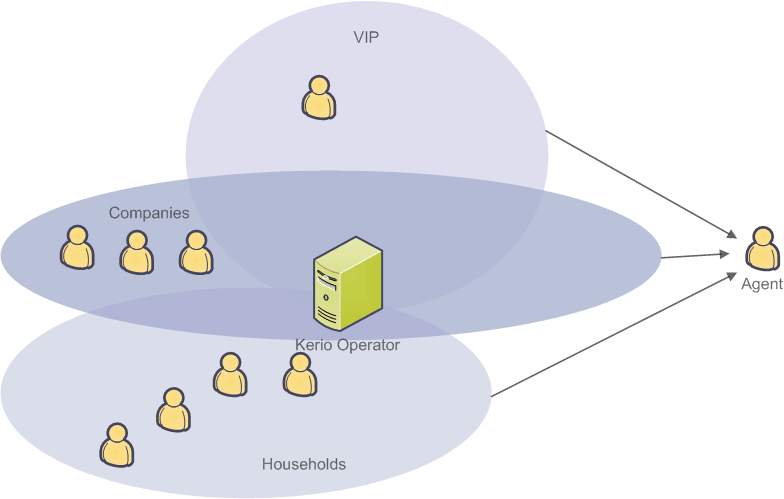
Operating multiple queues at once
To help agents identify the queues, you can upload various audio records for each queue. The record identifying the queue is played to the agent before a call from this queue is connected.
Upload new audio record as follows:
- Select a call queue or create a new one in section Configuration > Call Queues.
- In the displayed dialog, go to the Announcements tab.
- Check the Help agents identify the source queue by playing this announcement and click on Select.
- In the Select Audio File dialog box, double-click a record to select it, or upload your own record to Kerio Operator (it must be in WAV or GSM format). Use the Upload button.
It is also possible to set priorities for individual queues:
- Open the Configuration > Call Queues section.
- Select a queue or create a new one.
- In the displayed dialog, go to the General tab and set the desired priority.
- Repeat the configuration for other queues.
Queues with higher priority are processed first.
Displaying missed calls on phones in call queues
When an incoming calls rings in the call queue and an agent answers it, other devices in the queue register the call as missed anyway.
To not display missed calls on other devices:
- In the Kerio Operator administration interface, go to Configuration > Call Queues.
- Select an extension and click Edit.
- Switch to Advanced tab.
- Select Do not display missed calls on the phones.
- Click OK.
Monitoring active call queues
- In the administration interface, go to section Status > Call Queues.
- The top table shows currently active queues.
- The other tables display agents and callers in a queue. Just select a queue and the details in table Agents and Callers are updated.
You can also reset the call queue statistics to start from zero. Use the Reset Statistics button.