Using Kerio Phone
NOTE
Redesigned in Kerio Operator 2.5!
This topic is for Kerio Phone for desktop and web. For information about Kerio Operator Softphone for mobile devices, see Configuring Kerio Operator Softphone for mobile devices.
Kerio PhoneA softphone available as a native desktop or web-based application. is an application for making audio and video calls through Kerio Operator. It can be installed on Microsoft Windows and macOS, or it can be accessed via web using the most modern browsers.
Through Kerio Phone, you can:
- Call people using their names or extensions.
- Transfer or park the call
- Customize your voicemail, read and manage your voicemail messages.
- Add people to your Favorites — Kerio Phone shows you if their extension is free or busy.
- Change the theme of your softphone.
Making calls through Kerio Phone
For more information refer to Making calls through Kerio Phone.
Using the favorites buttons
In Kerio Phone, you can add people to your Favorite buttons.
For more information refer to Using the favorites buttons in Kerio Phone.
Using voicemail
For the configuration of voicemails in the administration interface, see Configuring voicemail.
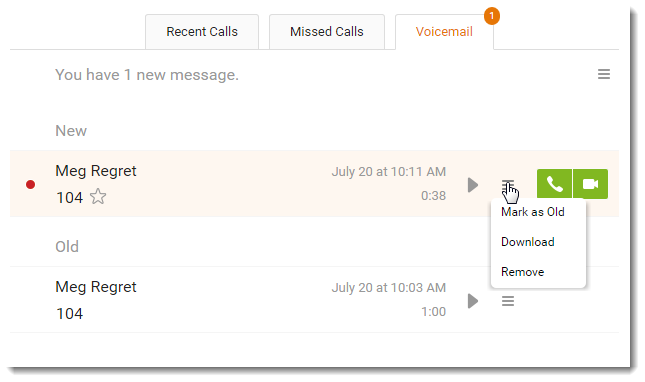
In Kerio Phone, go to Voicemail to:
- Play, download, and remove voicemail messages
- Dial numbers that left voicemail messages
- Mark voicemail messages as unread
- Dial voicemail number
Voicemail Menu
After reaching your voicemail, an automatic menu will navigate you through your messages and other options. You can view the whole menu in picture.
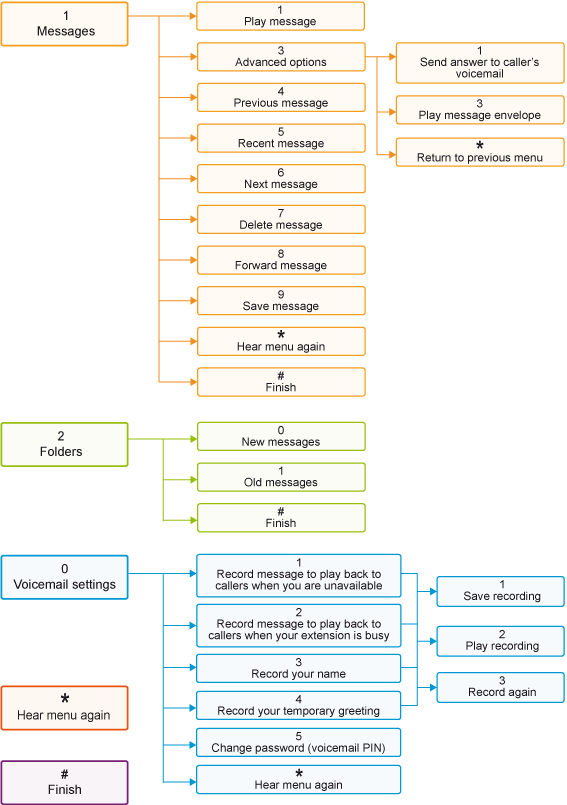
Voicemail Menu
Recording your own greeting for voicemail
If you wish to record your own greeting to voicemail, such as: “Hello. You have reached Kelly Jellybelly. I cannot answer the phone right now, but please leave me a message.”, follow these instructions:
- Login to your voicemail, enter the PIN and press
0. - Follow the instructions of the auto attendant script.
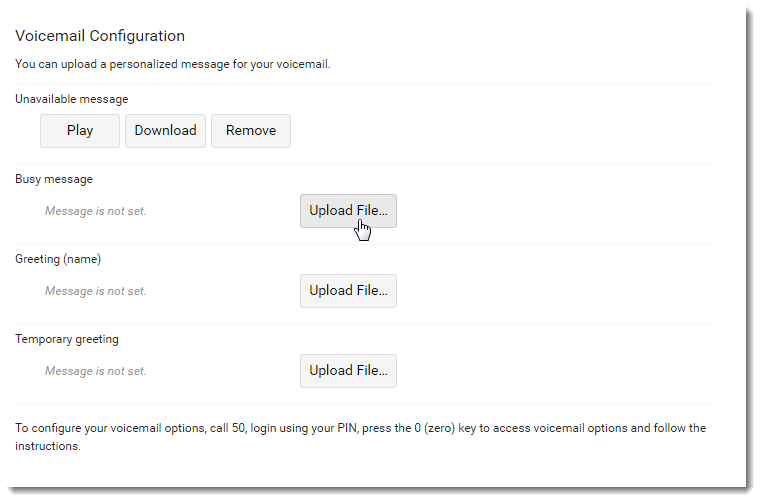
Uploading your own voicemail announcement messages
NOTE
New in Kerio Operator 2.4.0!
You can now upload your own sound files and change your voicemail messages:
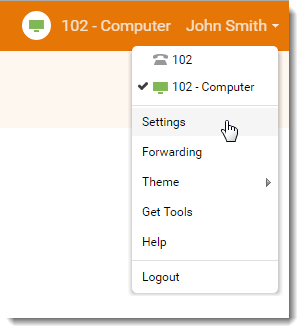
- In Kerio Phone, click your name to open the toolbar.
- Go to Settings > Voicemail.
- In the line of a message you want to change, click Upload File and select a new file.
NOTE
You can upload only files in a .wav format. The maximum length of the sound file is 30 seconds.
Using call forwarding
For more information refer to Redirecting calls in Kerio Phone.
Using call transfer and call parking
For more information refer to Transferring and Parking calls using Kerio Phone.
Call history
Kerio Phone logs every call you make, receive, and miss and displays them under following tabs in the Calls section:
- Recent Calls for incoming and outgoing calls
- Missed Calls for missed calls
To dial the contact straight from the call history tabs,
click  or
or  .
.
Changing password for authentication at Kerio Phone
- Log in to Kerio Phone.
WARNING
In Kerio Phonefor web, you can change your password only via the HTTPS protocol. Type the following address in your browser's address bar:
https://address
- Click your name to open the toolbar.
- Go to Settings > Password.
- Type your current and new passwords.
- Click Change Password.
If you do not remember your password, contact your network administrator. They can set a new password for you.
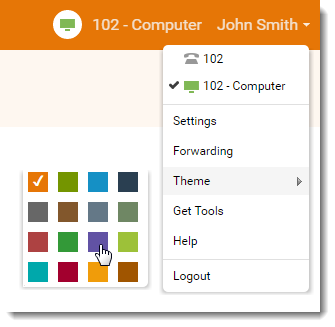
Changing the theme
If you want to change the color theme of your Kerio Phone:
- Click your name to open the toolbar.
- Go to the Change theme section.
- Select a new color.
Changing the PIN number
- Login to Kerio Phone.
WARNING
In Kerio Phone for web, you can change your PIN only via the HTTPS protocol. Type the following address in your browser's address bar:
https://address
- Click your name to open the toolbar.
- Go to Settings > PIN.
- Type new PIN.
- Click Change PIN.
Changing date and time format
To change the date and time format (for example, in history):
- In Kerio Phone, click your name to open the toolbar.
- Go to Settings > General.
- In the Locales section, deselect Set your locale to match your language settings.
- Select a format for the date and time.
- Click Save.