XCAPI FoIP
XCAPI is a software-only Fax over IP (FoIPFax over Internet Protocol) solution from TE-SYSTEMS. This topic explains how to install XCAPI on your GFI FaxMaker server.
Installing XCAPI
Install XCAPI during the GFI FaxMaker Configuration Wizard, either after installation, or by launching it manually from Start > GFI FaxMaker > FaxMaker Configuration Wizard.
1. In the Welcome page of the GFI FaxMaker Configuration Wizard click Next to continue.
NOTE
Some GFI FaxMaker services may be restarted when running the configuration wizard.

Selecting the XCAPI option
2. Click ISDNIntegrated services digital network / CAPICommon ISDN Application Programming Interface devices, and select TE-SYSTEMS XCAPI Fax over IP. Click Next.
3. Click YES to start the XCAPI installation wizard.
NOTE
1. XCAPI is pre-packaged with GFI FaxMaker. No additional downloads are required.
2. Only one CAPI device can be installed on the same system. For more information, refer to:
4. Select the language used to install XCAPI and click Next.
5. In the Welcome page, click Next.
6. Click Yes if you accept the End User License Agreement.
7. Click Next to install XCAPI in the default location or Browse to select a different path.
8. Specify the Start menu program folder for XCAPI. Click Next to start installation.
9. Click Finish to complete installation.
Adding an XCAPI FAX-over-IP controller
XCAPI configuration
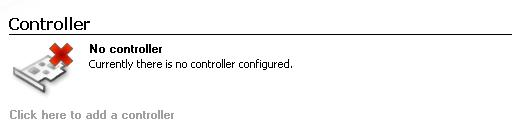
1. Open the XCAPI Configuration and from the Controller section select Click here to add a controller link.
2. From the Controller Wizard select Add Voice-over-IP controller (VoIPVoice over Internet protocol) and click Next.
Add a new controller
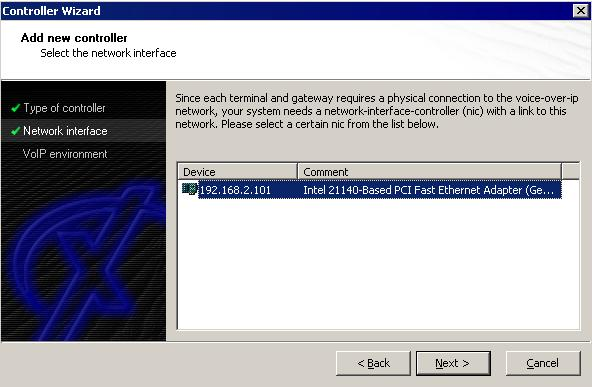
3. Select the Network Card that XCAPI will use to communicate with your VoIP Gateway.
4. Select the VoIP gateway that will be used to send and receive faxes. If the list included in XCAPI does not contain your PBX, select a compatible or one of the generic environments such as ‘H.323 Gateway’ or ‘SIP’.
NOTE
For more information refer to the XCAPI Interoperability list available from:
Define VoIP gateway properties
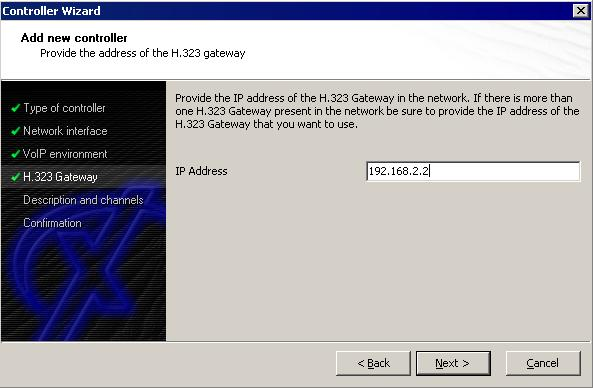
5. Depending on the VoIP gateway selected, provide the properties of the VoIP gateway. Typically this consists of the IP address of the VoIP gateway and any authentication settings required by your VoIP gateway. Click Next to continue setup.
6. Provide a meaningful description of the newly created controller and decide how many channels should be available for GFI FaxMaker.
7. Click Next and Finish to finalize settings.
8. From the GFI FaxMaker Configuration Wizard, click Configure lines to configure fax lines. For more information refer to Fax Lines.
9. Finalize the GFI FaxMaker Configuration Wizard.
NOTE
The GFI FaxMaker machine may require a reboot if any files were locked (in use) during installation.
Adding XCAPI fax lines in GFI FaxMaker
To add XCAPI lines in GFI FaxMaker:
- Click Add... in the Lines/Devices properties dialog.
- Choose any available fax line and in Device type, select ISDN PRIPrimary Rate Interface / IP CAPI 2.0 devices.
- Select a Physical line/port and click OK.
- In the Device tab, under ISDN type, choose TE-SYSTEMS XCAPI.
- Configure other line options. For more information refer to Fax Lines.