Post-install configurations
On the initial launch of GFI EndPointSecurity management console, the Quick Start wizardA wizard to guide you in the configuration of GFI EndPointSecurity with custom settings. It is launched upon the initial launch of GFI EndPointSecurity management console and is intended for first time use. is automatically launched. This enables you to configure important GFI EndPointSecurity settings for first time use.
The Quick Start wizard consists of the following steps and guides you to configure:
- Risk Assessment
- Automatic discoveryA GFI EndPointSecurity feature to search and discover computers that were newly connected to the network at configured scheduled times.
- Power users
- Users groups
- Database backendA database used by GFI EndPointSecurity to keep an audit trail of all events generated by GFI EndPointSecurity agents deployed on target computers..
Note
The Quick Start Wizard can be re-launched from File > Quick Start Wizard.
To use the Quick Start Wizard:
- Click Next at the wizard welcome screen.
Post installation tasks: Launching the wizard
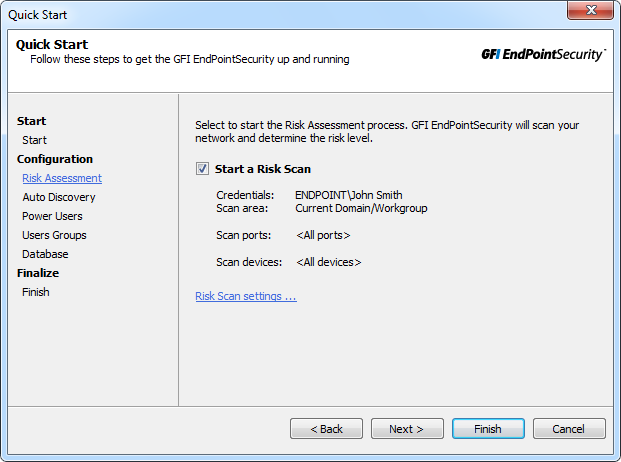
- From Risk Assessment, select/unselect Start a Risk Scan to enable / disable the function to start a scan on your network to determine the risk level.
Post installation tasks: Configure scan settings
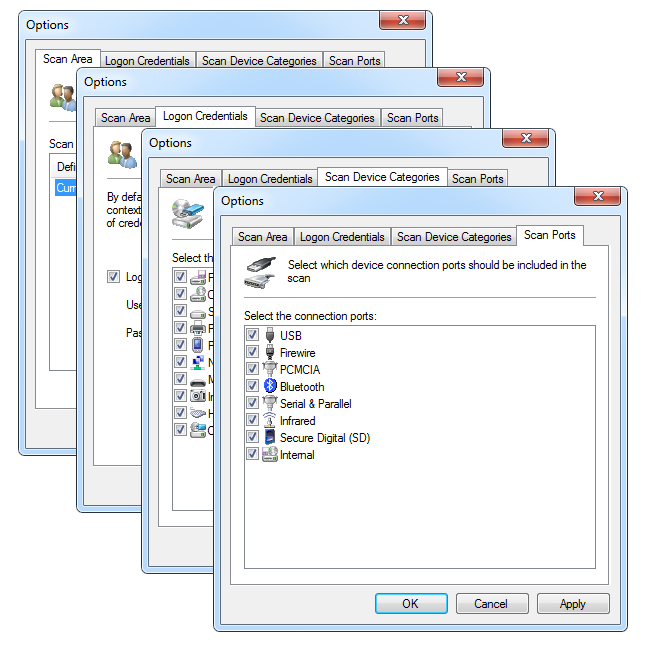
- (Optional) Click Risk scan settings... and configure settings from the tabs described below:
| Tab | Description |
|---|---|
| Scan Area |
Select the target area on which GFI EndPointSecurity scans the computers on the network.
|
| Logon Credentials |
Enable/disable Logon using credentials below and specify a set of credentials that GFI EndPointSecurity will use to access computers that will be scanned. |
| Scan Device Categories | Select the device categories that GFI EndPointSecurity will include in the scan. |
| Scan ports | Select the device connection ports that GFI EndPointSecurity will include in the scan. |
- Click Apply and OK to close the Risk Assessment dialog and click Next at the Quick Start Wizard.
Post installation tasks: Enabling auto discovery
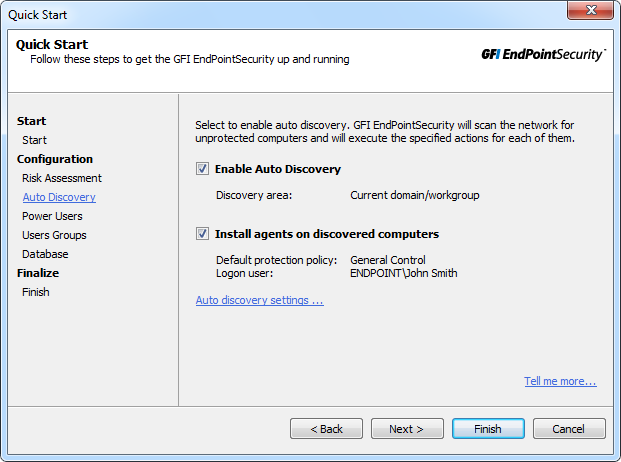
- From Auto Discovery, select/unselect Enable Auto Discovery to turn on/off auto discovery. When Auto Discovery is enabled, GFI EndPointSecurity periodically scans your network for new computers.
- Select/unselect Install agents on discovered computers to turn on/off automatic deployment of GFI EndPointSecurity Agents on newly discovered computers.

Post installation tasks: Configure auto discovery options
- (Optional) Click Auto discovery settings... and configure settings from the tabs described below:
| Tab | Description |
|---|---|
| Auto Discovery | Enable/disable auto discovery and configure a schedule when GFI EndPointSecurity scans your network for new computers. |
| Discovery Area |
Select where GFI EndPointSecurity searches for new computers. Select from:
|
| Actions | Configure the actions taken by GFI EndPointSecurity when a new computer is discovered. Also select the policy that these settings apply to. |
- Click Apply and OK to close the Auto Discovery dialog and click Next at the Quick Start Wizard.

Post installation tasks: Configure power users
- From Power Users select/unselect Set GFI EndPointSecurity Power Users to enable/disable power users features. Members of the power users group have access to any connected device effected by this policy.
- Click Select Power Users... and from the Power Users dialog, click Add... to add users from your domain/workgroup.
- Click Apply and OK to close the Power Users dialog and click Next at the Quick Start Wizard.
Post installation tasks: Configure users groups
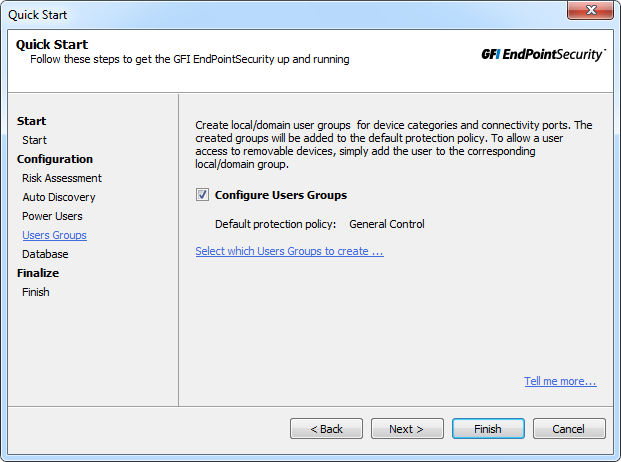
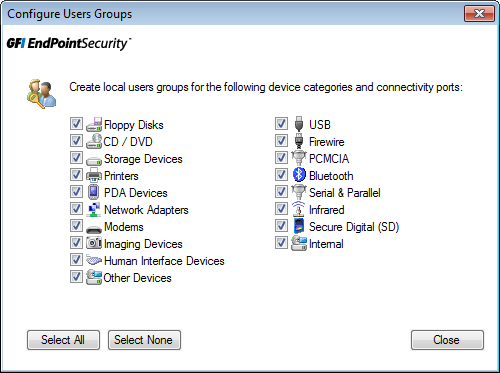
- From Users Groups, select/unselect Configure Users Groups to create domain/workgroup users and bind them to device categories and connectivity ports settings selected in the next step.
Post installation tasks: Select device categories for users groups
- Click Select which Users Groups to create.... From the Configure Users Groups dialog, select the devices and/or connection ports for which users are created on. To manage every supported device and port from this policy, click Select All.
- Click Close to close the Configure Users Groups and click Next at the Quick Start Wizard.
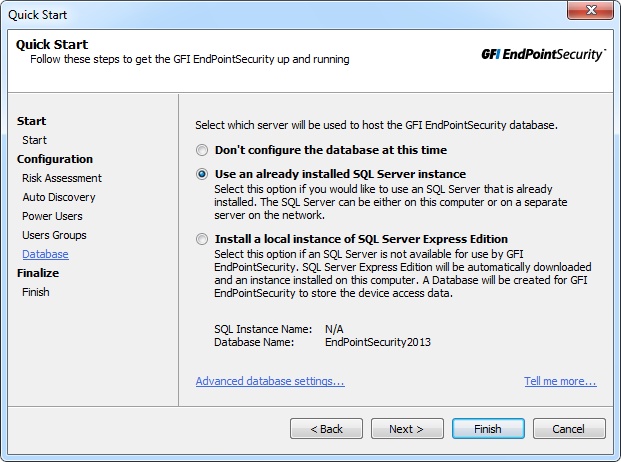
Post installation tasks: Configure database settings
- From Database, select the database type you want to use as the database backend. Select from the options described below:
| Option | Description |
|---|---|
| Don't configure the database at this time | Finalize the Quick Start Wizard and configure the database backend later. For more information, refer to ACM |
| Use an already installed SQL Server instance | Use an instance of Microsoft SQL Server already installed on the same machine you are installing GFI EndPointSecurity or any other machine on the network. |
| Install a local instance of SQL Express Edition | Select this option to download and install an instance of Microsoft SQL Server Express on the same machine you are installing GFI EndPointSecurity. An Internet connection is required. |

Post installation tasks: Configure advanced database settings
- (Optional) Click Advanced database settings... to specify the SQL Server address, database name, logon method and the respective credentials. Click Apply and OK to close the Database Backend dialog.
- Click Next and wait for the settings to be applied. Click Finish to close the Quick Start Wizard.